


Liberty Dragon Single Flap Pet Door for Aluminum Sliders


$409.99 .
- Convenient for aluminum sliders: The Liberty Dragon Pet Door is an economical and removable pet door solution designed for aluminum sliding glass doors
- Stylish design: Aluminum frame available in black or white to complement your home's decor
- Insulated two-piece flap: Enhances energy efficiency and insulation with its robust vinyl material; Small comes with clear vinyl flap while medium and large doors equipped with a two-piece flap with a U-shaped gasket
- Easy installation: Quick, simple installation with no tools required for most setups, fitting sliding door track heights from 74-3/4" to 96-1/4"
- Ideal for rentals: Easily removable, perfect for temporary installations or rental properties
 Product Details
Product Details
The Liberty Dragon Patio Panel Pet Door for Aluminum Sliding Glass Doors (also available in a Double Flap) is made to complement your existing sliding door frame. This removable panel with a built-in single flap Liberty Dragon pet door is an economical solution for installing a pet door in a sliding glass door. With a spring-loaded design, the Liberty Dragon aluminum patio panel can be installed and removed in minutes, making it an ideal choice for vacation homes and rental properties.
The Liberty Dragon Pet Door for Aluminum Sliders Single Flap is an economical and removable solution for pet owners with aluminum sliding glass doors. The high-quality aluminum frame, available in black or white, adds a sleek appearance to your home while ensuring durability.
Experience hassle-free installation with no tools required for most setups, and enjoy the compatibility of this pet door with sliding door track heights ranging from 74-3/4" to 96-1/4". The Liberty Dragon Pet Door is perfect for temporary installations or rental properties, as it is easily removable without causing damage to your existing door. The patio panel fits sliding glass door tracks at least 1" wide.
The transparent flap design, made from robust vinyl, enhances insulation and energy efficiency, while the 3/16" clear Low-E safety glass is suited for moderate climates. Foam weatherstripping is included to maintain your home's insulation and keep your energy bills low.
The panel comes with a locking cover and a C-Clamp lock for extra security.
Give your pets the freedom and independence they deserve with the Liberty Dragon Pet Door for Aluminum Sliders Single Flap. Your furry friends will love coming and going as they please, and you'll appreciate the peace of mind knowing they're safe and comfortable.
Features:
- High-quality aluminum frame: Offers durability and a sleek appearance
- Flexible flap material: Sturdy, flexible polyolefin elastomer flap ensures insulation and pet comfort
- Clear Low E safety glass: Suited for moderate climates, maintaining insulation with foam weatherstripping
- Removable panel design: Easy-to-remove, ideal for temporary or seasonal installations
- Wide compatibility: Available in three track height adjustment ranges, fitting most sliding doors 74-3/4"-96-1/4" in height
Size Chart
| Flap Size | Flap Dimension | Step Over Range | Overall Panel Width | Recommended Pet Height |
|---|---|---|---|---|
| Small | 5" w x 12" h | 3" - 5" | 10-3/16" | 9" - 16" |
| Medium | 7" w x 16" h | 3" - 5" | 12-1/4" | 9" - 22" |
| Large | 9" w x 20" h | 3" - 7" (ships at 5") | 14-1/4" | 9" - 28" |
| Extra Large | 11" w x 24" h | 3" - 7" (ships at 5") | 16-5/16" | 9" - 35" |
| XXL | 13" w x 28" h | 3" - 7" (ships at 5") | 18-3/8" | 9" - 40" |
Track Height Adjustment range is based on the measurement of your sliding door track height from the lowest point of your track to the highest point. Each Liberty Pet Door Panel has a 3" adjustment range. The following standard adjustment ranges are available:
- Short: 74 3⁄4" – 77 3⁄4"
- Regular: 77 1⁄4" – 80 1⁄4"
- Tall: 93 1⁄4" – 96 1⁄4" (additional cost)
If your measured track height does not fall within one of the ranges above, we can make a custom height! Custom height option may take up to 4 weeks to special order the glass and build the panel.
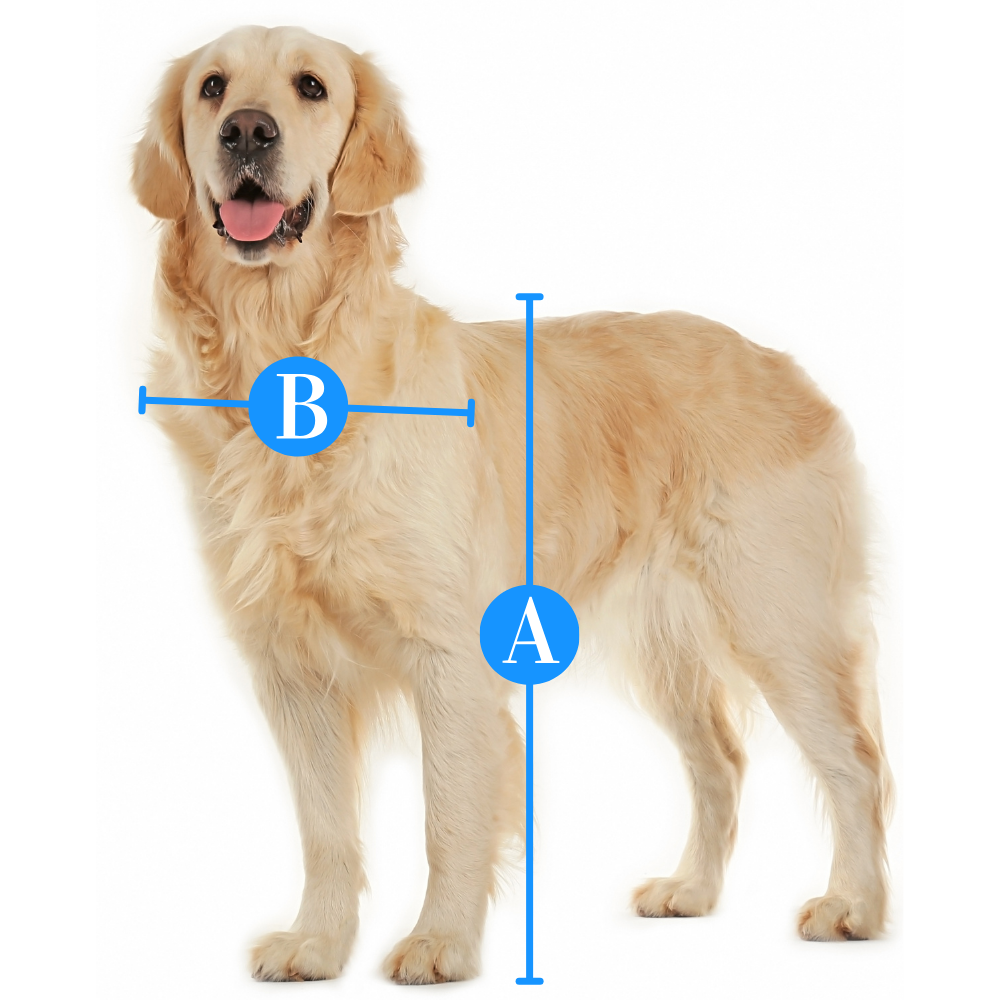
Find The Best Pet Door Size For My Pet

A
Pet Height: inches
B
Pet Width: inches
Installation Instructions
Click to view the Two-Piece Sliding Glass Pet Door Panel Instructions.
 Difficulty
Easy
Difficulty
Easy
 Steps
06
Steps
06
 Time Required
0.5 hours
Time Required
0.5 hours
 Sections
02
Sections
02
 Flags
02
Flags
02
Parts
- Panel Pet Door
- Foam Weather Strip
- Center Post Weather Seal Draft Stopper
- Sliding Door C-Clamp Lock
- Screwdriver
Tools
- Flathead Screwdriver
Please read instructions & notes thoroughly before installation.
One-Piece Panel
Step 1 Adjust the Step Over (Optional)

- The top of the flap should be positioned to be at least 1” above the top of the pet’s shoulder.
- If the factory setting is not suitable, please adjust it before proceeding. If the current setting is suitable, proceed to the “Installation Instructions” section.
Step 2 Adjust the Screws

- Lay the entire panel on a flat surface.
- Using a #2 flat head screwdriver, remove the bottom side-screws and loosen the upper side-screws. Screws were tightly installed to hold the panel together during shipping; a power tool* is recommended.
Step 3 Adjust the Spacers

- Once the bottom screws have been removed and the upper side-screws loosened, the Pet Door Assembly and spacers can be removed by sliding the sections down and out of the panel.
Step 4 Replace the Spacers

- Replace the spacers and the Pet Door Assembly by sliding them back in a different order to achieve the desired height. You can move the spacer below and above the flap to raise or lower the flap height.
Step 5 Tighten the Screws
- When finished, replace the bottom side-screws and tighten the next upper-side screws.
Step 6 Unlock Spring Mechanism

- Loosen the height adjustment locks at the top of the pet panel with the screwdriver. This allows the spring mechanism to move freely up and down.
Step 7 Test Fit the Panel in Your Track

- To insert the panel into the top track, push up against the spring mechanism and swing the bottom of the panel up and over the threshold.
- Seat the panel on top of the small guide rail in the track.
Step 8 Apply the Weatherstripping

- Once you’re sure the panel fits, remove it from the frame and lay it on its side on the ground.
- Apply the foam weather-stripping by peeling back the paper and exposing the adhesive.
- Unroll it along the edge of the panel, pressing to ensure it adheres. Install on both sides, trim it fit with scissors.
Step 9 Install the Draft Stopper

- The center post weather seal strip (draft stopper) should be installed on the inside of the home.
- Trim with scissors as needed. Clean the edge of your patio door with rubbing alcohol before installing to assure a good seal.
- Repeat step two to install the panel in your track.
Click to view the One-Piece Sliding Glass Pet Door Panel Instructions.
Difficulty
Easy
Steps
06
Time Required
0.5 hours
 Sections
03
Flags
02
Sections
03
Flags
02
Parts
- Top Glass Panel Section
- Bottom Flap Section
- Foam Weather Strip
- Center Post Weather Seal Draft Stopper
- 4 Flathead Screws
- Flathead Screwdriver
- Screwdriver for Adjustment Locks
- Sliding Door C-Clamp Lock
Tools
- Flathead Screwdriver
Please read instructions & notes thoroughly before installation.
Two-Piece Panel
Step 1 Adjust Step Over Height (Optional)

- The top of the flap should be positioned to be at least 1” above the top of the pet’s shoulder.
- If the factory setting is not suitable, please adjust it before proceeding. If the current setting is suitable, proceed to the “Installation Instructions” section.
Step 2 Rearrange the Pieces (Optional)

- Simply slide the pieces up and out from the bottom half of your panel to rearrange.
- Loosen a bottom screw if the pieces are too snug to move.
Step 3 Reconnect the Pieces (Optional)
- Replace the spacers and the Pet Door Assembly by sliding them back in a different order to achieve the desired height.
- You can move the spacer below or above the flap to raise or lower the flap height.
Step 4 Screw the Pieces Together

- The order of the pieces is important! The piece on the bottom needs to always be at the bottom, as that is where the screws attach. You can now assemble the patio panel!
Step 5 Align the Connectors


- Remove the 2 flat head sectional connector screws from the exposed part of the connector on each side.
- Align the aluminum connectors extending from the bottom flap panel section with the top glass panel section.
- Press the aluminum connectors into the holes at the bottom of the top glass panel section.
- Ensure locking cover & height adjustment locks are on the same side!
Step 6 Tap the Pieces Together

- Gently tap the bottom surface of the panel against the ground to completely insert the connectors.
- Protect hard surfaces to prevent scratching.
- The components of the panel are designed to slide together very tightly.
Step 7 Secure the Sections

- Fasten the two panels together using the four flathead screws.
- Use the included flathead screwdriver to tighten all four flathead screws so the two halves of the door are pulled together.
Step 8 Adjust Spring Mechanism
- Loosen the height adjustment locks at the top of the pet panel. This allows the spring mechanism to move freely up and down.
Step 9 Test Fit the Panel in Your Track
- To insert the panel into the top track, push up against the spring mechanism and swing the bottom of the panel up and over the threshold.
- Seat the panel on top of the small guide rail in the track.
Step 10 Apply the Weatherstripping
- Once you’re sure the panel fits, remove it from the frame and lay it on its side on the ground.
- Apply the foam weather-stripping by peeling back the paper and exposing the adhesive.
- Unroll it along the edge of the panel, pressing to ensure it adheres. Install on both sides, trim it fit with scissors.
- Repeat step two to install the panel in your track.
Step 11 Install the Draft Stopper
- The center post weather seal strip (draft stopper) should be installed on the inside of the home.
- Trim with scissors as needed. Clean the edge of your patio door with rubbing alcohol before installing to assure a good seal.
Dragon Locking Details
Since you cannot lock your sliding glass door to your panel pet door, we have provided you with an alternative locking method to secure your home.
Installing the Clamp Lock
- This clamp has a screw that tightens by hand to prevent the sliding door from moving beyond the clamp’s placement.
- For doors manufactured with the glass slider on the inside track, the lock can usually be installed on the door’s raised track.

Locking the Flap
- The Dragon Pet Door comes with a secure locking cover to block access to the flap when needed.
- The locking cover is a great perfect for keeping pets inside at night, or for blocking access to the flap when you're away.
Alternative Locking Method
- A great alternative to locking your sliding glass door is a Charley bar or dowel in the track.
- Both work off the same concept—they block the slider from opening. When engaged you cannot pull the sliding door away from the pet door panel.

FREQUENTLY ASKED QUESTIONS
What if my panel is slightly too tall?
You can trim up to 3/4” off the spring- loaded adjustment piece at the top. This can be done by removing the adjustment pieces with a #2 Phillips head screwdriver and cutting down the flanges. Be careful not to cut too low or you will not be able to put the top back on.

The dark area marks where you can trim:

What if my panel is slightly too short?
We offer height extensions that will add 3/4” to the top of the panel that you slide into the channel at the top. These are made from the same aluminum as the panel so you can match the color.
You can also make your own extension out of nominal 1” wood (which is 3/4” thick), such as a 1x3, if you need more than 3/4" in height. Cut it to the same width as the panel and slide it into the channel at the top. Paint the wood to match your frame color. If the extension makes the panel feel unstable, you can secure it with screws.
What if the panel is wobbling slightly back and forth?
If your track is wider than 1” you can use small wooden shims or extra weather-stripping to fill in the gap inside the top and bottom tracks. By placing the material inside the tracks you won't be able to see it, but it will stabilize the panel.
FAQ
Warranty
Warranty Type: Limited.
Duration: 3 years
Coverage: Defects in materials and workmanship under standard regular use.
Exclusions:
Damage caused by misuse or not using the product as intended.
Improper installation.
Damage caused by chewing.
Customer Reviews
Pleased
Door is great. 12-year-old dog has already taken to it. Not complicated to install, though a second try would even be easier.
Have not received it yet
It’s been 3 weeks since I ordered it and according to the email I got yesterday it hasn’t shipped yet ?? Therefore I am not enjoying it al all. Either is my dog.
Excellent
Very high quality and easy to install. Thanks!
Exactly as described
Exactly as described and promoted
Perfect for my apartment. The dogs love it!
Excellent. I would highly recommend this door.

Size Chart
| Flap Size | Flap Dimension | Step Over Range | Overall Panel Width | Recommended Pet Height |
|---|---|---|---|---|
| Small | 5" w x 12" h | 3" - 5" | 10-3/16" | 9" - 16" |
| Medium | 7" w x 16" h | 3" - 5" | 12-1/4" | 9" - 22" |
| Large | 9" w x 20" h | 3" - 7" (ships at 5") | 14-1/4" | 9" - 28" |
| Extra Large | 11" w x 24" h | 3" - 7" (ships at 5") | 16-5/16" | 9" - 35" |
| XXL | 13" w x 28" h | 3" - 7" (ships at 5") | 18-3/8" | 9" - 40" |
Track Height Adjustment range is based on the measurement of your sliding door track height from the lowest point of your track to the highest point. Each Liberty Pet Door Panel has a 3" adjustment range. The following standard adjustment ranges are available:
- Short: 74 3⁄4" – 77 3⁄4"
- Regular: 77 1⁄4" – 80 1⁄4"
- Tall: 93 1⁄4" – 96 1⁄4" (additional cost)
If your measured track height does not fall within one of the ranges above, we can make a custom height! Custom height option may take up to 4 weeks to special order the glass and build the panel.
Find The Best Pet Door Size For My Pet
A
Pet Height: inches
B
Pet Width: inches
Click to view the Two-Piece Sliding Glass Pet Door Panel Instructions.
Difficulty
Easy
Steps
06
Time Required
0.5 hours
Sections
02
Flags
02
Parts
- Panel Pet Door
- Foam Weather Strip
- Center Post Weather Seal Draft Stopper
- Sliding Door C-Clamp Lock
- Screwdriver
Tools
- Flathead Screwdriver
Please read instructions & notes thoroughly before installation.
One-Piece Panel
Step 1 Adjust the Step Over (Optional)
- The top of the flap should be positioned to be at least 1” above the top of the pet’s shoulder.
- If the factory setting is not suitable, please adjust it before proceeding. If the current setting is suitable, proceed to the “Installation Instructions” section.
Step 2 Adjust the Screws
- Lay the entire panel on a flat surface.
- Using a #2 flat head screwdriver, remove the bottom side-screws and loosen the upper side-screws. Screws were tightly installed to hold the panel together during shipping; a power tool* is recommended.
Step 3 Adjust the Spacers
- Once the bottom screws have been removed and the upper side-screws loosened, the Pet Door Assembly and spacers can be removed by sliding the sections down and out of the panel.
Step 4 Replace the Spacers
- Replace the spacers and the Pet Door Assembly by sliding them back in a different order to achieve the desired height. You can move the spacer below and above the flap to raise or lower the flap height.
Step 5 Tighten the Screws
- When finished, replace the bottom side-screws and tighten the next upper-side screws.
Step 6 Unlock Spring Mechanism
- Loosen the height adjustment locks at the top of the pet panel with the screwdriver. This allows the spring mechanism to move freely up and down.
Step 7 Test Fit the Panel in Your Track
- To insert the panel into the top track, push up against the spring mechanism and swing the bottom of the panel up and over the threshold.
- Seat the panel on top of the small guide rail in the track.
Step 8 Apply the Weatherstripping
- Once you’re sure the panel fits, remove it from the frame and lay it on its side on the ground.
- Apply the foam weather-stripping by peeling back the paper and exposing the adhesive.
- Unroll it along the edge of the panel, pressing to ensure it adheres. Install on both sides, trim it fit with scissors.
Step 9 Install the Draft Stopper
- The center post weather seal strip (draft stopper) should be installed on the inside of the home.
- Trim with scissors as needed. Clean the edge of your patio door with rubbing alcohol before installing to assure a good seal.
- Repeat step two to install the panel in your track.
Click to view the One-Piece Sliding Glass Pet Door Panel Instructions.
Difficulty
Easy
Steps
06
Time Required
0.5 hours
Sections
03
Flags
02
Parts
- Top Glass Panel Section
- Bottom Flap Section
- Foam Weather Strip
- Center Post Weather Seal Draft Stopper
- 4 Flathead Screws
- Flathead Screwdriver
- Screwdriver for Adjustment Locks
- Sliding Door C-Clamp Lock
Tools
- Flathead Screwdriver
Please read instructions & notes thoroughly before installation.
Two-Piece Panel
Step 1 Adjust Step Over Height (Optional)
- The top of the flap should be positioned to be at least 1” above the top of the pet’s shoulder.
- If the factory setting is not suitable, please adjust it before proceeding. If the current setting is suitable, proceed to the “Installation Instructions” section.
Step 2 Rearrange the Pieces (Optional)
- Simply slide the pieces up and out from the bottom half of your panel to rearrange.
- Loosen a bottom screw if the pieces are too snug to move.
Step 3 Reconnect the Pieces (Optional)
- Replace the spacers and the Pet Door Assembly by sliding them back in a different order to achieve the desired height.
- You can move the spacer below or above the flap to raise or lower the flap height.
Step 4 Screw the Pieces Together
- The order of the pieces is important! The piece on the bottom needs to always be at the bottom, as that is where the screws attach. You can now assemble the patio panel!
Step 5 Align the Connectors
- Remove the 2 flat head sectional connector screws from the exposed part of the connector on each side.
- Align the aluminum connectors extending from the bottom flap panel section with the top glass panel section.
- Press the aluminum connectors into the holes at the bottom of the top glass panel section.
- Ensure locking cover & height adjustment locks are on the same side!
Step 6 Tap the Pieces Together
- Gently tap the bottom surface of the panel against the ground to completely insert the connectors.
- Protect hard surfaces to prevent scratching.
- The components of the panel are designed to slide together very tightly.
Step 7 Secure the Sections
- Fasten the two panels together using the four flathead screws.
- Use the included flathead screwdriver to tighten all four flathead screws so the two halves of the door are pulled together.
Step 8 Adjust Spring Mechanism
- Loosen the height adjustment locks at the top of the pet panel. This allows the spring mechanism to move freely up and down.
Step 9 Test Fit the Panel in Your Track
- To insert the panel into the top track, push up against the spring mechanism and swing the bottom of the panel up and over the threshold.
- Seat the panel on top of the small guide rail in the track.
Step 10 Apply the Weatherstripping
- Once you’re sure the panel fits, remove it from the frame and lay it on its side on the ground.
- Apply the foam weather-stripping by peeling back the paper and exposing the adhesive.
- Unroll it along the edge of the panel, pressing to ensure it adheres. Install on both sides, trim it fit with scissors.
- Repeat step two to install the panel in your track.
Step 11 Install the Draft Stopper
- The center post weather seal strip (draft stopper) should be installed on the inside of the home.
- Trim with scissors as needed. Clean the edge of your patio door with rubbing alcohol before installing to assure a good seal.
Dragon Locking Details
Since you cannot lock your sliding glass door to your panel pet door, we have provided you with an alternative locking method to secure your home.
Installing the Clamp Lock
- This clamp has a screw that tightens by hand to prevent the sliding door from moving beyond the clamp’s placement.
- For doors manufactured with the glass slider on the inside track, the lock can usually be installed on the door’s raised track.
Locking the Flap
- The Dragon Pet Door comes with a secure locking cover to block access to the flap when needed.
- The locking cover is a great perfect for keeping pets inside at night, or for blocking access to the flap when you're away.
Alternative Locking Method
- A great alternative to locking your sliding glass door is a Charley bar or dowel in the track.
- Both work off the same concept—they block the slider from opening. When engaged you cannot pull the sliding door away from the pet door panel.
FREQUENTLY ASKED QUESTIONS
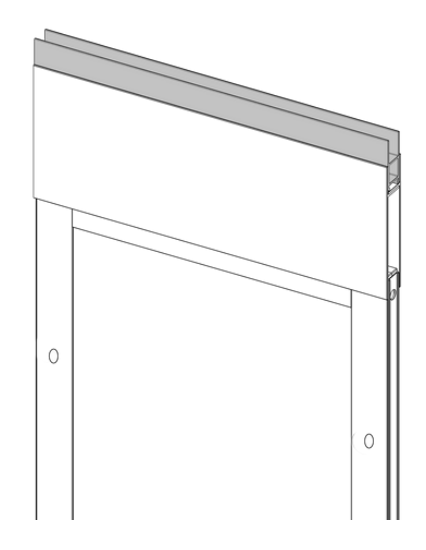
What if my panel is slightly too tall?
You can trim up to 3/4” off the spring- loaded adjustment piece at the top. This can be done by removing the adjustment pieces with a #2 Phillips head screwdriver and cutting down the flanges. Be careful not to cut too low or you will not be able to put the top back on.
The dark area marks where you can trim:
What if my panel is slightly too short?
We offer height extensions that will add 3/4” to the top of the panel that you slide into the channel at the top. These are made from the same aluminum as the panel so you can match the color.
You can also make your own extension out of nominal 1” wood (which is 3/4” thick), such as a 1x3, if you need more than 3/4" in height. Cut it to the same width as the panel and slide it into the channel at the top. Paint the wood to match your frame color. If the extension makes the panel feel unstable, you can secure it with screws.
What if the panel is wobbling slightly back and forth?
If your track is wider than 1” you can use small wooden shims or extra weather-stripping to fill in the gap inside the top and bottom tracks. By placing the material inside the tracks you won't be able to see it, but it will stabilize the panel.
FAQ
Warranty
Warranty Type: Limited.
Duration: 3 years
Coverage: Defects in materials and workmanship under standard regular use.
Exclusions:
Damage caused by misuse or not using the product as intended.
Improper installation.
Damage caused by chewing.
Pleased
Door is great. 12-year-old dog has already taken to it. Not complicated to install, though a second try would even be easier.
Have not received it yet
It’s been 3 weeks since I ordered it and according to the email I got yesterday it hasn’t shipped yet ?? Therefore I am not enjoying it al all. Either is my dog.
Excellent
Very high quality and easy to install. Thanks!
Exactly as described
Exactly as described and promoted
Perfect for my apartment. The dogs love it!
Excellent. I would highly recommend this door.