


Dragon Double Flap Pet Door for Aluminum Sliders


- Economical and efficient: This Dragon Pet Door for Aluminum Sliders Double Flap combines cost-effectiveness with energy efficiency, perfect for your aluminum sliding glass doors
- Sturdy construction: Designed with a high-quality aluminum frame in black or white, and a durable double flap system for better insulation
- Easy installation: The spring-loaded design allows for quick installation and removal, making it ideal for temporary or seasonal use
- Compatibility: Fits various sliding door sizes, ensuring the perfect fit for your home
- Enhanced security: The pet door includes a C-Clamp lock and a sturdy black locking cover for added peace of mind
 Product Details
Product Details
Discover the convenience and energy efficiency of the Dragon Pet Door for Aluminum Sliders Double Flap, an economical sliding door panel with a built-in pet door. Designed with your furry friends in mind, this pet door provides easy access to the outdoors while ensuring a seamless match with your existing aluminum sliding glass door frame, thanks to its sturdy aluminum construction in black or white.
The Dragon Pet Door's double flap system is designed for improved insulation, keeping your home comfortable in various climates. Foam weatherstripping is also included to enhance your home's insulation. With its quick and easy spring-loaded installation, this pet door is perfect for temporary or seasonal use in vacation homes and rental properties. This patio panel is designed to fit sliding glass door tracks that are at least 1" wide.
For added security, the Dragon Pet Door includes a C-Clamp lock to hold the panel in place, along with a sturdy black locking cover to block access when needed. Compatible with various sliding door sizes, this pet door offers versatility and adaptability to suit your home's needs.
Experience the benefits of the Dragon Pet Door for Aluminum Sliders Double Flap for yourself and enjoy the freedom it brings to both you and your pets.
Features:
- Double flap design: The two-piece flap system maximizes insulation value and energy efficiency, keeping your home comfortable in different climates
- Quick setup: The spring-loaded design ensures easy installation, with no drilling required, perfect for rental properties and vacation homes
- Adaptable to your needs: The Dragon Pet Door is compatible with various sliding door sizes and aluminum-frame sliding doors, making it a versatile solution
- Added security: The C-Clamp lock and black locking cover provide extra protection against intruders and unwanted animal visitors
- Maintain your home's insulation: Foam weatherstripping is included to further insulate your home and help maintain its temperature
Size Chart
- Small5 3/8"w x 9"h
- Medium 7 1/16"w x 13 1/16"h
- Large 9 3/8"w x 16 9/16"h
Flap Dimensions:
5 3/8"w x 9"h
The entry way your dog goes through.Step Over Range
3"
Distance from the bottom of the flap to the floor you pet must step over to enter the pet door.


Overall Panel Width
12 5/16"
How wide the panel is overall.Flap Dimensions:
7 1/16"w x 13 1/16"h
The entry way your dog goes through.Step Over Range
3”
Distance from the bottom of the flap to the floor you pet must step over to enter the pet door. Overall Panel Width
13 5/8"
How wide the panel is overall.Flap Dimensions:
9 3/8"w x 16 9/16"h
The entry way your dog goes through.Step Over Range
3"
Distance from the bottom of the flap to the floor you pet must step over to enter the pet door. Overall Panel Width
16 5/16"
How wide the panel is overall.| Flap Size | Flap Dimensions | Step Over | Overall Panel Width | Recommended Pet Height* |
|---|---|---|---|---|
| Small | 5 3/8"w x 9"h | 3" | 12 5/16" | 7" - 11" |
| Medium | 7 1/16"w x 13 1/16"h | 3" | 13 5/8" | 11" - 16" |
| Large | 9 3/8"w x 16 9/16"h | 3" | 16 5/16" | 11" - 20.5" |
*measured from the ground to the tallest point of their back.
IMPORTANT SIZING INFORMATION
The Dragon Pet Door’s two-piece flap is designed to tear away for your pet’s safety. If you pet door is not the right size for your pet, they may break off flap during normal use. Follow these sizing tips to help ensure that you are buying the right Dragon Pet Door size:
- Check the Flap Height: You must measure your dog before purchasing a pet door. A large dog may not fit in a “large” pet door. The tallest point of your dog’s back should be at least 1” beneath the top of the flap.
- Check the Step-Over: Your pet should be able to over the bottom of the flap comfortably. If the distance from the floor to the bottom of the pet door (called the stepover) is too high, your dog’s paw may catch in the pet door’s U-gasket. It’s better to have a taller pet door that is lower to the ground than a smaller pet door that is too high up.
- Check Your Entry/Exit Level: The inside of your home may be higher than the ground outside. This means that your door may have different step-over heights depending on whether you are indoors or outdoors. Try to use the lower level when picking your step over height. You can also even of the different levels with a ramp or platform.
- Reinforce Your Flap: Every Dragon Pet Door comes with instructions for how to reinforce the screws keeping your flap in place. If you are worried in any way that your pet may rip off the flap, we recommend preemptively reinforcing your flap. Note that doing so will negate the teat-away safety feature.
If you have any questions about which size pet door your pet needs, please contact our team of pet door experts for guidance and recommendations.
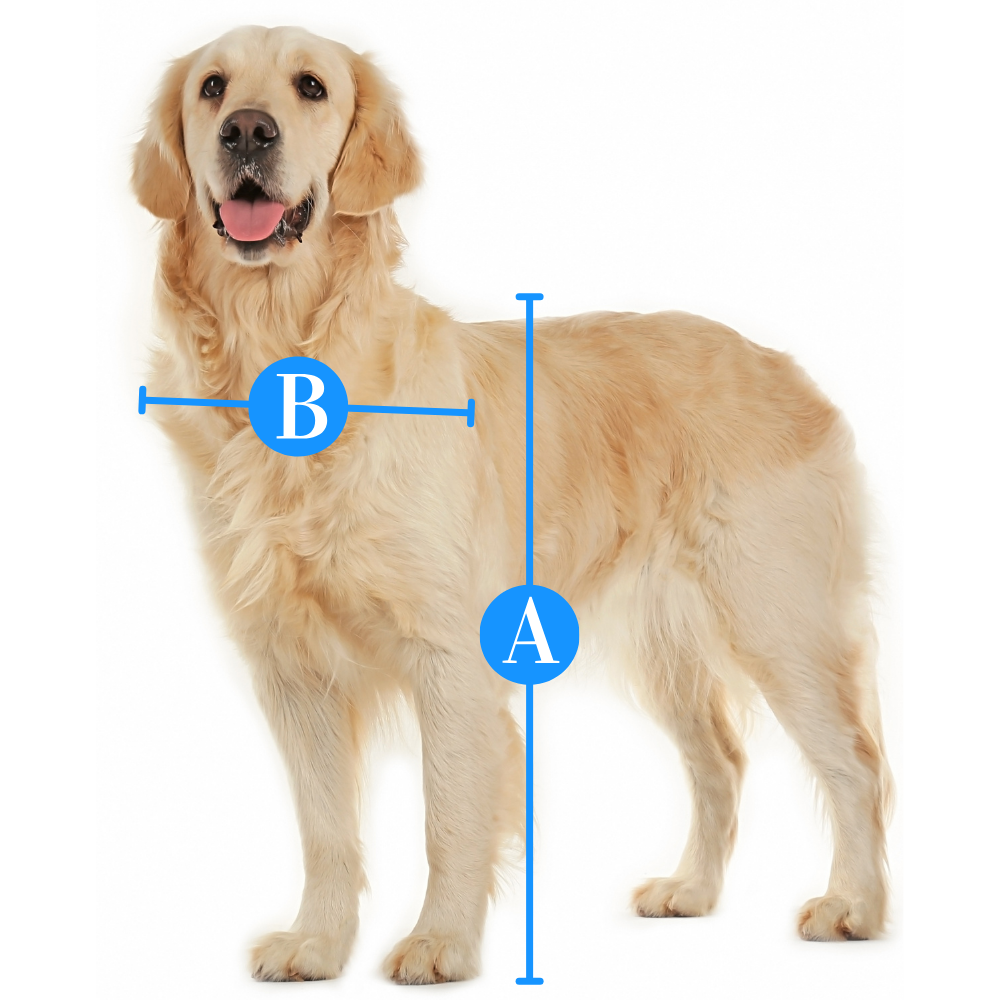
Find The Best Pet Door Size For My Pet

A
Pet Height: inches
B
Pet Width: inches
Installation Instructions
Click to view the Two-Piece Sliding Glass Pet Door Panel Instructions.

 Difficulty
Easy
Difficulty
Easy
 Steps
04
Steps
04
 Time Required
0.5 Hours
Time Required
0.5 Hours
 Sections
03
Sections
03
 Flags
02
Flags
02
Parts
- 1 Panel Pet Door with a Pre-Installed Dragon Pet Door
- 1 Foam Weather Strip Seal
- 1 C-Clamp Lock
- 1 Locking Cover
Tools
- Flathead Screwdriver
Please read instructions & notes thoroughly before installation.
ONE-PIECE PANEL ASSEMBLY
Step 1 Adjust the Top Piece

- Loosen the height adjustment locks at the top of the panel with a screwdriver. This allows the spring mechanism to move freely up and down.
Step 2 Test-Fit the Panel

- Insert the panel into the top track of your framing, push the panel into the spring mechanism and swing the bottom of the panel up and over the threshold into the rail at the bottom.
- If you can't quite clear the track, try swinging in from the outside as the outside track wall may be shorter.
Step 3 Apply the Weather Stripping

- Once you have confirmed the panel fits, remove the panel from the track and lay it on its side.
- Apply the foam weather-stripping by peeling back the paper and exposing the adhesive. Unroll it along the edge of the panel, pressing to ensure it adheres.
- Use scissors to trim the strip to fit the length of your panel.
- Flip your panel around to apply on the other side.
Step 4 Install the Panel

- Place the panel back into the sliding glass door, then tighten the height adjustment locks to lock it in place.
Click to view the One-Piece Sliding Glass Pet Door Panel Instructions.
 Difficulty
Easy
Steps
08
Time Required
0.5 Hours
Sections
03
Flags
04
Difficulty
Easy
Steps
08
Time Required
0.5 Hours
Sections
03
Flags
04
Parts
- 1 Panel Pet Door with a Pre-Installed Dragon Pet Door
- 1 Foam Weather Strip Seal
- 1 C-Clamp Lock
- 1 Locking Cover
- 4 Flathead Screws
- Flathead screwdriver
Tools
- Flathead Screwdriver
- Philips-head screwdriver (for sectional)
Please read instructions & notes thoroughly before installation.
SECTIONAL ASSEMBLY
Step 1 Loosen the Screws
- With a Phillips-head screwdriver, loosen the top two screws of the Dragon frame to make room for the glass section to fit inside.
Step 2 Connect the Sections

- Slide the flap section into the glass section. Make sure the locking cover is on the same side as the height adjustment locks on the glass section.
- Keep adjusting the flap section until it is fully flush with the glass section.
- Alternatively, pick up the panel and tap it on the ground on a soft surface.
Step 3 Fasten the Sections Together

- Fasten the sections by screwing in two connector screws each into the section connectors on both sides with the provided flat head screwdriver.
- Tighten down all eight connector screws.
Step 4 Secure the Pet Door Frame

- Retighten the two Dragon frame screws until the Dragon frames are flush with the glass section.
- Press the nut into the frame to keep it from rotating.
- Proceed with the regular Dragon panel Instructions below.
Step 5 Adjust the Top Piece
- Loosen the height adjustment locks at the top of the panel. This allows the spring mechanism to move freely up and down.
Step 6 Test-Fit the Panel
- Insert the panel into the top track of your framing, push the panel into the spring mechanism and swing the bottom of the panel up and over the threshold into the rail at the bottom.
- If you can't quite clear the track, try swinging in from the outside as the outside track wall may be shorter.
Step 7 Apply the Weather Stripping
- Once you have confirmed the panel fits, remove the panel from the track and lay it on its side.
- Apply the foam weather-stripping by peeling back the paper and exposing the adhesive. Unroll it along the edge of the panel, pressing to ensure it adheres.
- Use scissors to trim the strip to fit the length of your panel.
- Flip your panel around to apply on the other side.
Step 8 Install the Panel
- Place the panel back into the sliding glass door, then tighten the height adjustment locks to lock it in place. Installation complete!
Dragon Locking Details
Since you cannot lock your sliding glass door to your panel pet door, we have provided you with an alternative locking method to secure your home.
Installing the Clamp Lock
- This clamp has a screw that tightens by hand to prevent the sliding door from moving beyond the clamp’s placement.
- For doors manufactured with the glass slider on the inside track, the lock can usually be installed on the door’s raised track.

Locking the Flap
- The Dragon Pet Door comes with a secure locking cover to block access to the flap when needed.
- The locking cover is a great perfect for keeping pets inside at night, or for blocking access to the flap when you're away.
Alternative Locking Method
- A great alternative to locking your sliding glass door is a Charley bar or dowel in the track.
- Both work off the same concept—they block the slider from opening. When engaged you cannot pull the sliding door away from the pet door panel.

FREQUENTLY ASKED QUESTIONS
What if my panel is slightly too tall?
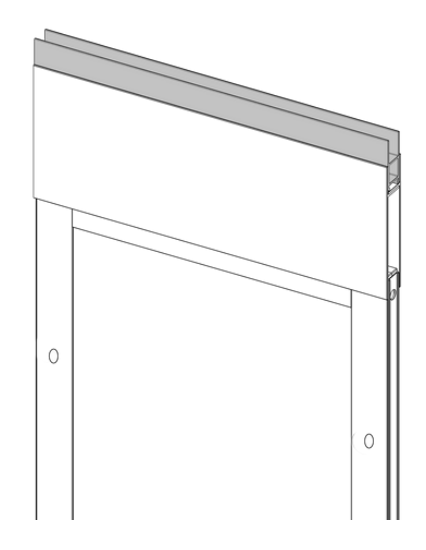
You can trim up to 3/4” off the spring- loaded adjustment piece at the top. This can be done by removing the adjustment pieces with a #2 Phillips head screwdriver and cutting down the flanges. Be careful not to cut too low or you will not be able to put the top back on.

The dark area marks where you can trim:

What if my panel is slightly too short?
We offer height extensions that will add 3/4” to the top of the panel that you slide into the channel at the top. These are made from the same aluminum as the panel so you can match the color.
You can also make your own extension out of nominal 1” wood (which is 3/4” thick), such as a 1x3, if you need more than 3/4" in height. Cut it to the same width as the panel and slide it into the channel at the top. Paint the wood to match your frame color. If the extension makes the panel feel unstable, you can secure it with screws.
What if the panel is wobbling slightly back and forth?
If your track is wider than 1” you can use small wooden shims or extra weather-stripping to fill in the gap inside the top and bottom tracks. By placing the material inside the tracks you won't be able to see it, but it will stabilize the panel.
FAQ
What's the difference between the single flap and the double flap Dragon panels for aluminum sliding doors?The double flap option provides increased insulation against the cold. Both options have magnets on the flap to keep the door sealed in wind. |
I want to get the large pet door for my dog, but I am concerned about a person fitting through it.All Dragon Pet Doors come with a locking cover. This cover can be used to keep you doggy in. It also can be used to keep intruders from entering your home. It slides into the interior frame. |
How do I know what size to get for my pet?When installing the pet door you want it to clear the top of your dog's back by 1-2 inches, minimum. Make sure the step-over is less than 1/3 of your dog's height. Lastly, you want the width of the door to be big enough to allow your pet to go through without touching the sides, about an inch extra. |
Are replacement flaps available?Yes, you can buy Dragon replacement flaps. |
My sliding door track has a triangular guide rail. Will this pet door still work?Some sliding glass door tracks have a triangle-shaped guide rail instead of a cylindrical pencil rail running along the middle. This pet door panel has an arch along the bottom that is designed to sit on top of a cylindrical pencil rail. Pencil rails are shorter in height than triangular guide rails, which means that the pet door panel would wobble on top of it rather than sitting flush with the rest of the track. To accommodate the pet door panel you will need to build up the sides of the triangular guide rail so that the tip is less than ¼” tall. Please reach out to customer service if you have any questions about this process. |
Will this panel work if my sliding glass door has a buried track?Some sliding glass doors have buried tracks. Since this panel has an arch along the bottom that is designed to sit on top of a pencil rail, it will not be secure in a slider with a buried track without modifications. We recommend securing the panel to the track wall with L brackets or toenailing it to the track wall. Toenailing is the process of fastening the panel to the track by driving a nail at roughly a 45-degree angle into the panel and through the track wall. Please note that these modifications result in a semi-permanent installation. If you needed to remove the panel in the future you would first have to remove the L brackets or nails. Additionally, please note that this process would leave holes in the pet door panel and it would no longer be returnable. Please reach out to customer service to further discuss your options for a buried track. |
I have a hurricane patio door. Will this pet door work for me?Hurricane door track styles vary widely, so they are case-by-case. Please reach out to customer service to discuss your pet door options for your sliding door. |
Will this pet door work with Anderson and Pella sliding doors?Anderson and Pella sliding glass doors have an inner track wall but no outer track wall. Additionally, the pencil rail is on the outer edge of the track rather than in the middle. Since this pet door panel is designed to sit between two track walls and on top of a centered pencil rail, it cannot be installed in Anderson or Pella doors without modifications. We recommend building out your track and using L brackets or toenailing to secure the bottom of the panel to the inner track wall. Building out the track means adding a piece of wood or vinyl that is the same height as the pencil rail to the space next to the pencil rail. This creates a flat surface for the pet door panel to sit on. Next, you will need to secure the panel to the track wall. To do this, you can use L brackets or you can toenail the panel into the track wall. Toenailing is the process of fastening the panel to the track by driving a nail at roughly a 45-degree angle into the panel and through the track wall. Please note that these modifications result in a semi-permanent installation. If you needed to remove the panel in the future you would first have to remove the L brackets or nails. Additionally, please note that this process would leave holes in the pet door panel and it would no longer be returnable. Please reach out to customer service to further discuss this process or different options for an Anderson or Pella sliding door. |
Is the Dragon patio panel good for renters?Absolutely! The Dragon panel can function as a temporary dog door sliding door panel because it does not require any permanent alterations to install. Easily install or remove the panel in your track in a matter of minutes. |
Warranty
Dragon Pet Doors One Year Warranty
Dragon Pet Doors have a one-year warranty for normal wear and tear and manufacturing defects.
Customer Reviews

Size Chart
- Small5 3/8"w x 9"h
- Medium 7 1/16"w x 13 1/16"h
- Large 9 3/8"w x 16 9/16"h
Flap Dimensions:
5 3/8"w x 9"h
The entry way your dog goes through.Step Over Range
3"
Distance from the bottom of the flap to the floor you pet must step over to enter the pet door. Overall Panel Width
12 5/16"
How wide the panel is overall.Flap Dimensions:
7 1/16"w x 13 1/16"h
The entry way your dog goes through.Step Over Range
3”
Distance from the bottom of the flap to the floor you pet must step over to enter the pet door. Overall Panel Width
13 5/8"
How wide the panel is overall.Flap Dimensions:
9 3/8"w x 16 9/16"h
The entry way your dog goes through.Step Over Range
3"
Distance from the bottom of the flap to the floor you pet must step over to enter the pet door. Overall Panel Width
16 5/16"
How wide the panel is overall.| Flap Size | Flap Dimensions | Step Over | Overall Panel Width | Recommended Pet Height* |
|---|---|---|---|---|
| Small | 5 3/8"w x 9"h | 3" | 12 5/16" | 7" - 11" |
| Medium | 7 1/16"w x 13 1/16"h | 3" | 13 5/8" | 11" - 16" |
| Large | 9 3/8"w x 16 9/16"h | 3" | 16 5/16" | 11" - 20.5" |
*measured from the ground to the tallest point of their back.
IMPORTANT SIZING INFORMATION
The Dragon Pet Door’s two-piece flap is designed to tear away for your pet’s safety. If you pet door is not the right size for your pet, they may break off flap during normal use. Follow these sizing tips to help ensure that you are buying the right Dragon Pet Door size:
- Check the Flap Height: You must measure your dog before purchasing a pet door. A large dog may not fit in a “large” pet door. The tallest point of your dog’s back should be at least 1” beneath the top of the flap.
- Check the Step-Over: Your pet should be able to over the bottom of the flap comfortably. If the distance from the floor to the bottom of the pet door (called the stepover) is too high, your dog’s paw may catch in the pet door’s U-gasket. It’s better to have a taller pet door that is lower to the ground than a smaller pet door that is too high up.
- Check Your Entry/Exit Level: The inside of your home may be higher than the ground outside. This means that your door may have different step-over heights depending on whether you are indoors or outdoors. Try to use the lower level when picking your step over height. You can also even of the different levels with a ramp or platform.
- Reinforce Your Flap: Every Dragon Pet Door comes with instructions for how to reinforce the screws keeping your flap in place. If you are worried in any way that your pet may rip off the flap, we recommend preemptively reinforcing your flap. Note that doing so will negate the teat-away safety feature.
If you have any questions about which size pet door your pet needs, please contact our team of pet door experts for guidance and recommendations.
Find The Best Pet Door Size For My Pet
A
Pet Height: inches
B
Pet Width: inches
Click to view the Two-Piece Sliding Glass Pet Door Panel Instructions.
Difficulty
Easy
Steps
04
Time Required
0.5 Hours
Sections
03
Flags
02
Parts
- 1 Panel Pet Door with a Pre-Installed Dragon Pet Door
- 1 Foam Weather Strip Seal
- 1 C-Clamp Lock
- 1 Locking Cover
Tools
- Flathead Screwdriver
Please read instructions & notes thoroughly before installation.
ONE-PIECE PANEL ASSEMBLY
Step 1 Adjust the Top Piece
- Loosen the height adjustment locks at the top of the panel with a screwdriver. This allows the spring mechanism to move freely up and down.
Step 2 Test-Fit the Panel
- Insert the panel into the top track of your framing, push the panel into the spring mechanism and swing the bottom of the panel up and over the threshold into the rail at the bottom.
- If you can't quite clear the track, try swinging in from the outside as the outside track wall may be shorter.
Step 3 Apply the Weather Stripping
- Once you have confirmed the panel fits, remove the panel from the track and lay it on its side.
- Apply the foam weather-stripping by peeling back the paper and exposing the adhesive. Unroll it along the edge of the panel, pressing to ensure it adheres.
- Use scissors to trim the strip to fit the length of your panel.
- Flip your panel around to apply on the other side.
Step 4 Install the Panel
- Place the panel back into the sliding glass door, then tighten the height adjustment locks to lock it in place.
Click to view the One-Piece Sliding Glass Pet Door Panel Instructions.
Difficulty
Easy
Steps
08
Time Required
0.5 Hours
Sections
03
Flags
04
Parts
- 1 Panel Pet Door with a Pre-Installed Dragon Pet Door
- 1 Foam Weather Strip Seal
- 1 C-Clamp Lock
- 1 Locking Cover
- 4 Flathead Screws
- Flathead screwdriver
Tools
- Flathead Screwdriver
- Philips-head screwdriver (for sectional)
Please read instructions & notes thoroughly before installation.
SECTIONAL ASSEMBLY
Step 1 Loosen the Screws
- With a Phillips-head screwdriver, loosen the top two screws of the Dragon frame to make room for the glass section to fit inside.
Step 2 Connect the Sections
- Slide the flap section into the glass section. Make sure the locking cover is on the same side as the height adjustment locks on the glass section.
- Keep adjusting the flap section until it is fully flush with the glass section.
- Alternatively, pick up the panel and tap it on the ground on a soft surface.
Step 3 Fasten the Sections Together
- Fasten the sections by screwing in two connector screws each into the section connectors on both sides with the provided flat head screwdriver.
- Tighten down all eight connector screws.
Step 4 Secure the Pet Door Frame
- Retighten the two Dragon frame screws until the Dragon frames are flush with the glass section.
- Press the nut into the frame to keep it from rotating.
- Proceed with the regular Dragon panel Instructions below.
Step 5 Adjust the Top Piece
- Loosen the height adjustment locks at the top of the panel. This allows the spring mechanism to move freely up and down.
Step 6 Test-Fit the Panel
- Insert the panel into the top track of your framing, push the panel into the spring mechanism and swing the bottom of the panel up and over the threshold into the rail at the bottom.
- If you can't quite clear the track, try swinging in from the outside as the outside track wall may be shorter.
Step 7 Apply the Weather Stripping
- Once you have confirmed the panel fits, remove the panel from the track and lay it on its side.
- Apply the foam weather-stripping by peeling back the paper and exposing the adhesive. Unroll it along the edge of the panel, pressing to ensure it adheres.
- Use scissors to trim the strip to fit the length of your panel.
- Flip your panel around to apply on the other side.
Step 8 Install the Panel
- Place the panel back into the sliding glass door, then tighten the height adjustment locks to lock it in place. Installation complete!
Dragon Locking Details
Since you cannot lock your sliding glass door to your panel pet door, we have provided you with an alternative locking method to secure your home.
Installing the Clamp Lock
- This clamp has a screw that tightens by hand to prevent the sliding door from moving beyond the clamp’s placement.
- For doors manufactured with the glass slider on the inside track, the lock can usually be installed on the door’s raised track.
Locking the Flap
- The Dragon Pet Door comes with a secure locking cover to block access to the flap when needed.
- The locking cover is a great perfect for keeping pets inside at night, or for blocking access to the flap when you're away.
Alternative Locking Method
- A great alternative to locking your sliding glass door is a Charley bar or dowel in the track.
- Both work off the same concept—they block the slider from opening. When engaged you cannot pull the sliding door away from the pet door panel.
FREQUENTLY ASKED QUESTIONS
What if my panel is slightly too tall?
You can trim up to 3/4” off the spring- loaded adjustment piece at the top. This can be done by removing the adjustment pieces with a #2 Phillips head screwdriver and cutting down the flanges. Be careful not to cut too low or you will not be able to put the top back on.
The dark area marks where you can trim:
What if my panel is slightly too short?
We offer height extensions that will add 3/4” to the top of the panel that you slide into the channel at the top. These are made from the same aluminum as the panel so you can match the color.
You can also make your own extension out of nominal 1” wood (which is 3/4” thick), such as a 1x3, if you need more than 3/4" in height. Cut it to the same width as the panel and slide it into the channel at the top. Paint the wood to match your frame color. If the extension makes the panel feel unstable, you can secure it with screws.
What if the panel is wobbling slightly back and forth?
If your track is wider than 1” you can use small wooden shims or extra weather-stripping to fill in the gap inside the top and bottom tracks. By placing the material inside the tracks you won't be able to see it, but it will stabilize the panel.
FAQ
What's the difference between the single flap and the double flap Dragon panels for aluminum sliding doors?The double flap option provides increased insulation against the cold. Both options have magnets on the flap to keep the door sealed in wind. |
I want to get the large pet door for my dog, but I am concerned about a person fitting through it.All Dragon Pet Doors come with a locking cover. This cover can be used to keep you doggy in. It also can be used to keep intruders from entering your home. It slides into the interior frame. |
How do I know what size to get for my pet?When installing the pet door you want it to clear the top of your dog's back by 1-2 inches, minimum. Make sure the step-over is less than 1/3 of your dog's height. Lastly, you want the width of the door to be big enough to allow your pet to go through without touching the sides, about an inch extra. |
Are replacement flaps available?Yes, you can buy Dragon replacement flaps. |
My sliding door track has a triangular guide rail. Will this pet door still work?Some sliding glass door tracks have a triangle-shaped guide rail instead of a cylindrical pencil rail running along the middle. This pet door panel has an arch along the bottom that is designed to sit on top of a cylindrical pencil rail. Pencil rails are shorter in height than triangular guide rails, which means that the pet door panel would wobble on top of it rather than sitting flush with the rest of the track. To accommodate the pet door panel you will need to build up the sides of the triangular guide rail so that the tip is less than ¼” tall. Please reach out to customer service if you have any questions about this process. |
Will this panel work if my sliding glass door has a buried track?Some sliding glass doors have buried tracks. Since this panel has an arch along the bottom that is designed to sit on top of a pencil rail, it will not be secure in a slider with a buried track without modifications. We recommend securing the panel to the track wall with L brackets or toenailing it to the track wall. Toenailing is the process of fastening the panel to the track by driving a nail at roughly a 45-degree angle into the panel and through the track wall. Please note that these modifications result in a semi-permanent installation. If you needed to remove the panel in the future you would first have to remove the L brackets or nails. Additionally, please note that this process would leave holes in the pet door panel and it would no longer be returnable. Please reach out to customer service to further discuss your options for a buried track. |
I have a hurricane patio door. Will this pet door work for me?Hurricane door track styles vary widely, so they are case-by-case. Please reach out to customer service to discuss your pet door options for your sliding door. |
Will this pet door work with Anderson and Pella sliding doors?Anderson and Pella sliding glass doors have an inner track wall but no outer track wall. Additionally, the pencil rail is on the outer edge of the track rather than in the middle. Since this pet door panel is designed to sit between two track walls and on top of a centered pencil rail, it cannot be installed in Anderson or Pella doors without modifications. We recommend building out your track and using L brackets or toenailing to secure the bottom of the panel to the inner track wall. Building out the track means adding a piece of wood or vinyl that is the same height as the pencil rail to the space next to the pencil rail. This creates a flat surface for the pet door panel to sit on. Next, you will need to secure the panel to the track wall. To do this, you can use L brackets or you can toenail the panel into the track wall. Toenailing is the process of fastening the panel to the track by driving a nail at roughly a 45-degree angle into the panel and through the track wall. Please note that these modifications result in a semi-permanent installation. If you needed to remove the panel in the future you would first have to remove the L brackets or nails. Additionally, please note that this process would leave holes in the pet door panel and it would no longer be returnable. Please reach out to customer service to further discuss this process or different options for an Anderson or Pella sliding door. |
Is the Dragon patio panel good for renters?Absolutely! The Dragon panel can function as a temporary dog door sliding door panel because it does not require any permanent alterations to install. Easily install or remove the panel in your track in a matter of minutes. |
Warranty
Dragon Pet Doors One Year Warranty
Dragon Pet Doors have a one-year warranty for normal wear and tear and manufacturing defects.