


PetSafe SmartDoor Connected Pet Door


- Control Anywhere: Electronic pet door managed via a smartphone app.
- Personalized Access: Set custom schedules for individual pets.
- Microchip Compatibility: Medium SmartDoor syncs with select microchips.
- Energy Efficient: Dynamic weather sealing maintains home temperature.
- Sizes Available: Comes in both Medium and Large options.
 Product Details
Product Details
Dive into the age of smart living with the PetSafe SmartDoor Connected Pet Door. This state-of-the-art electronic pet door seamlessly fuses convenience with security, especially in homes graced with the presence of multiple furry friends. Imagine providing your pets the luxury to explore the outdoors, while you retain the peace of mind, knowing unwanted visitors remain outside.
Harnessing the power of cutting-edge technology, this door grants you unparalleled control. With the associated smartphone app, not only can you craft tailored access schedules for each pet, but you can also supervise when the door is utilized, ensuring their safety. Distinctly, our Medium SmartDoor offers an edge with its compatibility with a range of microchips, allowing it to resonate with the unique 'key' your cat already carries. For those leaning towards traditional collar keys, both our Medium and Large SmartDoors have you covered, capable of programming up to five keys.
Craftsmanship shines through in the SmartDoor's design. Energy efficiency stands at its core with dynamic weather sealing, ensuring your home remains a sanctuary, irrespective of external weather conditions. Its versatile nature means it's not just restricted to door installations. Need a tunnel extension or adapter? It's equipped for that too. For optimal performance, we suggest utilizing rechargeable batteries or the Wall Adaptor.
The PetSafe SmartDoor Connected Pet Door isn’t merely a door; it's an upgrade to your home, a testament to modern technology, and a nod to an enhanced quality of life for your pets. Do note, the microchip adaption is specifically tailored for cats using the Medium SmartDoor, compatible with FDX-B/15 Digit, FDX-A/10 Digit, AVID H, and AVID Encrypted/9 or 15 Digit microchips.
Experience a blend of innovation and style, ensuring your pets' outdoor adventures are as limitless as your peace of mind. Elevate your home with the finest in electronic dog and cat door technology. Secure, efficient, and refined—welcome to the future of pet access.
Features:
- Advanced Scheduling: Use the My PetSafe App to design unique access times for every pet.
- Remote Management: Lock, unlock, and monitor door usage from any location.
- Multiple Key Options: Sync with various microchip types (Medium SmartDoor) or program up to 5 collar keys.
- Weather-Sealed Design: Prioritizes energy conservation and comfort.
- Flexible Installation: Primarily for door setups, but adaptable with tunnel extensions and adapters.
Key sizes varies by flap size:
Small: 1"w x 1"h
Medium: 1.2"w x 1.2"h
Large: 1.24w x 1.6"h
Size Chart
- Medium7.1” W x 7.8” H
- Large11.9” W x 16.1” H
Flap Dimensions:
7.1” W x 7.8” H
The entry way your dog goes through.Outside Frame Dimensions
10.8” W x 14.3” H
The outer edge of the pet door.


Rough Cut Out:
8.5” W x 10.4” H (non-metal door)
9.7” W x 12.7” H (metal door)
The size of the hole needed to fit your pet door into your door.Flap Dimensions:
11.9” W x 16.1” H
The entry way your dog goes through.Outside Frame Dimensions
16.5” W x 23.1” H
The outer edge of the pet door. Rough Cut Out:
13.2” W x 19.1” H (non-metal door)
14.8” W x 21.5” H (metal door)
The size of the hole needed to fit your pet door into your door.| Flap Size | Flap Opening | Rough Cut Out | Frame Dimension | Recommended Height Range |
|---|---|---|---|---|
| Medium | 7.1" w x 7.8" h | 8.5" w x 10.4" h (non-metal door)9.7" w x 12.7" h (metal door) | 10.8" w x 14.3" h | 5"-12.5" |
| Large | 11.9" w x 16.1" h | 13.2" w x 19.1" h (non-metal door) 14.8" w x 21.5" h (metal door) | 16.5" w x 23.1" h | 12.5"-24" |
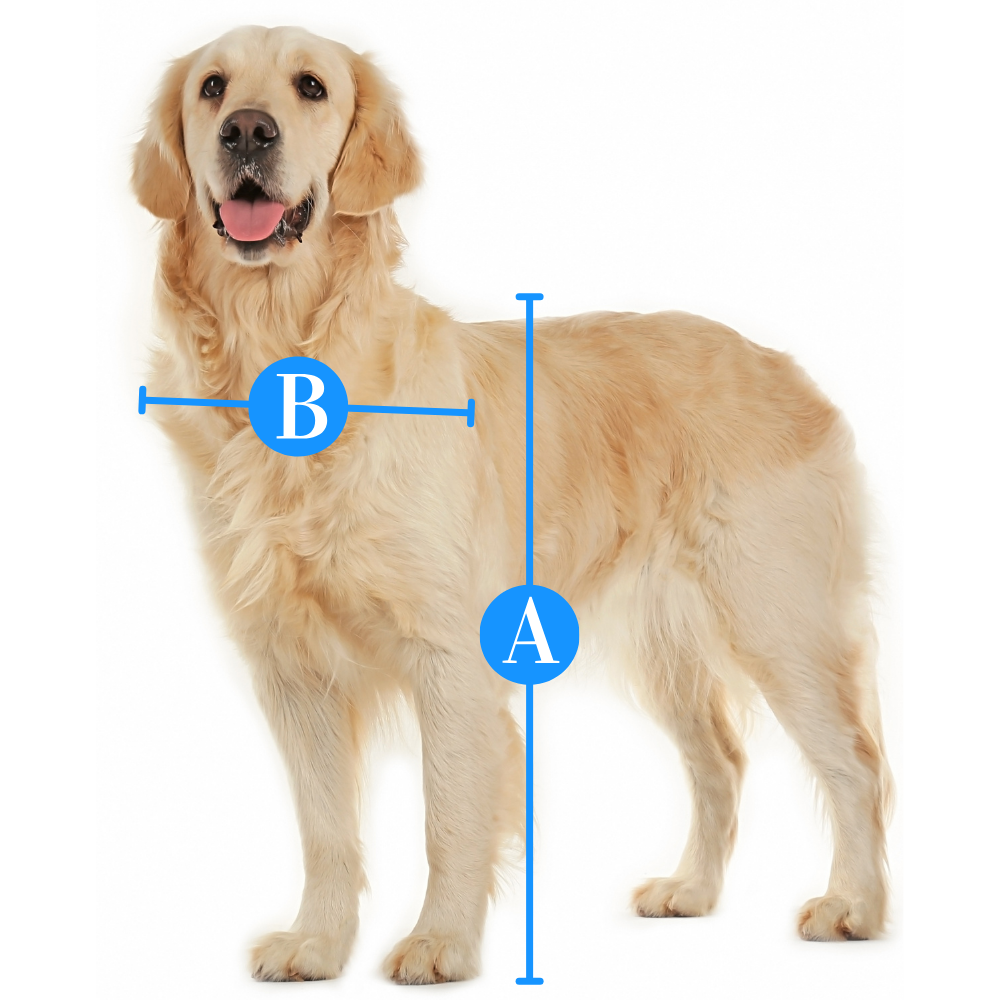
Do not know which flap size to get? Here is a measurement guide to help you out.
Installation Instructions
Install Into a Metal Door
 Difficulty
High
Difficulty
High
 Steps
13
Steps
13
 Time Required
2-3 hours
Time Required
2-3 hours
 Sections
01
Sections
01
 Flags
02
Flags
02
Parts
- 1 Interior Frame
- 1 Exterior Frame
- 1 Installaion adapter
- Cutting Templates for non-metal and metal doors
- 4 Spire clips
- 8 Blanking plus
- 1 Foam Spacer
- 4 Long screws
- 4 Short screws
- 8 Tiny screws (medium doors)
- 16 Tiny screws (large doors)
Tools
- Tape measure Pencil
- Level
- Hammer (optional)
- Flat blade (slotted) screwdriver (optional)
- A raised level surface, such as two sawhorses (optional)
- Scissors
- Tape
- Safety glasses
- Dust mask
- Hearing protection
- Work gloves
- Drill
- 1/2-inch (12 mm) drill bit
- 5/16-inch (8 mm) drill bit
- Jigsaw
- Jigsaw blade appropriate for cutting metal, and at least 1 inch longer than the thickness of the door
- #2 Phillips (crosshead) screwdriver
- Exterior-grade caulk
Important: Before installing the pet door, follow the instructions in the guide that came with your SmartDoor™ to install batteries in the pet door and download and set up the My PetSafe® app.
Note: Before Installation Your Pet Doort

- Installing the SmartDoor™ with installation adaptors ensures the best possible operation of your SmartDoor™ in a metal door.
- The metal in your door can interfere with the sensor in the SmartDoor™, affecting performance. By installing the SmartDoor™ within a larger opening (with the installation adaptors and spacer provided), you will increase the space between the pet door and the metal door, reducing or eliminating this interference and allowing the pet door to work as intended.
- If you previously installed the SmartDoor™ in your metal door without installation adaptors, remove it now. You will be increasing the size of the opening and then reinstalling the pet door with a larger spacer and installation adaptors.
Step 1 Measure your pet

- Measure your pet’s shoulder height when standing. If you have more than one pet, measure the tallest one. Make a note of this measurement.
- Make a mark at your pet’s shoulder height on the interior side of the door. Using a level, extend the line several inches/centimeters in both directions. This will help you place the cutting template correctly
Step 2 Mark the pet door location

- Draw a vertical line where you want the center/centre of the pet door to be. If your door has inset panels, consider how best to position the pet door to avoid gaps between the pet door frames and the door.
- Using a level, extend the line several inches/centimetres in both directions. This will help you place the cutting template correctly.
Step 3 Position the cutting template

- Cut out the cutting template for installation in metal doors with adaptors.
- Tape the cutting template to the interior side of the door, matching the shoulder height and center/centre lines on the cutting template with the horizontal and vertical lines you drew on the door.
Step 4 Check Template Position

- Check the position of the cutting template and adjust it as needed:
- If you have both large and small pets, make sure your shorter pets will be able to step up over the bottom edge of the pet door. It can be helpful to measure the length of your shorter pet’s legs and compare it to the distance between the lower edge of the cutting template and the floor. Ideally all pets should be able to use the pet door without having to jump up or slouch down.
- If there is an immediate step down outside the door, you may need to mount the pet door a little lower or provide an outdoor step for your pets to ensure they can use the pet door easily, both coming and going.
Step 5 Trace Template

- Once you are satisfied with the placement of the template, use a pencil to trace the outside edge of the cutting template. Remember to connect the corners.
Step 6 Remove Door From Hinges

- If desired, remove your door from its hinges and place it on a raised, level surface, such as two sawhorses. The interior side of the door should face up
- Removing the door from its hinges makes it a bit easier to cut the opening for the pet door, but you can install the pet door without removing your door from its hinges if you prefer.
Step 7 Drull Guide Holes

- Drill 1/2-inch (12 mm) holes through the door, just inside the corners of the cutting line. These will be the pilot holes for the jigsaw blade.
Step 8 Cut Out Hole

- Using a jigsaw, cut between the holes you just drilled, along the cutting line. Make sure your jigsaw blade is designed to cut metal and is at least 1 inch (25 mm) longer than the thickness of your door
Step 9 Install Foam Spacer

- If you removed your door from its hinges, rehang it now.
- Place the foam spacer at the bottom of the cut opening, in the middle. Use the spacer provided with the installation adaptors, not the one that came with the pet door.
Step 10 Insert Interior Frame

- Insert the tunnel of the interior frame through the middle of the installation adaptor. The smooth side of the installation adaptor should face the front..
- Insert the interior frame, with the installation adaptor, into the opening on the interior side of the door, on top of the spacer. Make sure the interior frame is horizontally centered/centred and level in the opening.
- Have a helper hold the interior frame and installation adaptor for you, or tape them in place while you go to the exterior side of the door to fit the exterior frame.
Step 11 Screw the Frames Together

- On the exterior side of the door, line up the second installation adaptor and exterior frame with the pet door tunnel.
- Holding the pet door frames and installation adaptors in place, insert screws through the holes in the exterior frame, through the installation adaptors and into the holes on the back of the interior frame. The screws will pass through the cutout opening.
- Choose the screws that best fit the thickness of your door. If your door is:
- Less than 1 inch (25 mm) thick, use the 3 5/32-inch (80 mm) screws. These screws were provided with the SmartDoor™
- Between 1 inch (25 mm) and 2 1/4 inches (57 mm) thick, use the 3 15/16-inch (100 mm) screws. These screws were provided with the installation adaptors.
Step 12 Screw the Frames Together

- Using a manual #2 Phillips (crosshead) screwdriver, tighten the screws just until the frames are attached.
- Before tightening the screws fully, check the position of the pet door and make any necessary adjustments. The pet door should be resting on the spacer, centered/centred horizontally in the opening and level.
- Once you are satisfied that the pet door is positioned correctly, finish tightening the screws. Do not overtighten.
Step 13 Caulk Edges of Pet Door

- On the exterior side of the door, apply exterior-grade caulk around the edges of the installation adaptor and the exterior frame, making sure to leave the weep holes open.
- If there are any gaps larger than 1/4 inch (6 mm), you will need to fill them with foam backer rod or other appropriate material before applying caulk.
- Apply exterior grade caulk around the edge of the pet door tunnel where it meets the exterior frame.
- Reinstall the batteries in the pet door.
Install Into a Wall
Difficulty
High
Steps
18
Time Required
2-3 hours
Sections
01
Flags
02
Parts
- 1 Interior Frame
- 1 Exterior Frame
- 1 Installaion adapter
- Cutting Templates for non-metal and metal doors
- 4 Spire clips
- 8 Blanking plus
- 1 Foam Spacer
- 4 Long screws
- 4 Short screws
- 8 Tiny screws (medium doors)
- 16 Tiny screws (large doors)
Tools
- Tape measure
- Pencil
- Level
- Stud finder
- Scissors
- Tape
- Safety glasses
- Dust mask
- Hearing protection
- Work gloves
- Drill
- 1/2-inch (12 mm) drill bit
- 5/16-inch (8 mm) drill bit
- Drill bit long enough to drill all the way through your wall to aid in template placement (diameter not critical)
- Jigsaw
- Jigsaw blade appropriate for the material you will be cutting
- #2 Phillips (crosshead) screwdriver
- Exterior-grade caulk
- Tunnel extension(s) (sold separately)
- Permanent glue
- All-weather tape
- Appropriate hardware for your wall construction (for example, wood screws if attaching to wall studs, toggle bolts if attaching to drywall/ plasterboard)
The following instructions explain how to install your SmartDoor™ in a wall using traditional framing and drywall/plasterboard construction. To install the SmartDoor™ in brick or masonry, please consult a licensed builder.
Note: Calculate How Many Tunnel Extensions You Will Need
- To install the SmartDoor™ in a wall, you will need to purchase enough tunnel extensions to span the thickness of your wall plus at least 1 1/4 inches (33 mm):
- The tunnel of the medium SmartDoor™ is 2 5/8 inches (66 mm) long, and the tunnel of the large SmartDoor™ is 2 11/16 inches (69 mm) long.
- Each tunnel extension adds another 2 inches (51 mm).
- The last tunnel extension needs to protrude from the wall by at least 1 1/4 inches (33 mm).
Step 1 Select Pet Door Location

- Choose a location for the SmartDoor™. It should be in a section of wall that is easily accessible by your pet and away from any electrical wiring or plumbing.
- Use a stud finder to locate the wall studs in the area you have selected for the pet door. Using a pencil, draw a vertical line midway between the studs, 10 to 12 inches (25.4 to 30.5 cm) above the floor.
- Cut a small hole in the wall and look inside to verify there is no wiring or plumbing present. Also check for the presence of metal in your wall. Metal can interfere with the sensor in the SmartDoor™; if your wall contains metal, you will need to install the pet door within a larger opening to increase the distance between the metal in the wall and the sensor in the SmartDoor.
Step 2 Measure Your Pet

- Measure your pet’s shoulder height when standing. If you have more than one pet, measure the tallest one.
- Mark your pet’s shoulder height on the vertical line. Using a level, extend the horizontal and vertical lines several inches/ centimetres in both directions.
Step 3 Position the cutting template

- Cut out the appropriate cutting template, based on what you found when you looked for metal inside your wall.
- Tape the cutting template to the interior side of the wall, matching the shoulder height and center/centre lines on the cutting template with the horizontal and vertical lines you drew on the wall.
Step 4 Check Cutting Template Position
- Check the position of the cutting template and adjust it as needed:
- If you have both large and small pets, make sure your shorter pets will be able to step up over the bottom edge of the pet door. It can be helpful to measure the length of your shorter pet’s legs and compare it to the distance between the lower edge of the cutting template and the floor. Ideally all pets should be able to use the pet door without having to jump up or slouch down.
- If the ground outdoors is lower than the floor indoors, you may need to mount the pet door a little lower or provide an outdoor step for your pets to ensure they can use the pet door easily, both coming and going.
Step 5 Drill Guide Holes

- Once you are satisfied with the placement of the cutting template, use a long drill bit to drill three holes through the center/centre locator holes on the template and all the way through the interior and exterior surfaces of the wall.
- Use both hands to hold the drill steady, straight and level.
- You will use these holes to align the template on the exterior side of the wall.
Step 6 Trace Cutting Template Edges

- Trace the outside edge of the cutting template, making sure to connect the corners.
- Make sure the cutting line is clearly marked on the wall. Carefully remove the cutting template and excess tape from the wall.
- Save the cutting template; you will need it for the exterior side of the wall.
Step 7 Cut the Opening

- Drill 1/2-inch (12 mm) holes through the interior wall, just inside the corners of the cutting line.
- These holes will be the pilot holes for the jigsaw blade.
- Using a jigsaw, cut the interior wall between the holes you just drilled, along the cutting line.
Step 8 Insert Interior Frame

- If you used the template for wall installation (without metal), insert the interior frame of the pet door into the opening to check the fit.
- Do not force the interior frame into the opening if it is too tight. If the opening is too small, remove the interior frame and recut or file the opening slightly to enlarge it.
- Once the interior frame fits into the opening, make any necessary adjustments to the opening to ensure the pet door sits level and plumb.
Step 9 Trace Template on Exterior Wall

- You are now ready to work from the exterior wall. Line up the three holes in the cutting template with the three holes you drilled through the wall. Make sure the template is level and then tape it into position.
- Trace the outside edge of the cutting template, making sure to connect the corners. Make sure the cutting line is clearly marked on the wall. Remove the cutting template and excess tape from the wall.
Step 10 Cut Through Exterior Wall

- Drill 1/2-inch (12 mm) holes through the exterior wall, just inside the corners of the cutting line. These holes will be the pilot holes for the jigsaw blade.
- Using a jigsaw, cut the exterior wall between the holes you just drilled, along the cutting line.
Step 11 Insert Tunnel Extension

- If you used the template for wall installation (without metal), insert a tunnel extension into the opening to check the fit.
- Do not force the tunnel extension into the opening if it is too tight. If the opening is too small, remove the tunnel extension and re-cut or file the opening slightly to enlarge it.
- Once the tunnel extension fits into the opening, make any necessary adjustments to the opening to ensure the tunnel extension sits level and plumb.
Step 12 Prepare the Interior Frame

- Fit an installation adaptor over the tunnel of the interior frame. The smooth side of the installation adaptor should face the front.
- Use four short screws to secure the installation adaptor to the back of the interior frame.
- Connect a tunnel extension to the pet door by fitting the lip of the tunnel extension over the tunnel of the pet door.
- Connect additional tunnel extensions as needed.
Step 13 Attach Tunnel Extensions Together

- Test fit the interior frame (with installation adaptor and tunnel extensions attached) in the opening. The last tunnel extension needs to protrude from the wall by at least 1 1/4 inches (33 mm).
- Add or remove tunnel extensions as needed.
- Once you are satisfied that you have connected the appropriate number of tunnel extensions, remove the tunnel extensions from the pet door and use permanent glue to attach the tunnel extensions to one another.
- Attach the tunnel extensions to the interior frame using all-weather tape. Do not glue the tunnel extensions to the interior frame.
Step 14 Insert Interior Frame Into Wall

- Insert the interior pet door assembly (interior frame with attached installation adaptor and tunnel extensions) into the opening in the interior wall.
- If you are installing the pet door within the larger cutout opening (for walls containing metal), make sure the pet door is centered/centred horizontally and vertically in the opening. You can use the spacer provided with the installation adaptors to support the bottom of the tunnel if desired.
- Hold the interior pet door assembly in place and use a pencil to mark the location of the holes for the screws.
- Remove the interior pet door assembly.
- Drill holes in the marked locations, making sure the holes are the appropriate size for the hardware you selected based on your wall construction.
- Replace the interior pet door assembly in the opening and secure it to the wall with appropriate hardware for your construction (not included).
Step 15 Prepare Exterior Frame

- Place the second installation adaptor on a flat surface, smooth side up.
- Install a spire clip in each of the four rectangular holes in the installation adaptor. The flat side of the spire clip should face the front, and the round hole in the spire clip should line up with the round hole in the installation adaptor.
- Place the exterior frame of the pet door on top of the installation adaptor.
- Use four short screws to secure the exterior frame to the installation adaptor
Step 16 Install the Exterior Frame

- On the exterior side of the wall, line up the exterior pet door assembly (exterior frame with attached installation adaptor) with the tunnel of the pet door.
- Hold the exterior pet door assembly in place and use a pencil to mark the location of the holes for the screws.
- Remove the exterior pet door assembly. Drill holes in the marked locations, making sure the holes are the appropriate size for the hardware you selected based on your wall construction.
- Replace the exterior pet door assembly and secure it to the exterior wall with appropriate hardware for your construction (not included).
Step 17 Insert Blanking Plugs

- On the interior side of the wall, insert blanking plugs into the holes in the installation adaptor.
- On the exterior side of the wall, insert blanking plugs into the holes in the exterior frame. These blanking plugs were supplied with the pet door.
- Insert blanking plugs into the holes in the installation adaptor.
- Replace the exterior pet door assembly and secure it to the exterior wall with appropriate hardware for your construction (not included).
Step 18 Caulk Edges of Pet Door

- On the exterior side of the wall, apply exterior-grade caulk around the edges of the installation adaptor and the exterior frame, making sure to leave the weep holes open.
- If there are any gaps larger than 1/4 inch (6 mm), you will need to fill them with foam backer rod or other appropriate material before applying caulk.
- Apply exterior-grade caulk around the edge of the pet door tunnel where it meets the exterior frame.
- Reinstall the batteries in the pet door.
Videos
Introducing the new SmartDoor Connected Pet Door | PetSafe
How to Install Your SmartDoor Connected Pet Door | PetSafe
Training Your Pet to use the SmartDoor Connected Pet Door | PetSafe
FAQ
I'm concerned about the reviews. Is this the second generation or first generation door?Second generation. There have been many improvements made since the first generation hit the market. We have heard far less in the way of warranty issues in the past few years. |
Is this door microchip compatible?Yes, but it compatible with FDX-B/15 Digit, FDX-A/10 Digit, AVID H, and AVID Encrypted/9 or 15 Digit microchips. Please note that the microchip feature is only for cats using the Medium pet door. |
Is the door compatible with other brand RFID keys or smart dog door collars?No, only the collar key made for this door. |
Can this be installed in a screen door?Mesh screen is usually not strong enough to hold up the PetSafe electronic dog doors as they are much heavier than regular manual doors, so we do not recommend it. Check out our selection of pet doors for screen doors. |
Can the PetSafe Smart Door be installed outside?Electronic doors have inner mechanisms that may be subject to water damage when exposed to the elements, so we do not recommend installing it outside. If installed in an exterior door exposed to the elements, we would recommend also installing some sort of rain cap to minimize extreme weather damage to the door. |
Is the collar smart pet door key waterproof?The collar key is "water resistant" meaning if your dog runs through a sprinkler or jumps in a puddle, it should hold up just fine. There is a seal around the battery to keep the water out, but if your dog is submerged in water long enough, moisture may get in and cause water damage. |
Will this door keep my cat from going out?Generally cats (or any pet without a registered collar key) will not be able to get out by themselves, but you can't say that it is a totally cat proof dog door. However, cats will be cats. If they learn that all they need to do is stick closely to the dog, there is a possibility they will find a way out. |
Can this door be installed in a wall?Yes, you can install this door with a wall adapter.The wall entry uses the same technology and RFID keys. Wall installations have a different cutting template and instructions. |
Do they make a SmartDoor™ Connected Pet Door for bigger dogs?No, the largest model of this door is only 10.8” W x 14.3” H . |
Why won't the collar key open the door anymore?There are multiple factors that could contribute to the door not opening like drained batteries or faulty wiring. For technical issues we would recommend contacting the manufacturer, PetSafe, directly as they would be better able to assist you regarding the door's inner mechanisms. |
Is this good for giant breeds?The PetSafe large pet door is only 10.8" x 14.3", so it would not really be suitable for giant breeds. High Tech Pet makes electronic pet doors large enough for bigger dogs. |
Warranty
Warranty Information:
Radio Systems Corporation is the industry leader in Consumer Pet Electronics; products are marketed under the PetSafe, Innotek, Invisible Fence, Guardian, Staywell, and SportDOG brands. Radio Systems Corporation and its authorized resellers (who display the appropriate sanctioned logos) only sell new products in original packaging. Product represented as used, refurbished, or “as-is”, or not in the original packaging will not be covered by our warranty, or any consumer support.
We are committed to consumer satisfaction. To that end Radio Systems Corp. cautions consumers from purchasing any product other than product in its original packaging or specially marked refurbished packaging.
Proof of Purchase must be provided to our customer care center before a warranty claim can be honored. For your convenience, you may register your product and provide proof of purchase immediately after your purchase. Thereafter, proof of purchase will not be required to fulfill a warranty claim. Products may be registered at www.petsafe.net/register-product. Proof of purchase is accepted via e-mail (receipt@petsafe.net), fax, or traditional mail. Proof of purchase is defined as the sales receipt or copy of the sales receipt.
Fax: 800-332-7942
Mail: Attn: Customer Care Center/POP Radio Systems Corporation 10427 PetSafe Way Knoxville TN 37932
2 Year Non-Transferable Limited Warranty:
What is Covered
Radio Systems Corporation, owner of the PetSafe Brand, (hereinafter referred to as “PetSafe”) warrants to the original retail consumer purchaser, and not any other purchaser or subsequent owner, that its PetSafe product, when subject to normal and proper residential use, will be free from defects in material or workmanship for a period of two (2) years from the purchase date. An “original retail consumer purchaser” is a person or entity who originally purchases the product or a gift recipient of a new product that is unopened and in its original packaging. When serviced by PetSafe Customer Service, PetSafe covers labor and parts for the first year of ownership; after the first year, a service or upgrade charge will apply relative to replacement of the product, with new or refurbished items at PetSafe’s sole discretion. The limited warranty is non-transferable and shall automatically terminate if the original retail consumer purchaser resells the PetSafe product or transfers the property on which the PetSafe product is installed. In the event of defect, these are your exclusive remedies.
Proper Product Use
This product is designed only for use with domesticated animals; do not use this product for any other purpose. However, the specific temperament of your animal may not work with this product. We recommend that you do not use this product if your animal is aggressive. If you are unsure whether this product is appropriate for your animal, please consult with your veterinarian or a certified trainer before you use this product. Please see the instruction manual for additional important information.
What is Not Covered
This non-transferrable limited warranty does not provide protection against, and PetSafe will have no liability under this non-transferrable limited warranty for any damage to or defects in the products caused by any animal, loss of product(s), failure, defect or damage caused by events and situations beyond normal residential exposure conditions, including, but not limited to: commercial use, misuse, abuse, neglect, improper installation or installation not in accordance with PetSafe’s instructions, use of non-PetSafe accessories, impacts of foreign objects, acts of God, abnormal or improper use, improper storage, attempted repair or service by anyone other than PetSafe Customer Service, accident, alteration, defects in or failure of the surface the PetSafe product is installed in or upon, discoloration or other damage caused by pollution, sunlight, other environmental conditions, mold, dirt, mildew, or exposure to harmful chemicals and any other cause not involving manufacturing defects in the PetSafe product. Under no circumstances will PetSafe be liable for any non-PetSafe labor charges or any expenses whatsoever in connection with the removal, repair, or installation of either the original or replacement component(s) relative to in-ground fence installation, kennel installation, pet door installation, and other permanent, semi-permanent, or fixture type installations on the retail consumer purchaser’s property.
Registering the Product
Within thirty (30) days of purchase, please go to www.petsafe.net/register-product to register your purchase. A sales receipt shall be required to obtain warranty coverage. Please keep this information in a safe place.
Making a Warranty Claim
To obtain warranty service, call the PetSafe Customer Care center. In the United States or Canada, 1-800-732-2677; in Australia, 1800 786 608; in New Zealand, 0800 543 054.
Pursuant to this non-transferrable limited warranty, PetSafe will replace the part with a new or refurbished part. This non-transferrable limited warranty will then apply to either the new or refurbished part for the remainder of the original non-transferrable limited warranty period.
Disclaimers
Replacement as provided under this non-transferrable limited warranty is the exclusive remedy of the consumer. Neither labor to remove the part nor labor to install the refurbished or replaced part is covered.
This non-transferrable limited warranty is in lieu of all other express warranties. PetSafe expressly disclaims and excludes all other warranties, express or implied, including without limitation, the warranties of merchantability and fitness for a particular purpose. PetSafe also disclaims and excludes all liability for incidental, consequential, punitive, direct, indirect, special, or any other damages arising out of or connected with the purchase, use, or misuse of this product or for the breach of any express or implied warranties or breach of contract or otherwise. Purchaser assumes all risks and liabilities from the use or misuse of this product. PetSafe does not authorize any other person or agent to make any other express or implied warranties.
Furthermore, PetSafe will not be liable for any loss, damage, or injury resulting from delay in delivery of replacement parts or for any failure by PetSafe to perform covered repair work due to circumstances beyond PetSafe’s control.
Governing Law
This non-transferrable limited warranty shall be governed by the law of the State of Tennessee, U.S.A., and by the laws of the United States of America, excluding their conflicts of laws principles. Furthermore, the United Nations Convention on Contracts for the International Sale of Goods is hereby excluded in its entirety from application to this non-transferrable limited warranty. Jurisdiction and venue shall be exclusive to the courts of Knox County, Tennessee. These warranties give you specific legal rights, and you may also have other rights that vary from state to state or country to country. Some states or countries do not allow the exclusion or limitation of incidental or consequential damages, so the above limitation or exclusion may not apply to you.
Making a Warranty Claim:
If you need assistance or to make a warranty claim, please contact our Customer Care Center for help in troubleshooting and, if necessary, to arrange a warranty repair for your product.
Customer Reviews

Size Chart
- Medium7.1” W x 7.8” H
- Large11.9” W x 16.1” H
Flap Dimensions:
7.1” W x 7.8” H
The entry way your dog goes through.Outside Frame Dimensions
10.8” W x 14.3” H
The outer edge of the pet door. Rough Cut Out:
8.5” W x 10.4” H (non-metal door)
9.7” W x 12.7” H (metal door)
The size of the hole needed to fit your pet door into your door.Flap Dimensions:
11.9” W x 16.1” H
The entry way your dog goes through.Outside Frame Dimensions
16.5” W x 23.1” H
The outer edge of the pet door. Rough Cut Out:
13.2” W x 19.1” H (non-metal door)
14.8” W x 21.5” H (metal door)
The size of the hole needed to fit your pet door into your door.| Flap Size | Flap Opening | Rough Cut Out | Frame Dimension | Recommended Height Range |
|---|---|---|---|---|
| Medium | 7.1" w x 7.8" h | 8.5" w x 10.4" h (non-metal door)9.7" w x 12.7" h (metal door) | 10.8" w x 14.3" h | 5"-12.5" |
| Large | 11.9" w x 16.1" h | 13.2" w x 19.1" h (non-metal door) 14.8" w x 21.5" h (metal door) | 16.5" w x 23.1" h | 12.5"-24" |
Do not know which flap size to get? Here is a measurement guide to help you out.
Install Into a Metal Door
Difficulty
High
Steps
13
Time Required
2-3 hours
Sections
01
Flags
02
Parts
- 1 Interior Frame
- 1 Exterior Frame
- 1 Installaion adapter
- Cutting Templates for non-metal and metal doors
- 4 Spire clips
- 8 Blanking plus
- 1 Foam Spacer
- 4 Long screws
- 4 Short screws
- 8 Tiny screws (medium doors)
- 16 Tiny screws (large doors)
Tools
- Tape measure Pencil
- Level
- Hammer (optional)
- Flat blade (slotted) screwdriver (optional)
- A raised level surface, such as two sawhorses (optional)
- Scissors
- Tape
- Safety glasses
- Dust mask
- Hearing protection
- Work gloves
- Drill
- 1/2-inch (12 mm) drill bit
- 5/16-inch (8 mm) drill bit
- Jigsaw
- Jigsaw blade appropriate for cutting metal, and at least 1 inch longer than the thickness of the door
- #2 Phillips (crosshead) screwdriver
- Exterior-grade caulk
Important: Before installing the pet door, follow the instructions in the guide that came with your SmartDoor™ to install batteries in the pet door and download and set up the My PetSafe® app.
Note: Before Installation Your Pet Doort
- Installing the SmartDoor™ with installation adaptors ensures the best possible operation of your SmartDoor™ in a metal door.
- The metal in your door can interfere with the sensor in the SmartDoor™, affecting performance. By installing the SmartDoor™ within a larger opening (with the installation adaptors and spacer provided), you will increase the space between the pet door and the metal door, reducing or eliminating this interference and allowing the pet door to work as intended.
- If you previously installed the SmartDoor™ in your metal door without installation adaptors, remove it now. You will be increasing the size of the opening and then reinstalling the pet door with a larger spacer and installation adaptors.
Step 1 Measure your pet
- Measure your pet’s shoulder height when standing. If you have more than one pet, measure the tallest one. Make a note of this measurement.
- Make a mark at your pet’s shoulder height on the interior side of the door. Using a level, extend the line several inches/centimeters in both directions. This will help you place the cutting template correctly
Step 2 Mark the pet door location
- Draw a vertical line where you want the center/centre of the pet door to be. If your door has inset panels, consider how best to position the pet door to avoid gaps between the pet door frames and the door.
- Using a level, extend the line several inches/centimetres in both directions. This will help you place the cutting template correctly.
Step 3 Position the cutting template
- Cut out the cutting template for installation in metal doors with adaptors.
- Tape the cutting template to the interior side of the door, matching the shoulder height and center/centre lines on the cutting template with the horizontal and vertical lines you drew on the door.
Step 4 Check Template Position
- Check the position of the cutting template and adjust it as needed:
- If you have both large and small pets, make sure your shorter pets will be able to step up over the bottom edge of the pet door. It can be helpful to measure the length of your shorter pet’s legs and compare it to the distance between the lower edge of the cutting template and the floor. Ideally all pets should be able to use the pet door without having to jump up or slouch down.
- If there is an immediate step down outside the door, you may need to mount the pet door a little lower or provide an outdoor step for your pets to ensure they can use the pet door easily, both coming and going.
Step 5 Trace Template
- Once you are satisfied with the placement of the template, use a pencil to trace the outside edge of the cutting template. Remember to connect the corners.
Step 6 Remove Door From Hinges
- If desired, remove your door from its hinges and place it on a raised, level surface, such as two sawhorses. The interior side of the door should face up
- Removing the door from its hinges makes it a bit easier to cut the opening for the pet door, but you can install the pet door without removing your door from its hinges if you prefer.
Step 7 Drull Guide Holes
- Drill 1/2-inch (12 mm) holes through the door, just inside the corners of the cutting line. These will be the pilot holes for the jigsaw blade.
Step 8 Cut Out Hole
- Using a jigsaw, cut between the holes you just drilled, along the cutting line. Make sure your jigsaw blade is designed to cut metal and is at least 1 inch (25 mm) longer than the thickness of your door
Step 9 Install Foam Spacer
- If you removed your door from its hinges, rehang it now.
- Place the foam spacer at the bottom of the cut opening, in the middle. Use the spacer provided with the installation adaptors, not the one that came with the pet door.
Step 10 Insert Interior Frame
- Insert the tunnel of the interior frame through the middle of the installation adaptor. The smooth side of the installation adaptor should face the front..
- Insert the interior frame, with the installation adaptor, into the opening on the interior side of the door, on top of the spacer. Make sure the interior frame is horizontally centered/centred and level in the opening.
- Have a helper hold the interior frame and installation adaptor for you, or tape them in place while you go to the exterior side of the door to fit the exterior frame.
Step 11 Screw the Frames Together
- On the exterior side of the door, line up the second installation adaptor and exterior frame with the pet door tunnel.
- Holding the pet door frames and installation adaptors in place, insert screws through the holes in the exterior frame, through the installation adaptors and into the holes on the back of the interior frame. The screws will pass through the cutout opening.
- Choose the screws that best fit the thickness of your door. If your door is:
- Less than 1 inch (25 mm) thick, use the 3 5/32-inch (80 mm) screws. These screws were provided with the SmartDoor™
- Between 1 inch (25 mm) and 2 1/4 inches (57 mm) thick, use the 3 15/16-inch (100 mm) screws. These screws were provided with the installation adaptors.
Step 12 Screw the Frames Together
- Using a manual #2 Phillips (crosshead) screwdriver, tighten the screws just until the frames are attached.
- Before tightening the screws fully, check the position of the pet door and make any necessary adjustments. The pet door should be resting on the spacer, centered/centred horizontally in the opening and level.
- Once you are satisfied that the pet door is positioned correctly, finish tightening the screws. Do not overtighten.
Step 13 Caulk Edges of Pet Door
- On the exterior side of the door, apply exterior-grade caulk around the edges of the installation adaptor and the exterior frame, making sure to leave the weep holes open.
- If there are any gaps larger than 1/4 inch (6 mm), you will need to fill them with foam backer rod or other appropriate material before applying caulk.
- Apply exterior grade caulk around the edge of the pet door tunnel where it meets the exterior frame.
- Reinstall the batteries in the pet door.
Install Into a Wall
Difficulty
High
Steps
18
Time Required
2-3 hours
Sections
01
Flags
02
Parts
- 1 Interior Frame
- 1 Exterior Frame
- 1 Installaion adapter
- Cutting Templates for non-metal and metal doors
- 4 Spire clips
- 8 Blanking plus
- 1 Foam Spacer
- 4 Long screws
- 4 Short screws
- 8 Tiny screws (medium doors)
- 16 Tiny screws (large doors)
Tools
- Tape measure
- Pencil
- Level
- Stud finder
- Scissors
- Tape
- Safety glasses
- Dust mask
- Hearing protection
- Work gloves
- Drill
- 1/2-inch (12 mm) drill bit
- 5/16-inch (8 mm) drill bit
- Drill bit long enough to drill all the way through your wall to aid in template placement (diameter not critical)
- Jigsaw
- Jigsaw blade appropriate for the material you will be cutting
- #2 Phillips (crosshead) screwdriver
- Exterior-grade caulk
- Tunnel extension(s) (sold separately)
- Permanent glue
- All-weather tape
- Appropriate hardware for your wall construction (for example, wood screws if attaching to wall studs, toggle bolts if attaching to drywall/ plasterboard)
The following instructions explain how to install your SmartDoor™ in a wall using traditional framing and drywall/plasterboard construction. To install the SmartDoor™ in brick or masonry, please consult a licensed builder.
Note: Calculate How Many Tunnel Extensions You Will Need
- To install the SmartDoor™ in a wall, you will need to purchase enough tunnel extensions to span the thickness of your wall plus at least 1 1/4 inches (33 mm):
- The tunnel of the medium SmartDoor™ is 2 5/8 inches (66 mm) long, and the tunnel of the large SmartDoor™ is 2 11/16 inches (69 mm) long.
- Each tunnel extension adds another 2 inches (51 mm).
- The last tunnel extension needs to protrude from the wall by at least 1 1/4 inches (33 mm).
Step 1 Select Pet Door Location
- Choose a location for the SmartDoor™. It should be in a section of wall that is easily accessible by your pet and away from any electrical wiring or plumbing.
- Use a stud finder to locate the wall studs in the area you have selected for the pet door. Using a pencil, draw a vertical line midway between the studs, 10 to 12 inches (25.4 to 30.5 cm) above the floor.
- Cut a small hole in the wall and look inside to verify there is no wiring or plumbing present. Also check for the presence of metal in your wall. Metal can interfere with the sensor in the SmartDoor™; if your wall contains metal, you will need to install the pet door within a larger opening to increase the distance between the metal in the wall and the sensor in the SmartDoor.
Step 2 Measure Your Pet
- Measure your pet’s shoulder height when standing. If you have more than one pet, measure the tallest one.
- Mark your pet’s shoulder height on the vertical line. Using a level, extend the horizontal and vertical lines several inches/ centimetres in both directions.
Step 3 Position the cutting template
- Cut out the appropriate cutting template, based on what you found when you looked for metal inside your wall.
- Tape the cutting template to the interior side of the wall, matching the shoulder height and center/centre lines on the cutting template with the horizontal and vertical lines you drew on the wall.
Step 4 Check Cutting Template Position
- Check the position of the cutting template and adjust it as needed:
- If you have both large and small pets, make sure your shorter pets will be able to step up over the bottom edge of the pet door. It can be helpful to measure the length of your shorter pet’s legs and compare it to the distance between the lower edge of the cutting template and the floor. Ideally all pets should be able to use the pet door without having to jump up or slouch down.
- If the ground outdoors is lower than the floor indoors, you may need to mount the pet door a little lower or provide an outdoor step for your pets to ensure they can use the pet door easily, both coming and going.
Step 5 Drill Guide Holes
- Once you are satisfied with the placement of the cutting template, use a long drill bit to drill three holes through the center/centre locator holes on the template and all the way through the interior and exterior surfaces of the wall.
- Use both hands to hold the drill steady, straight and level.
- You will use these holes to align the template on the exterior side of the wall.
Step 6 Trace Cutting Template Edges
- Trace the outside edge of the cutting template, making sure to connect the corners.
- Make sure the cutting line is clearly marked on the wall. Carefully remove the cutting template and excess tape from the wall.
- Save the cutting template; you will need it for the exterior side of the wall.
Step 7 Cut the Opening
- Drill 1/2-inch (12 mm) holes through the interior wall, just inside the corners of the cutting line.
- These holes will be the pilot holes for the jigsaw blade.
- Using a jigsaw, cut the interior wall between the holes you just drilled, along the cutting line.
Step 8 Insert Interior Frame
- If you used the template for wall installation (without metal), insert the interior frame of the pet door into the opening to check the fit.
- Do not force the interior frame into the opening if it is too tight. If the opening is too small, remove the interior frame and recut or file the opening slightly to enlarge it.
- Once the interior frame fits into the opening, make any necessary adjustments to the opening to ensure the pet door sits level and plumb.
Step 9 Trace Template on Exterior Wall
- You are now ready to work from the exterior wall. Line up the three holes in the cutting template with the three holes you drilled through the wall. Make sure the template is level and then tape it into position.
- Trace the outside edge of the cutting template, making sure to connect the corners. Make sure the cutting line is clearly marked on the wall. Remove the cutting template and excess tape from the wall.
Step 10 Cut Through Exterior Wall
- Drill 1/2-inch (12 mm) holes through the exterior wall, just inside the corners of the cutting line. These holes will be the pilot holes for the jigsaw blade.
- Using a jigsaw, cut the exterior wall between the holes you just drilled, along the cutting line.
Step 11 Insert Tunnel Extension
- If you used the template for wall installation (without metal), insert a tunnel extension into the opening to check the fit.
- Do not force the tunnel extension into the opening if it is too tight. If the opening is too small, remove the tunnel extension and re-cut or file the opening slightly to enlarge it.
- Once the tunnel extension fits into the opening, make any necessary adjustments to the opening to ensure the tunnel extension sits level and plumb.
Step 12 Prepare the Interior Frame
- Fit an installation adaptor over the tunnel of the interior frame. The smooth side of the installation adaptor should face the front.
- Use four short screws to secure the installation adaptor to the back of the interior frame.
- Connect a tunnel extension to the pet door by fitting the lip of the tunnel extension over the tunnel of the pet door.
- Connect additional tunnel extensions as needed.
Step 13 Attach Tunnel Extensions Together
- Test fit the interior frame (with installation adaptor and tunnel extensions attached) in the opening. The last tunnel extension needs to protrude from the wall by at least 1 1/4 inches (33 mm).
- Add or remove tunnel extensions as needed.
- Once you are satisfied that you have connected the appropriate number of tunnel extensions, remove the tunnel extensions from the pet door and use permanent glue to attach the tunnel extensions to one another.
- Attach the tunnel extensions to the interior frame using all-weather tape. Do not glue the tunnel extensions to the interior frame.
Step 14 Insert Interior Frame Into Wall
- Insert the interior pet door assembly (interior frame with attached installation adaptor and tunnel extensions) into the opening in the interior wall.
- If you are installing the pet door within the larger cutout opening (for walls containing metal), make sure the pet door is centered/centred horizontally and vertically in the opening. You can use the spacer provided with the installation adaptors to support the bottom of the tunnel if desired.
- Hold the interior pet door assembly in place and use a pencil to mark the location of the holes for the screws.
- Remove the interior pet door assembly.
- Drill holes in the marked locations, making sure the holes are the appropriate size for the hardware you selected based on your wall construction.
- Replace the interior pet door assembly in the opening and secure it to the wall with appropriate hardware for your construction (not included).
Step 15 Prepare Exterior Frame
- Place the second installation adaptor on a flat surface, smooth side up.
- Install a spire clip in each of the four rectangular holes in the installation adaptor. The flat side of the spire clip should face the front, and the round hole in the spire clip should line up with the round hole in the installation adaptor.
- Place the exterior frame of the pet door on top of the installation adaptor.
- Use four short screws to secure the exterior frame to the installation adaptor
Step 16 Install the Exterior Frame
- On the exterior side of the wall, line up the exterior pet door assembly (exterior frame with attached installation adaptor) with the tunnel of the pet door.
- Hold the exterior pet door assembly in place and use a pencil to mark the location of the holes for the screws.
- Remove the exterior pet door assembly. Drill holes in the marked locations, making sure the holes are the appropriate size for the hardware you selected based on your wall construction.
- Replace the exterior pet door assembly and secure it to the exterior wall with appropriate hardware for your construction (not included).
Step 17 Insert Blanking Plugs
- On the interior side of the wall, insert blanking plugs into the holes in the installation adaptor.
- On the exterior side of the wall, insert blanking plugs into the holes in the exterior frame. These blanking plugs were supplied with the pet door.
- Insert blanking plugs into the holes in the installation adaptor.
- Replace the exterior pet door assembly and secure it to the exterior wall with appropriate hardware for your construction (not included).
Step 18 Caulk Edges of Pet Door
- On the exterior side of the wall, apply exterior-grade caulk around the edges of the installation adaptor and the exterior frame, making sure to leave the weep holes open.
- If there are any gaps larger than 1/4 inch (6 mm), you will need to fill them with foam backer rod or other appropriate material before applying caulk.
- Apply exterior-grade caulk around the edge of the pet door tunnel where it meets the exterior frame.
- Reinstall the batteries in the pet door.
FAQ
I'm concerned about the reviews. Is this the second generation or first generation door?Second generation. There have been many improvements made since the first generation hit the market. We have heard far less in the way of warranty issues in the past few years. |
Is this door microchip compatible?Yes, but it compatible with FDX-B/15 Digit, FDX-A/10 Digit, AVID H, and AVID Encrypted/9 or 15 Digit microchips. Please note that the microchip feature is only for cats using the Medium pet door. |
Is the door compatible with other brand RFID keys or smart dog door collars?No, only the collar key made for this door. |
Can this be installed in a screen door?Mesh screen is usually not strong enough to hold up the PetSafe electronic dog doors as they are much heavier than regular manual doors, so we do not recommend it. Check out our selection of pet doors for screen doors. |
Can the PetSafe Smart Door be installed outside?Electronic doors have inner mechanisms that may be subject to water damage when exposed to the elements, so we do not recommend installing it outside. If installed in an exterior door exposed to the elements, we would recommend also installing some sort of rain cap to minimize extreme weather damage to the door. |
Is the collar smart pet door key waterproof?The collar key is "water resistant" meaning if your dog runs through a sprinkler or jumps in a puddle, it should hold up just fine. There is a seal around the battery to keep the water out, but if your dog is submerged in water long enough, moisture may get in and cause water damage. |
Will this door keep my cat from going out?Generally cats (or any pet without a registered collar key) will not be able to get out by themselves, but you can't say that it is a totally cat proof dog door. However, cats will be cats. If they learn that all they need to do is stick closely to the dog, there is a possibility they will find a way out. |
Can this door be installed in a wall?Yes, you can install this door with a wall adapter.The wall entry uses the same technology and RFID keys. Wall installations have a different cutting template and instructions. |
Do they make a SmartDoor™ Connected Pet Door for bigger dogs?No, the largest model of this door is only 10.8” W x 14.3” H . |
Why won't the collar key open the door anymore?There are multiple factors that could contribute to the door not opening like drained batteries or faulty wiring. For technical issues we would recommend contacting the manufacturer, PetSafe, directly as they would be better able to assist you regarding the door's inner mechanisms. |
Is this good for giant breeds?The PetSafe large pet door is only 10.8" x 14.3", so it would not really be suitable for giant breeds. High Tech Pet makes electronic pet doors large enough for bigger dogs. |
Warranty
Warranty Information:
Radio Systems Corporation is the industry leader in Consumer Pet Electronics; products are marketed under the PetSafe, Innotek, Invisible Fence, Guardian, Staywell, and SportDOG brands. Radio Systems Corporation and its authorized resellers (who display the appropriate sanctioned logos) only sell new products in original packaging. Product represented as used, refurbished, or “as-is”, or not in the original packaging will not be covered by our warranty, or any consumer support.
We are committed to consumer satisfaction. To that end Radio Systems Corp. cautions consumers from purchasing any product other than product in its original packaging or specially marked refurbished packaging.
Proof of Purchase must be provided to our customer care center before a warranty claim can be honored. For your convenience, you may register your product and provide proof of purchase immediately after your purchase. Thereafter, proof of purchase will not be required to fulfill a warranty claim. Products may be registered at www.petsafe.net/register-product. Proof of purchase is accepted via e-mail (receipt@petsafe.net), fax, or traditional mail. Proof of purchase is defined as the sales receipt or copy of the sales receipt.
Fax: 800-332-7942
Mail: Attn: Customer Care Center/POP Radio Systems Corporation 10427 PetSafe Way Knoxville TN 37932
2 Year Non-Transferable Limited Warranty:
What is Covered
Radio Systems Corporation, owner of the PetSafe Brand, (hereinafter referred to as “PetSafe”) warrants to the original retail consumer purchaser, and not any other purchaser or subsequent owner, that its PetSafe product, when subject to normal and proper residential use, will be free from defects in material or workmanship for a period of two (2) years from the purchase date. An “original retail consumer purchaser” is a person or entity who originally purchases the product or a gift recipient of a new product that is unopened and in its original packaging. When serviced by PetSafe Customer Service, PetSafe covers labor and parts for the first year of ownership; after the first year, a service or upgrade charge will apply relative to replacement of the product, with new or refurbished items at PetSafe’s sole discretion. The limited warranty is non-transferable and shall automatically terminate if the original retail consumer purchaser resells the PetSafe product or transfers the property on which the PetSafe product is installed. In the event of defect, these are your exclusive remedies.
Proper Product Use
This product is designed only for use with domesticated animals; do not use this product for any other purpose. However, the specific temperament of your animal may not work with this product. We recommend that you do not use this product if your animal is aggressive. If you are unsure whether this product is appropriate for your animal, please consult with your veterinarian or a certified trainer before you use this product. Please see the instruction manual for additional important information.
What is Not Covered
This non-transferrable limited warranty does not provide protection against, and PetSafe will have no liability under this non-transferrable limited warranty for any damage to or defects in the products caused by any animal, loss of product(s), failure, defect or damage caused by events and situations beyond normal residential exposure conditions, including, but not limited to: commercial use, misuse, abuse, neglect, improper installation or installation not in accordance with PetSafe’s instructions, use of non-PetSafe accessories, impacts of foreign objects, acts of God, abnormal or improper use, improper storage, attempted repair or service by anyone other than PetSafe Customer Service, accident, alteration, defects in or failure of the surface the PetSafe product is installed in or upon, discoloration or other damage caused by pollution, sunlight, other environmental conditions, mold, dirt, mildew, or exposure to harmful chemicals and any other cause not involving manufacturing defects in the PetSafe product. Under no circumstances will PetSafe be liable for any non-PetSafe labor charges or any expenses whatsoever in connection with the removal, repair, or installation of either the original or replacement component(s) relative to in-ground fence installation, kennel installation, pet door installation, and other permanent, semi-permanent, or fixture type installations on the retail consumer purchaser’s property.
Registering the Product
Within thirty (30) days of purchase, please go to www.petsafe.net/register-product to register your purchase. A sales receipt shall be required to obtain warranty coverage. Please keep this information in a safe place.
Making a Warranty Claim
To obtain warranty service, call the PetSafe Customer Care center. In the United States or Canada, 1-800-732-2677; in Australia, 1800 786 608; in New Zealand, 0800 543 054.
Pursuant to this non-transferrable limited warranty, PetSafe will replace the part with a new or refurbished part. This non-transferrable limited warranty will then apply to either the new or refurbished part for the remainder of the original non-transferrable limited warranty period.
Disclaimers
Replacement as provided under this non-transferrable limited warranty is the exclusive remedy of the consumer. Neither labor to remove the part nor labor to install the refurbished or replaced part is covered.
This non-transferrable limited warranty is in lieu of all other express warranties. PetSafe expressly disclaims and excludes all other warranties, express or implied, including without limitation, the warranties of merchantability and fitness for a particular purpose. PetSafe also disclaims and excludes all liability for incidental, consequential, punitive, direct, indirect, special, or any other damages arising out of or connected with the purchase, use, or misuse of this product or for the breach of any express or implied warranties or breach of contract or otherwise. Purchaser assumes all risks and liabilities from the use or misuse of this product. PetSafe does not authorize any other person or agent to make any other express or implied warranties.
Furthermore, PetSafe will not be liable for any loss, damage, or injury resulting from delay in delivery of replacement parts or for any failure by PetSafe to perform covered repair work due to circumstances beyond PetSafe’s control.
Governing Law
This non-transferrable limited warranty shall be governed by the law of the State of Tennessee, U.S.A., and by the laws of the United States of America, excluding their conflicts of laws principles. Furthermore, the United Nations Convention on Contracts for the International Sale of Goods is hereby excluded in its entirety from application to this non-transferrable limited warranty. Jurisdiction and venue shall be exclusive to the courts of Knox County, Tennessee. These warranties give you specific legal rights, and you may also have other rights that vary from state to state or country to country. Some states or countries do not allow the exclusion or limitation of incidental or consequential damages, so the above limitation or exclusion may not apply to you.
Making a Warranty Claim:
If you need assistance or to make a warranty claim, please contact our Customer Care Center for help in troubleshooting and, if necessary, to arrange a warranty repair for your product.
- Choosing a selection results in a full page refresh.
- Press the space key then arrow keys to make a selection.