


Liberty Cat Door Patio Panel


- Fits sliding glass doors from 74" to 96", ensuring a perfect fit for a wide range of door sizes.
- Features energy-efficient safety glass and a magnetic weather-seal flap to maintain indoor comfort all year round.
- Quickly integrates with sliding glass doors without the need for permanent modifications, ideal for renters and homeowners.
- Constructed with high-quality materials, available in aluminum or vinyl frames, and comes with a 3-year warranty.
- Offers both standard and custom height ranges to meet specific needs, enhancing flexibility for various architectural designs.
 Product Details
Product Details
The Liberty Cat Door Patio Panel embodies the ideal balance of form and function, providing a smart, user-friendly solution for cat owners who want to give their cats freedom while preserving their home's aesthetic and thermal efficiency. Designed to integrate smoothly with sliding glass doors, this pet door is perfect for both homes and apartments, thanks to its non-invasive installation process.
Crafted in the USA, the Liberty Cat Door Patio Panel offers a robust construction in both aluminum and vinyl. These materials are selected not only for their durability but also for their ability to complement any home design. The aluminum frame can be installed into tracks at least 1" thick; the vinyl frame requires a track width of at least 1.25".
The door includes a clear vinyl flap that is both lightweight and sturdy. The flap’s magnetic closure enhances its functionality by providing a secure seal that protects against the weather, keeping your home comfortable regardless of the season.
This patio panel is highly customizable, available in a range of standard sizes as well as custom options to ensure a perfect fit for any sliding glass door height between 74" and 96". The spring-loaded mechanism allows for quick, tools-free installation or removal, offering a flexible, temporary cat door solution for homeowners and tenants alike.
Safety is a priority with the Liberty Cat Door, which features a heavy-duty locking cover to prevent unwanted entries. An optional C-Clamp Lock can be added for an extra layer of security, making it a reliable choice for those concerned about maintaining secure access points.
The Liberty Cat Door Patio Panel is more than just a pet door; it is a long-term investment in your home's functionality and your pet's independence, backed by a dedicated support team and a comprehensive 3-year warranty.
Features:
- Versatile Design: Accommodates aluminum sliding glass door tracks at least 1" thick and vinyl sliding door tracks at least 1.25" thick. Unsure what adjustment range to get? Pick the shorter of the two.
- Secure and Durable: Includes a sturdy locking cover and optional C-Clamp Lock for enhanced security, ensuring peace of mind.
- Clear Vinyl Flap: Equipped with a transparent, lightweight flap with magnetic closure, making it easy for cats to use while keeping elements out.
- Aesthetic Integration: Available in white or black to seamlessly blend with any home décor, maintaining the aesthetic integrity of your space.
- Climate Resilient: Engineered to remain flexible and functional even in temperatures as low as 0°F, ensuring durability in various weather conditions.


Size Chart
| Flap Size | Flap Dimension | Step Over Range | Overall Panel Width | Recommended Pet Height |
|---|---|---|---|---|
| Small | 7" w x 8" h | 3" - 5" | 10-3/16" | 9" - 13" |
If your measured track height does not fall within one of the ranges above, we can make a custom height! Custom height option may take up to 4 weeks to special order the glass and build the panel.
Installation Instructions
One-Piece Panel
 Difficulty
Easy
Difficulty
Easy
 Steps
06
Steps
06
 Time Required
0.5 hours
Time Required
0.5 hours
 Sections
02
Sections
02
 Flags
02
Flags
02
Parts
- Panel Pet Door
- Foam Weather Strip
- Center Post Weather Seal Draft Stopper
- Sliding Door C-Clamp Lock
- Screwdriver
Tools
- Flathead Screwdriver
Please read instructions & notes thoroughly before installation.
One-Piece Panel
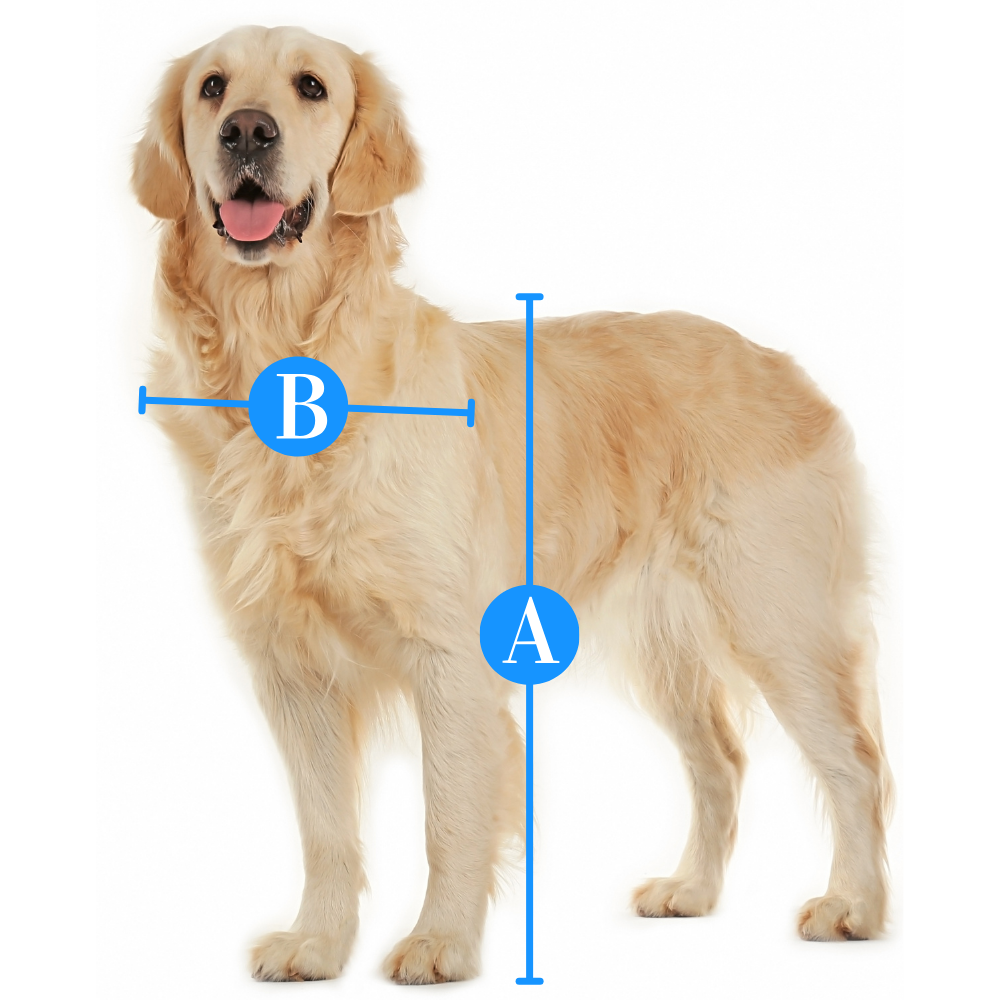
Step 1 Adjust the Step Over (Optional)

- The top of the flap should be positioned to be at least 1” above the top of the pet’s shoulder.
- If the factory setting is not suitable, please adjust it before proceeding. If the current setting is suitable, proceed to the “Installation Instructions” section.
Step 2 Adjust the Screws

- Lay the entire panel on a flat surface.
- Using a #2 flat head screwdriver, remove the bottom side-screws and loosen the upper side-screws. Screws were tightly installed to hold the panel together during shipping; a power tool* is recommended.
Step 3 Adjust the Spacers

- Once the bottom screws have been removed and the upper side-screws loosened, the Pet Door Assembly and spacers can be removed by sliding the sections down and out of the panel.
Step 4 Replace the Spacers

- Replace the spacers and the Pet Door Assembly by sliding them back in a different order to achieve the desired height. You can move the spacer below and above the flap to raise or lower the flap height.
Step 5 Tighten the Screws
- When finished, replace the bottom side-screws and tighten the next upper-side screws.
Step 6 Unlock Spring Mechanism

- Loosen the height adjustment locks at the top of the pet panel with the screwdriver. This allows the spring mechanism to move freely up and down.
Step 7 Test Fit the Panel in Your Track

- To insert the panel into the top track, push up against the spring mechanism and swing the bottom of the panel up and over the threshold.
- Seat the panel on top of the small guide rail in the track.
Step 8 Apply the Weatherstripping


- Once you're sure the panel fits, remove it from the frame and lay it on its side on the ground.
- For foam weatherstripping: Peel the backing off the foam weatherstripping. Press it along both edges of the panel, trimming as needed with scissors to ensure a snug fit.
- For rubber weatherstripping: Clean the edge of your sliding door or window with rubbing alcohol to help the weatherstripping stick properly. Starting at the top or bottom, peel and press the strip into place with the folded edge facing indoors—align angled cuts if you have two pieces. For best results, apply the seal to the sliding door or window, but it can go on the pet door panel if needed.
Step 9 Install the Draft Stopper

- The center post weather seal strip (draft stopper) should be installed on the inside of the home.
- Trim with scissors as needed. Clean the edge of your patio door with rubbing alcohol before installing to assure a good seal.
- Repeat step two to install the panel in your track.
Two-Piece Panel
Difficulty
Easy
Steps
06
Time Required
0.5 hours
 Sections
03
Flags
02
Sections
03
Flags
02
Parts
- Top Glass Panel Section
- Bottom Flap Section
- Foam Weather Strip
- Center Post Weather Seal Draft Stopper
- 4 Flathead Screws
- Flathead Screwdriver
- Screwdriver for Adjustment Locks
- Sliding Door C-Clamp Lock
Tools
- Flathead Screwdriver
Please read instructions & notes thoroughly before installation.
Two-Piece Panel
Step 1 Adjust Step Over Height (Optional)

- The top of the flap should be positioned to be at least 1” above the top of the pet’s shoulder.
- If the factory setting is not suitable, please adjust it before proceeding. If the current setting is suitable, proceed to the “Installation Instructions” section.
Step 2 Rearrange the Pieces (Optional)

- Simply slide the pieces up and out from the bottom half of your panel to rearrange.
- Loosen a bottom screw if the pieces are too snug to move.
Step 3 Reconnect the Pieces (Optional)
- Replace the spacers and the Pet Door Assembly by sliding them back in a different order to achieve the desired height.
- You can move the spacer below or above the flap to raise or lower the flap height.
Step 4 Screw the Pieces Together

- The order of the pieces is important! The piece on the bottom needs to always be at the bottom, as that is where the screws attach. You can now assemble the patio panel!
Step 5 Align the Connectors


- Remove the 2 flat head sectional connector screws from the exposed part of the connector on each side.
- Align the aluminum connectors extending from the bottom flap panel section with the top glass panel section.
- Press the aluminum connectors into the holes at the bottom of the top glass panel section.
- Ensure locking cover & height adjustment locks are on the same side!
Step 6 Tap the Pieces Together

- Gently tap the bottom surface of the panel against the ground to completely insert the connectors.
- Protect hard surfaces to prevent scratching.
- The components of the panel are designed to slide together very tightly.
Step 7 Secure the Sections

- Fasten the two panels together using the four flathead screws.
- Use the included flathead screwdriver to tighten all four flathead screws so the two halves of the door are pulled together.
Step 8 Adjust Spring Mechanism
- Loosen the height adjustment locks at the top of the pet panel. This allows the spring mechanism to move freely up and down.
Step 9 Test Fit the Panel in Your Track
- To insert the panel into the top track, push up against the spring mechanism and swing the bottom of the panel up and over the threshold.
- Seat the panel on top of the small guide rail in the track.
Step 10 Apply the Weatherstripping
- Once you're sure the panel fits, remove it from the frame and lay it on its side on the ground.
- For foam weatherstripping: Peel the backing off the foam weatherstripping. Press it along both edges of the panel, trimming as needed with scissors to ensure a snug fit.
- For rubber weatherstripping: Clean the edge of your sliding door or window with rubbing alcohol to help the weatherstripping stick properly. Starting at the top or bottom, peel and press the strip into place with the folded edge facing indoors—align angled cuts if you have two pieces. For best results, apply the seal to the sliding door or window, but it can go on the pet door panel if needed.
Step 11 Install the Draft Stopper
- The center post weather seal strip (draft stopper) should be installed on the inside of the home.
- Trim with scissors as needed. Clean the edge of your patio door with rubbing alcohol before installing to assure a good seal.
Adjusting Stepover Height
Lock Details

Since you cannot lock your sliding door to your panel pet door, we have provided you with alternative locking methods to secure your home:
Installing the sliding door clamp: This clamp has a screw that tightens by hand to prevent the sliding door from moving beyond the clamp’s placement. For doors manufactured with the glass slider on the inside track, the lock can usually be installed on the door’s raised track.
If you aren’t able to use the lock that comes with the panel: A great alternative to locking your sliding glass door is a Charley bar or dowel in the track. Both work off the same concept – they block the slider from opening. When engaged you cannot pull the sliding door away from the pet door panel.

Other Installation Options
Semi-Permanent Installation:
You might choose to secure the panel in your track with screws. This can be done by drilling screws at an angle in the top and bottom tracks. We recommend doing this from the outside to minimize damage to the sliding glass door frame. One-way screws will prevent tampering or removal of the panel from the outside.

Stationary Panel:
Some stationary sliding door panels can be unfastened and moved over to one side so that you can install the pet door panel between the jamb and stationary panel.
Avoid damaging your sliding glass door by checking that your door can move and that you can reinstall it properly before trying to uninstall the unit.
You will still lose space in your slider to move through, however, you will be able to use your existing sliding door lock to secure your home. Installing your pet door this way is also great in that you already have an alarm system in place.
If your sliding glass door slides on the outside track, using an alternative lock might not be possible, so this allows you to still lock your door.
NOTE: You can do the stationary panel install with the regular spring actuator method – no need to screw it in.
FAQ
Will this fit my vinyl sliding glass door?Yes, but make sure you select the vinyl frame option. Aluminum panels may not perfectly match your vinyl sliding glass door and may cause condensation. |
If I custom order a short version of this panel, could I install it into my window track?While it's possible, a more suitable option would be the Liberty Pet Door for Horizontal Sliding Windows, which is already available in standard window sizes. |
Need to fix a broken flap?You can easily replace a broken flap with the Liberty Pet Door Replacement Flap, designed for quick and straightforward installation. |
How does the door frame adjust to temperature changes?The Liberty Pet Door features an adaptive frame with magnets that adjust their position to accommodate the contraction of the vinyl flap in cold temperatures and its expansion when it's warm, ensuring a consistently tight seal throughout the year. |
What prevents cold air from entering through the pet door?The door is designed with robust magnetic closures and weatherstripping to prevent drafts, creating an efficient barrier against cold air. |
How do I replace the flap?Replacing the flap is simple: remove the old flap by unscrewing it from the adapter, then attach the new flap with screws to ensure your pet's passage is secure and functional. |
Warranty
Warranty Type: Limited.
Duration: 3 years
Coverage: Defects in materials and workmanship under standard regular use.
Exclusions:
Damage caused by misuse or not using the product as intended.
Improper installation.
Damage caused by chewing.
Customer Reviews

Size Chart
| Flap Size | Flap Dimension | Step Over Range | Overall Panel Width | Recommended Pet Height |
|---|---|---|---|---|
| Small | 7" w x 8" h | 3" - 5" | 10-3/16" | 9" - 13" |
If your measured track height does not fall within one of the ranges above, we can make a custom height! Custom height option may take up to 4 weeks to special order the glass and build the panel.
One-Piece Panel
Difficulty
Easy
Steps
06
Time Required
0.5 hours
Sections
02
Flags
02
Parts
- Panel Pet Door
- Foam Weather Strip
- Center Post Weather Seal Draft Stopper
- Sliding Door C-Clamp Lock
- Screwdriver
Tools
- Flathead Screwdriver
Please read instructions & notes thoroughly before installation.
One-Piece Panel
Step 1 Adjust the Step Over (Optional)
- The top of the flap should be positioned to be at least 1” above the top of the pet’s shoulder.
- If the factory setting is not suitable, please adjust it before proceeding. If the current setting is suitable, proceed to the “Installation Instructions” section.
Step 2 Adjust the Screws
- Lay the entire panel on a flat surface.
- Using a #2 flat head screwdriver, remove the bottom side-screws and loosen the upper side-screws. Screws were tightly installed to hold the panel together during shipping; a power tool* is recommended.
Step 3 Adjust the Spacers
- Once the bottom screws have been removed and the upper side-screws loosened, the Pet Door Assembly and spacers can be removed by sliding the sections down and out of the panel.
Step 4 Replace the Spacers
- Replace the spacers and the Pet Door Assembly by sliding them back in a different order to achieve the desired height. You can move the spacer below and above the flap to raise or lower the flap height.
Step 5 Tighten the Screws
- When finished, replace the bottom side-screws and tighten the next upper-side screws.
Step 6 Unlock Spring Mechanism
- Loosen the height adjustment locks at the top of the pet panel with the screwdriver. This allows the spring mechanism to move freely up and down.
Step 7 Test Fit the Panel in Your Track
- To insert the panel into the top track, push up against the spring mechanism and swing the bottom of the panel up and over the threshold.
- Seat the panel on top of the small guide rail in the track.
Step 8 Apply the Weatherstripping
- Once you're sure the panel fits, remove it from the frame and lay it on its side on the ground.
- For foam weatherstripping: Peel the backing off the foam weatherstripping. Press it along both edges of the panel, trimming as needed with scissors to ensure a snug fit.
- For rubber weatherstripping: Clean the edge of your sliding door or window with rubbing alcohol to help the weatherstripping stick properly. Starting at the top or bottom, peel and press the strip into place with the folded edge facing indoors—align angled cuts if you have two pieces. For best results, apply the seal to the sliding door or window, but it can go on the pet door panel if needed.
Step 9 Install the Draft Stopper
- The center post weather seal strip (draft stopper) should be installed on the inside of the home.
- Trim with scissors as needed. Clean the edge of your patio door with rubbing alcohol before installing to assure a good seal.
- Repeat step two to install the panel in your track.
Two-Piece Panel
Difficulty
Easy
Steps
06
Time Required
0.5 hours
Sections
03
Flags
02
Parts
- Top Glass Panel Section
- Bottom Flap Section
- Foam Weather Strip
- Center Post Weather Seal Draft Stopper
- 4 Flathead Screws
- Flathead Screwdriver
- Screwdriver for Adjustment Locks
- Sliding Door C-Clamp Lock
Tools
- Flathead Screwdriver
Please read instructions & notes thoroughly before installation.
Two-Piece Panel
Step 1 Adjust Step Over Height (Optional)
- The top of the flap should be positioned to be at least 1” above the top of the pet’s shoulder.
- If the factory setting is not suitable, please adjust it before proceeding. If the current setting is suitable, proceed to the “Installation Instructions” section.
Step 2 Rearrange the Pieces (Optional)
- Simply slide the pieces up and out from the bottom half of your panel to rearrange.
- Loosen a bottom screw if the pieces are too snug to move.
Step 3 Reconnect the Pieces (Optional)
- Replace the spacers and the Pet Door Assembly by sliding them back in a different order to achieve the desired height.
- You can move the spacer below or above the flap to raise or lower the flap height.
Step 4 Screw the Pieces Together
- The order of the pieces is important! The piece on the bottom needs to always be at the bottom, as that is where the screws attach. You can now assemble the patio panel!
Step 5 Align the Connectors
- Remove the 2 flat head sectional connector screws from the exposed part of the connector on each side.
- Align the aluminum connectors extending from the bottom flap panel section with the top glass panel section.
- Press the aluminum connectors into the holes at the bottom of the top glass panel section.
- Ensure locking cover & height adjustment locks are on the same side!
Step 6 Tap the Pieces Together
- Gently tap the bottom surface of the panel against the ground to completely insert the connectors.
- Protect hard surfaces to prevent scratching.
- The components of the panel are designed to slide together very tightly.
Step 7 Secure the Sections
- Fasten the two panels together using the four flathead screws.
- Use the included flathead screwdriver to tighten all four flathead screws so the two halves of the door are pulled together.
Step 8 Adjust Spring Mechanism
- Loosen the height adjustment locks at the top of the pet panel. This allows the spring mechanism to move freely up and down.
Step 9 Test Fit the Panel in Your Track
- To insert the panel into the top track, push up against the spring mechanism and swing the bottom of the panel up and over the threshold.
- Seat the panel on top of the small guide rail in the track.
Step 10 Apply the Weatherstripping
- Once you're sure the panel fits, remove it from the frame and lay it on its side on the ground.
- For foam weatherstripping: Peel the backing off the foam weatherstripping. Press it along both edges of the panel, trimming as needed with scissors to ensure a snug fit.
- For rubber weatherstripping: Clean the edge of your sliding door or window with rubbing alcohol to help the weatherstripping stick properly. Starting at the top or bottom, peel and press the strip into place with the folded edge facing indoors—align angled cuts if you have two pieces. For best results, apply the seal to the sliding door or window, but it can go on the pet door panel if needed.
Step 11 Install the Draft Stopper
- The center post weather seal strip (draft stopper) should be installed on the inside of the home.
- Trim with scissors as needed. Clean the edge of your patio door with rubbing alcohol before installing to assure a good seal.
Adjusting Stepover Height
Lock Details
Since you cannot lock your sliding door to your panel pet door, we have provided you with alternative locking methods to secure your home:
Installing the sliding door clamp: This clamp has a screw that tightens by hand to prevent the sliding door from moving beyond the clamp’s placement. For doors manufactured with the glass slider on the inside track, the lock can usually be installed on the door’s raised track.
If you aren’t able to use the lock that comes with the panel: A great alternative to locking your sliding glass door is a Charley bar or dowel in the track. Both work off the same concept – they block the slider from opening. When engaged you cannot pull the sliding door away from the pet door panel.
Other Installation Options
Semi-Permanent Installation:
You might choose to secure the panel in your track with screws. This can be done by drilling screws at an angle in the top and bottom tracks. We recommend doing this from the outside to minimize damage to the sliding glass door frame. One-way screws will prevent tampering or removal of the panel from the outside.
Stationary Panel:
Some stationary sliding door panels can be unfastened and moved over to one side so that you can install the pet door panel between the jamb and stationary panel.
Avoid damaging your sliding glass door by checking that your door can move and that you can reinstall it properly before trying to uninstall the unit.
You will still lose space in your slider to move through, however, you will be able to use your existing sliding door lock to secure your home. Installing your pet door this way is also great in that you already have an alarm system in place.
If your sliding glass door slides on the outside track, using an alternative lock might not be possible, so this allows you to still lock your door.
NOTE: You can do the stationary panel install with the regular spring actuator method – no need to screw it in.
FAQ
Will this fit my vinyl sliding glass door?Yes, but make sure you select the vinyl frame option. Aluminum panels may not perfectly match your vinyl sliding glass door and may cause condensation. |
If I custom order a short version of this panel, could I install it into my window track?While it's possible, a more suitable option would be the Liberty Pet Door for Horizontal Sliding Windows, which is already available in standard window sizes. |
Need to fix a broken flap?You can easily replace a broken flap with the Liberty Pet Door Replacement Flap, designed for quick and straightforward installation. |
How does the door frame adjust to temperature changes?The Liberty Pet Door features an adaptive frame with magnets that adjust their position to accommodate the contraction of the vinyl flap in cold temperatures and its expansion when it's warm, ensuring a consistently tight seal throughout the year. |
What prevents cold air from entering through the pet door?The door is designed with robust magnetic closures and weatherstripping to prevent drafts, creating an efficient barrier against cold air. |
How do I replace the flap?Replacing the flap is simple: remove the old flap by unscrewing it from the adapter, then attach the new flap with screws to ensure your pet's passage is secure and functional. |
Warranty
Warranty Type: Limited.
Duration: 3 years
Coverage: Defects in materials and workmanship under standard regular use.
Exclusions:
Damage caused by misuse or not using the product as intended.
Improper installation.
Damage caused by chewing.