


Endura Flap Designer Pro Series Pet Door for Walls


- Complete Installation Kit: Comes with all the supplies you'll need, including the tunnel, to install in any wall up to 16" deep
- Frames Only: Comes with just the frames or flaps; build your own tunnel and use your own supplies
- Integrates smoothly with your wall and trim for a sophisticated, professional appearance.
- Compatible with walls 2" - 15 3/4", using additional materials as needed.
- Offers long-lasting durability and is available in various flap sizes.
- Double-flap system provides optimal insulation and energy efficiency.
- Capable of withstanding 50 mph winds and remain flexible at temperatures as low as -40°F.
- Complete pet door kit for installation in your wall, if you only need the frames with flaps and a locking cover, please order the Builder Series.
 Product Details
Product Details
Upgrade your home's aesthetics while giving your pets the freedom they deserve with the Endura Flap Pet Door Builder Pro Pet Door. Designed for seamless integration with your wall and trim, this pet door delivers a sophisticated, professional finish that complements your home's style. With compatibility for wall thicknesses ranging from 2" to 15 3/4", this pet door offers versatility and adaptability for various wall types.
Featuring a robust aluminum frame, the Builder Pro is built to last, ensuring a perfect fit for pets of all shapes and sizes with its various flap size options. Choose from single or double-flap configurations to achieve the best insulation and energy efficiency, minimizing temperature fluctuations and energy loss in your home.
The specially designed flexible flap material remains functional in harsh weather conditions, withstanding 50 mph winds and temperatures as low as -40°F. The magnetic lining on the flaps creates a secure seal, preventing unwanted drafts or wind intrusions.
With easy installation, a 90-day return policy, and a lifetime warranty, the Endura Flap Pet Door Builder Pro provides peace of mind for your investment. Grant your pets the freedom they crave while enhancing your home's appearance and functionality with this premium pet door solution.
Features:
- Flush design: Creates a clean, polished look that harmonizes with your home's style.
- Heavy-duty aluminum frame: Guarantees long-lasting performance and durability.
- Weather-resistant flap material: Maintains functionality even in extreme weather conditions.
- Magnetic lining: Ensures a secure seal on flaps, preventing drafts or wind intrusions.
- Effortless installation: Comes with a 90-day return policy and a lifetime warranty for added assurance.
Size Chart
- Small Double Flap: 6"w x 10"h
- Medium Double Flap: 8"w x 14"h
- Large Double Flap: 10"w x 18"h
- Extra Large Double Flap: 12"w x 22"h
Flap Dimensions:
Double Flap:6"w x 10"h
The entry way your dog goes through.Outer Frame Dimensions
Outside: 10 1/8"w x 16 3/4"h
Inside: 7 5/8"w x 14 7/8"h
The outer edge of the pet door.


Rough Cut Out:
9 1/4"w x 16 3/8"h
The size of the hole needed to fit your pet door into your wall.Flap Dimensions:
Double Flap:8"w x 14"h
The entry way your dog goes through.Outer Frame Dimensions
Outside: 12 3/16"w x 20 3/4"h
Inside: 9 5/8"w x 18 7/8"h
The outer edge of the pet door. Rough Cut Out:
11 1/4"w x 20 3/8"h
The size of the hole needed to fit your pet door into your wall.Flap Dimensions:
Double Flap:10"w x 18"h
The entry way your dog goes through.Outer Frame Dimensions
Outside: 14 3/16"w x 24 3/4"h
Inside:11 11/16"w x 22 7/8"h
The outer edge of the pet door. Rough Cut Out:
13 3/8"w x 24 3/8"h
The size of the hole needed to fit your pet door into your wall.Flap Dimensions:
Double Flap:12"w x 22"h
The entry way your dog goes through.Outer Frame Dimensions
Outside: 16 1/4"w x 28 7/8"h
Inside: 13 3/4"w x 26 7/8"h
The outer edge of the pet door. Rough Cut Out:
15 3/8"w x 28 3/8"h
The size of the hole needed to fit your pet door into your wall.| Flap Size | Flap Dimension | Flap Style | Rough Cut Out | Outer Dimensions for Inside Frame | Outer Dimensions for Outside Frame | Recommended Pet Height |
|---|---|---|---|---|---|---|
| Small | 6" w x 10" h | Double | 9 1/4" w x 16 3/8" h | 7 5/8"w x 14 7/8"h | 10 1/8"w x 16 3/4"h | 8" - 14" |
| Medium | 8" w x 14" h | Double | 11 1/4" w x 20 3/8" h | 9 5/8"w x 18 7/8"h | 12 3/16"w x 20 3/4"h | 8" - 21" |
| Large | 10" w x 18" h | Double | 13 3/8" w x 24 3/8" | 11 11/16"w x 22 7/8"h | 14 3/16"w x 24 3/4"h | 8" - 27" |
| Extra Large | 12" w x 22" h | Double | 15 3/8" w x 28 3/8" h | 13 ¾"w x 26 7/8"h | 16 1/4"w x 28 7/8"h | 8" - 34" |
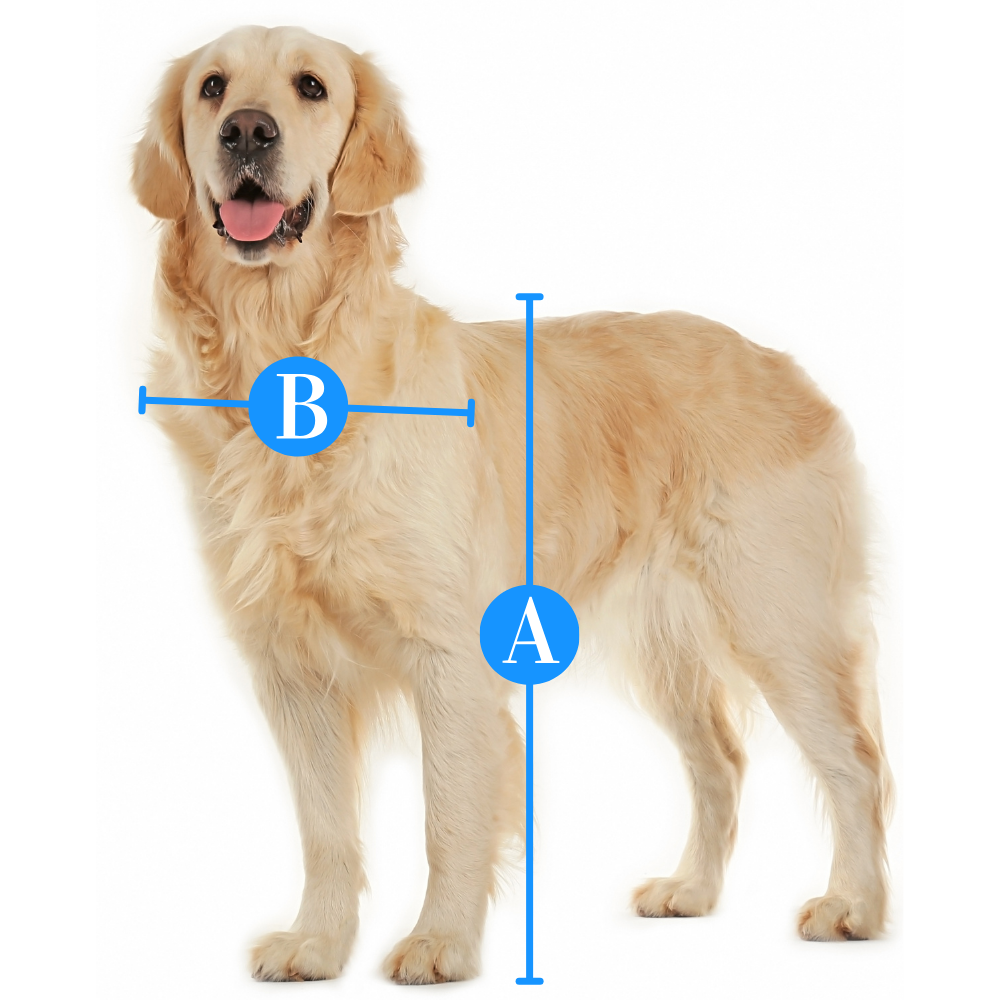
Do not know which size to get? Here is a measurement guide to help you out
Number of Flaps:
- 1 - Single Flap: On inside of wall (same side as locking cover)
- 2 - Double Flap: One on each side. The included dead-air-space and extra flap add significantly to the already considerable insulation and sealing values.
Find The Best Pet Door Size For My Pet

A
Pet Height: inches
B
Pet Width: inches
Installation Instructions

 Printable Version
 Difficulty
 Steps
Steps
 Time Required
 Sections
 Flags
Flags
Parts
- 1 Inside Frame
- 1 Outside Frame
- 4 Wood Tunnel Liners
- Sealing Tunnel Tape
- 8 Short Wood Screws
- 12 Medium Wood Screws
- 4 Long Wood Screws
- 4 Concrete Screws (with pilot drill bit)
- Wood Shims
- 1 Tube of Silicone
- Spray Foam Sealant
- 1 Locking Cover
- 1 Cutout Template
Tools
- Pencil
- Hammer/Mallet
- Caulking Gun
- Measuring Tape
- Electric Drill
- Safety Gear
- Stud Finder
- Drywall Knife (or other for cutting inner wall)
- Saw for Cutting Outer Wall (compatible with your wall material)
- Razorblade (for trimming tape)
- Philips Screwdriver
- Straight edge
- Level
Read instructions & notes thoroughly before installation. We recommend a licensed, bonded and insured contractor do this work.
Step 1 Measure Your Pet

- Measure your pet and make a mark at least 3” above your pet’s height on your wall, this will line up with the top of the cutout.
Step 2 Prepare Wall for Installation


- Find a location clear of plumbing, electrical and other obstructions. If you have stud construction choose a spot against one stud when possible.
- Use the included cutout template to mark out the rough opening in the wall. Make sure your lines are level. This cut out will leave space for the included tunnel material.
- Double check your template dimensions with the chart before cutting into your wall.
Step 3 Make the Rough Cutout

- Cut through your wall with the appropriate tools.
- Remove insulation inside the wall as needed. You can save some to put back into open areas of the wall cavity.
Step 4 Add a Bottom Support Stud

- Add a bottom support stud between the studs in your wall.
- Add any other supports or bracing as needed.
Step 5 Create A Tunnel Liner Box

- Create a tunnel liner box using 1/2" plywood.
Step 6 Draw Cut Line On Tunnel


- Slide tunnel box into opening until the inside of the box is flush or slightly inside the surface of your inner wall. Mark a line all around the box at the outer wall. Remove the box from the wall.
- Relocate the tunnel box screws so they are all within the usable area of the tunnel. Cut off the excess tunnel material line.
- Cut just inside your line to make sure the tunnel does not end up sticking out of the wall after installation. It should be flush or just inside the wall surface on both inside and outside.
Step 7 Attach the Tunnel Liner Box

- Insert the tunnel liner box into the rough cutout opening. Use the provided shims to get the tunnel level and square.
- Use the provided long wood screws and/or concrete screws to attach the tunnel box to a nearby stud, brick, concrete, or bottom support.
- Trim off shims flush to the wall. You can score with a knife then snap them off.
Step 8 Apply Spray Foam Sealant

- Use the spray foam sealant to fill any gaps around the tunnel box.
- Once the sealant dries, trim off any excess.
Step 9a Prepare Tunnel for Sealing Tunnel Tape

- Make sure that the spray foam sealant is dry and that the tunnel area is clean.
- To apply the sealing tunnel tape, start at the middle of the upper tunnel and apply the tape all around the tunnel, ending with a slight overlap at the top. Make sure to press the tape tightly into the corners as you go.
- Once in place, firmly apply pressure all along the tape to activate the adhesive.
Step 9b Apply Sealing Tunnel Tape


- Cut each corner up to the outer wall.
- Fold back each piece of the sealing tape against the outer wall, pressing firmly.
- Apply caulking to the openings in all four corners, sealing the cut area of the tape to the outer wall.
Step 10 Screw in the Frames

- Make sure the four tabs are upright and snug to the inside frame. You may have to loosen the screw to rotate it into place using a Phillips screwdriver.
- Insert the inside frame and level it. While holding the frame flush against the wall, use four wood screws to screw the mounting tabs to the inside of the tunnel.
- If there are larger gaps you can pre-bend the mounting tab toward the tunnel.
Step 11 Install the Outside Frame

- Repeat installation step #10 for the outside frame, making sure the flap(s) swing through both frames without interference.
Step 12 Seal the Inside Frame

- From the outside, apply silicone in the tunnel, around the sides and bottom edges of the inside frame. This will seal the tunnel to prevent water intrusion.
Step 13 Seal the Outside Frame

- Use a sharp razor blade to trim off any excess tunnel tape that is sticking out past the outside frame on all four sides.
- Apply silicone where the outside frame meets the exterior wall on the top and sides, but leave the bottom open to allow for drainage.
Step 14 Add Home Trim

- Add trim to the interior frame to suit your home design.
- Use caulking and paint as desired
Parts
- 1 Inside Frame
- 1 Outside Frame
- 1 Locking Cover
- 1 Cutout Template
Tools
- Pencil
- Hammer/Mallet
- Measuring Tape
- Electric Drill
- Safety Gear
- Stud Finder
- Drywall Knife (or other for cutting inner wall)
- Saw for Cutting Outer Wall (compatible with your wall material)
- Razorblade (for trimming tape)
- Philips Screwdriver
- Straight edge
- Level
Read instructions & notes thoroughly before installation. We recommend a licensed, bonded and insured contractor do this work.
Step 1 Measure Your Pet
- Measure your pet and make a mark at least 3” above your pet’s height on your wall, this will line up with the top of the cutout.
Step 2 Prepare Wall for Installation
- Find a location clear of plumbing, electrical and other obstructions. If you have stud construction choose a spot against one stud when possible.
- Use the included cutout template to mark out the rough opening in the wall. Make sure your lines are level. This cut out will leave space for the tunnel material.
- Double check your template dimensions with the chart before cutting into your wall.
Step 3 Make the Rough Cutout
- Cut through your wall with the appropriate tools.
- Remove insulation inside the wall as needed. You can save some to put back into open areas of the wall cavity.
Step 4 Add a Bottom Support Stud
- Add a bottom support stud between the studs in your wall.
- Add any other supports or bracing as needed.
Step 5 Create A Tunnel Liner Box
- Create a tunnel liner box using 1/2" plywood.
Step 6 Attach the Tunnel Liner Box
- Insert the tunnel liner box into the rough cutout opening. Use shims to get the tunnel level and square.
- Use wood screws and/or concrete screws to attach the tunnel box to a nearby stud, brick, concrete, or bottom support.
- Trim off shims flush to the wall. You can score with a knife then snap them off.
Step 7 Apply Spray Foam Sealant
- If needed, use spray foam sealant to fill any gaps around the tunnel box.
- Once the sealant dries, trim off any excess.
Step 8 Seal the Tunnel
- Use an outdoor rated paint to seal any exposed wood in the tunnel.
Step 9 Screw in the Frames
- Make sure the four tabs are upright and snug to the inside frame. You may have to loosen the screw to rotate it into place using a Phillips screwdriver.
- Insert the inside frame and level it. While holding the frame flush against the wall, use four wood screws to screw the mounting tabs to the inside of the tunnel.
- If there are larger gaps you can pre-bend the mounting tab toward the tunnel.
Step 10 Install the Outside Frame
- Repeat installation step #10 for the outside frame, making sure the flap(s) swing through both frames without interference.
Step 11 Seal the Inside Frame
- From the outside, apply silicone in the tunnel, around the sides and bottom edges of the inside frame. This will seal the tunnel to prevent water intrusion.
Step 12 Seal the Outside Frame

- Apply silicone where the outside frame meets the exterior wall on the top and sides, but leave the bottom open to allow for drainage.
Step 13 Add Home Trim
- Add trim to the interior frame to suit your home design.
- Use caulking and paint as desired
FAQ
I want to get the large pet door for my dog, but I am concerned about a person fitting through an x-large door.All Endura Flap Pet Doors for Walls come with a locking cover. This cover can be used to keep your pet inside by blocking access to the doggie door. It also can be used to keep intruders from entering your home. It is made from a special polymer that is as strong as 1/16 inch sheet of steel. If you need to, you can purchase additional Endura Flap locking covers.Security consultants agree that dogs are a good burglar deterrent, especially one that barks. If you want to leave your pet door open make sure the gate to access your yard is locked and you post a Beware of Dog sign. |
Can a large dog & cat use the same double flap door flaps?Our Endura Flap wall mount pet door has a strong magnetic seal which may be too strong for a cat. However, if you have cats and dogs sharing a door, you can decrease the magnetic resistance of the threshold on large and extra large sizes making it easier for a cat to use. For small or medium pet doors you can offset the magnets slightly which can also decrease the magnetic strength. |
Will my small dog be able to open the flaps on the extra large double flap dog door?It depends on the tenacity of your small dog. With the Endura flap door for walls you can decrease the magnetic resistance of the threshold on large and extra large sizes making it easier for your small dog to use. You will also want to make sure the door is mounted low enough for the small talk to walk through and high enough to clear the large dog's back. |
Is the flap on the interior or exterior frame for single flap model?For the single flap wall mount, the flap is attached to the interior frame. If you live in a very cold climate, we'd recommend the double flap model to keep snow out of the pet door tunnel. |
How do I know what size is best for my dog?When installing the Endura Flap wall door you want it to clear the top of your dog's back by 1-2 inches, minimum. You also want the step over to be comfortable. Lastly you want the width to allow your pet to go through without touching the sides. It's also important to consider step-over when installing dog doors for walls. Here's a measurement guide with tips on how to determine the correct size. |
Are the panels/flaps flexible? Seems like it would trap a dog if it backed up.The Endura Flap dog door for wall has a slightly more rigid flap than other economy style flaps, but it is a safe, soft, flexible flap. It remains flexible in temperatures as low as -40°F. |
Is a single flap doggy door for wall enough for extreme winter weather?A single Endura Flap on an exterior door is extremely energy-efficient and capable of withstanding winds up to 50 mph. It is the only door which allows you to increase the magnetic strength for increased wind resistance. It is recommended for timid pets. The double flap increases the energy-efficiency further. |
Does the door sound very loud when the dog goes in or out?When the wall dog door flap gets to its resting place there is a snapping sound when the magnets employ. This sound let's you know the door is doing its job sealing out the elements and keeping your heated or cooled air inside. |
I do not have to contend with wind or rain, if I buy the single flap version of the wall dog door is it possible to add the second flap in the future?It is possible, but it not simple and can be quite costly. A short explanation is that you will need to buy a new tunnel, outer frame with flap and installation kit. The only item you will keep with your single flap in the wall pet door unit is the interior frame with flap. |
What side does the locking cover slide in?Unlike other Endura Flap pet doors, the locking cover is front loading. It can be used on the inside or outside frame. |
Other brands of pet doors with plastic flaps always warp and thus let in air. How do these flaps hold up over time?The Endura Flap is made with a special polymer called Polyolefin. It remains safe, soft and flexible in temperatures as low as -40°F. It does not yellow nor harden in the sun. The patented magnetic design ensures the door door seals well for years. In fact, the pet door and flap are backed by a Lifetime warranty. |
Are there color options other than white?Yes, they are available in Tan and Bronze (Black). |
I have a dog that I want to let out, but I want to prevent our cats from using it. Can the door be weighted to keep them from using it?You can increase the magnetic strength of your Endura doggie door for walls by purchasing additional magnets from EnduraFlap.com. Some people have found success doing this and keeping their cats inside. |
What material is the tunnel made out of?The tunnel is made of wood. The wood is sealed with sealing tunnel tape and will keep the interior of your wall protected. |
Why is there a difference in flap size for the single versus the double flap models?Since each flap dual walled making them 7/8" thick as the pet pushes through the first flap will actually hit the second flap. This makes it so that there is a loss of about 1" of space a the top as they enter or exit. |
Is the patio pacific Endura Flap large wall mount - double flap large enough for a lab?In general we don't go by breed, however we have multiple dogs here that use that size door to get out to our yard. |
Is the Endura Door for Walls easy to install?Ease of installation is very subjective depending on skill set or access to certain tools that might be needed. The installation of a pet door say into a door is easier than installing it through a wall, however installing it into a door is more complicated than putting a pet door into a sliding door track, so it is also relative to what type of installation method. We recommend a contractor for installations going. |
Can I install this into my door?If you want to install an Endura Flap into a hinged door, then check out the Endura Flap Pet Door for Doors. |
Can this be installed into brick walls?Yes it can! You can find out how using this installing pet doors into brick walls guide. |
Warranty
Patio Pacific Inc Endura Flap Pet Door Lifetime Warranty
The Endura Flap lifetime warranty guarantees that any defective parts returned with proof of purchase will be replaced by the manufacturer for free. This excludes damage caused by accident, improper installation, overuse, or misuse—including damage by pets or glass breakage.
Customer Reviews

Size Chart
- Small Double Flap: 6"w x 10"h
- Medium Double Flap: 8"w x 14"h
- Large Double Flap: 10"w x 18"h
- Extra Large Double Flap: 12"w x 22"h
Flap Dimensions:
Double Flap:6"w x 10"h
The entry way your dog goes through.Outer Frame Dimensions
Outside: 10 1/8"w x 16 3/4"h
Inside: 7 5/8"w x 14 7/8"h
The outer edge of the pet door. Rough Cut Out:
9 1/4"w x 16 3/8"h
The size of the hole needed to fit your pet door into your wall.Flap Dimensions:
Double Flap:8"w x 14"h
The entry way your dog goes through.Outer Frame Dimensions
Outside: 12 3/16"w x 20 3/4"h
Inside: 9 5/8"w x 18 7/8"h
The outer edge of the pet door. Rough Cut Out:
11 1/4"w x 20 3/8"h
The size of the hole needed to fit your pet door into your wall.Flap Dimensions:
Double Flap:10"w x 18"h
The entry way your dog goes through.Outer Frame Dimensions
Outside: 14 3/16"w x 24 3/4"h
Inside:11 11/16"w x 22 7/8"h
The outer edge of the pet door. Rough Cut Out:
13 3/8"w x 24 3/8"h
The size of the hole needed to fit your pet door into your wall.Flap Dimensions:
Double Flap:12"w x 22"h
The entry way your dog goes through.Outer Frame Dimensions
Outside: 16 1/4"w x 28 7/8"h
Inside: 13 3/4"w x 26 7/8"h
The outer edge of the pet door. Rough Cut Out:
15 3/8"w x 28 3/8"h
The size of the hole needed to fit your pet door into your wall.| Flap Size | Flap Dimension | Flap Style | Rough Cut Out | Outer Dimensions for Inside Frame | Outer Dimensions for Outside Frame | Recommended Pet Height |
|---|---|---|---|---|---|---|
| Small | 6" w x 10" h | Double | 9 1/4" w x 16 3/8" h | 7 5/8"w x 14 7/8"h | 10 1/8"w x 16 3/4"h | 8" - 14" |
| Medium | 8" w x 14" h | Double | 11 1/4" w x 20 3/8" h | 9 5/8"w x 18 7/8"h | 12 3/16"w x 20 3/4"h | 8" - 21" |
| Large | 10" w x 18" h | Double | 13 3/8" w x 24 3/8" | 11 11/16"w x 22 7/8"h | 14 3/16"w x 24 3/4"h | 8" - 27" |
| Extra Large | 12" w x 22" h | Double | 15 3/8" w x 28 3/8" h | 13 ¾"w x 26 7/8"h | 16 1/4"w x 28 7/8"h | 8" - 34" |
Do not know which size to get? Here is a measurement guide to help you out
Number of Flaps:
- 1 - Single Flap: On inside of wall (same side as locking cover)
- 2 - Double Flap: One on each side. The included dead-air-space and extra flap add significantly to the already considerable insulation and sealing values.
Find The Best Pet Door Size For My Pet
A
Pet Height: inches
B
Pet Width: inches
Parts
- 1 Inside Frame
- 1 Outside Frame
- 4 Wood Tunnel Liners
- Sealing Tunnel Tape
- 8 Short Wood Screws
- 12 Medium Wood Screws
- 4 Long Wood Screws
- 4 Concrete Screws (with pilot drill bit)
- Wood Shims
- 1 Tube of Silicone
- Spray Foam Sealant
- 1 Locking Cover
- 1 Cutout Template
Tools
- Pencil
- Hammer/Mallet
- Caulking Gun
- Measuring Tape
- Electric Drill
- Safety Gear
- Stud Finder
- Drywall Knife (or other for cutting inner wall)
- Saw for Cutting Outer Wall (compatible with your wall material)
- Razorblade (for trimming tape)
- Philips Screwdriver
- Straight edge
- Level
Read instructions & notes thoroughly before installation. We recommend a licensed, bonded and insured contractor do this work.
Step 1 Measure Your Pet
- Measure your pet and make a mark at least 3” above your pet’s height on your wall, this will line up with the top of the cutout.
Step 2 Prepare Wall for Installation
- Find a location clear of plumbing, electrical and other obstructions. If you have stud construction choose a spot against one stud when possible.
- Use the included cutout template to mark out the rough opening in the wall. Make sure your lines are level. This cut out will leave space for the included tunnel material.
- Double check your template dimensions with the chart before cutting into your wall.
Step 3 Make the Rough Cutout
- Cut through your wall with the appropriate tools.
- Remove insulation inside the wall as needed. You can save some to put back into open areas of the wall cavity.
Step 4 Add a Bottom Support Stud
- Add a bottom support stud between the studs in your wall.
- Add any other supports or bracing as needed.
Step 5 Create A Tunnel Liner Box
- Create a tunnel liner box using 1/2" plywood.
Step 6 Draw Cut Line On Tunnel
- Slide tunnel box into opening until the inside of the box is flush or slightly inside the surface of your inner wall. Mark a line all around the box at the outer wall. Remove the box from the wall.
- Relocate the tunnel box screws so they are all within the usable area of the tunnel. Cut off the excess tunnel material line.
- Cut just inside your line to make sure the tunnel does not end up sticking out of the wall after installation. It should be flush or just inside the wall surface on both inside and outside.
Step 7 Attach the Tunnel Liner Box
- Insert the tunnel liner box into the rough cutout opening. Use the provided shims to get the tunnel level and square.
- Use the provided long wood screws and/or concrete screws to attach the tunnel box to a nearby stud, brick, concrete, or bottom support.
- Trim off shims flush to the wall. You can score with a knife then snap them off.
Step 8 Apply Spray Foam Sealant
- Use the spray foam sealant to fill any gaps around the tunnel box.
- Once the sealant dries, trim off any excess.
Step 9a Prepare Tunnel for Sealing Tunnel Tape
- Make sure that the spray foam sealant is dry and that the tunnel area is clean.
- To apply the sealing tunnel tape, start at the middle of the upper tunnel and apply the tape all around the tunnel, ending with a slight overlap at the top. Make sure to press the tape tightly into the corners as you go.
- Once in place, firmly apply pressure all along the tape to activate the adhesive.
Step 9b Apply Sealing Tunnel Tape
- Cut each corner up to the outer wall.
- Fold back each piece of the sealing tape against the outer wall, pressing firmly.
- Apply caulking to the openings in all four corners, sealing the cut area of the tape to the outer wall.
Step 10 Screw in the Frames
- Make sure the four tabs are upright and snug to the inside frame. You may have to loosen the screw to rotate it into place using a Phillips screwdriver.
- Insert the inside frame and level it. While holding the frame flush against the wall, use four wood screws to screw the mounting tabs to the inside of the tunnel.
- If there are larger gaps you can pre-bend the mounting tab toward the tunnel.
Step 11 Install the Outside Frame
- Repeat installation step #10 for the outside frame, making sure the flap(s) swing through both frames without interference.
Step 12 Seal the Inside Frame
- From the outside, apply silicone in the tunnel, around the sides and bottom edges of the inside frame. This will seal the tunnel to prevent water intrusion.
Step 13 Seal the Outside Frame
- Use a sharp razor blade to trim off any excess tunnel tape that is sticking out past the outside frame on all four sides.
- Apply silicone where the outside frame meets the exterior wall on the top and sides, but leave the bottom open to allow for drainage.
Step 14 Add Home Trim
- Add trim to the interior frame to suit your home design.
- Use caulking and paint as desired
Parts
- 1 Inside Frame
- 1 Outside Frame
- 1 Locking Cover
- 1 Cutout Template
Tools
- Pencil
- Hammer/Mallet
- Measuring Tape
- Electric Drill
- Safety Gear
- Stud Finder
- Drywall Knife (or other for cutting inner wall)
- Saw for Cutting Outer Wall (compatible with your wall material)
- Razorblade (for trimming tape)
- Philips Screwdriver
- Straight edge
- Level
Read instructions & notes thoroughly before installation. We recommend a licensed, bonded and insured contractor do this work.
Step 1 Measure Your Pet
- Measure your pet and make a mark at least 3” above your pet’s height on your wall, this will line up with the top of the cutout.
Step 2 Prepare Wall for Installation
- Find a location clear of plumbing, electrical and other obstructions. If you have stud construction choose a spot against one stud when possible.
- Use the included cutout template to mark out the rough opening in the wall. Make sure your lines are level. This cut out will leave space for the tunnel material.
- Double check your template dimensions with the chart before cutting into your wall.
Step 3 Make the Rough Cutout
- Cut through your wall with the appropriate tools.
- Remove insulation inside the wall as needed. You can save some to put back into open areas of the wall cavity.
Step 4 Add a Bottom Support Stud
- Add a bottom support stud between the studs in your wall.
- Add any other supports or bracing as needed.
Step 5 Create A Tunnel Liner Box
- Create a tunnel liner box using 1/2" plywood.
Step 6 Attach the Tunnel Liner Box
- Insert the tunnel liner box into the rough cutout opening. Use shims to get the tunnel level and square.
- Use wood screws and/or concrete screws to attach the tunnel box to a nearby stud, brick, concrete, or bottom support.
- Trim off shims flush to the wall. You can score with a knife then snap them off.
Step 7 Apply Spray Foam Sealant
- If needed, use spray foam sealant to fill any gaps around the tunnel box.
- Once the sealant dries, trim off any excess.
Step 8 Seal the Tunnel
- Use an outdoor rated paint to seal any exposed wood in the tunnel.
Step 9 Screw in the Frames
- Make sure the four tabs are upright and snug to the inside frame. You may have to loosen the screw to rotate it into place using a Phillips screwdriver.
- Insert the inside frame and level it. While holding the frame flush against the wall, use four wood screws to screw the mounting tabs to the inside of the tunnel.
- If there are larger gaps you can pre-bend the mounting tab toward the tunnel.
Step 10 Install the Outside Frame
- Repeat installation step #10 for the outside frame, making sure the flap(s) swing through both frames without interference.
Step 11 Seal the Inside Frame
- From the outside, apply silicone in the tunnel, around the sides and bottom edges of the inside frame. This will seal the tunnel to prevent water intrusion.
Step 12 Seal the Outside Frame
- Apply silicone where the outside frame meets the exterior wall on the top and sides, but leave the bottom open to allow for drainage.
Step 13 Add Home Trim
- Add trim to the interior frame to suit your home design.
- Use caulking and paint as desired
FAQ
I want to get the large pet door for my dog, but I am concerned about a person fitting through an x-large door.All Endura Flap Pet Doors for Walls come with a locking cover. This cover can be used to keep your pet inside by blocking access to the doggie door. It also can be used to keep intruders from entering your home. It is made from a special polymer that is as strong as 1/16 inch sheet of steel. If you need to, you can purchase additional Endura Flap locking covers.Security consultants agree that dogs are a good burglar deterrent, especially one that barks. If you want to leave your pet door open make sure the gate to access your yard is locked and you post a Beware of Dog sign. |
Can a large dog & cat use the same double flap door flaps?Our Endura Flap wall mount pet door has a strong magnetic seal which may be too strong for a cat. However, if you have cats and dogs sharing a door, you can decrease the magnetic resistance of the threshold on large and extra large sizes making it easier for a cat to use. For small or medium pet doors you can offset the magnets slightly which can also decrease the magnetic strength. |
Will my small dog be able to open the flaps on the extra large double flap dog door?It depends on the tenacity of your small dog. With the Endura flap door for walls you can decrease the magnetic resistance of the threshold on large and extra large sizes making it easier for your small dog to use. You will also want to make sure the door is mounted low enough for the small talk to walk through and high enough to clear the large dog's back. |
Is the flap on the interior or exterior frame for single flap model?For the single flap wall mount, the flap is attached to the interior frame. If you live in a very cold climate, we'd recommend the double flap model to keep snow out of the pet door tunnel. |
How do I know what size is best for my dog?When installing the Endura Flap wall door you want it to clear the top of your dog's back by 1-2 inches, minimum. You also want the step over to be comfortable. Lastly you want the width to allow your pet to go through without touching the sides. It's also important to consider step-over when installing dog doors for walls. Here's a measurement guide with tips on how to determine the correct size. |
Are the panels/flaps flexible? Seems like it would trap a dog if it backed up.The Endura Flap dog door for wall has a slightly more rigid flap than other economy style flaps, but it is a safe, soft, flexible flap. It remains flexible in temperatures as low as -40°F. |
Is a single flap doggy door for wall enough for extreme winter weather?A single Endura Flap on an exterior door is extremely energy-efficient and capable of withstanding winds up to 50 mph. It is the only door which allows you to increase the magnetic strength for increased wind resistance. It is recommended for timid pets. The double flap increases the energy-efficiency further. |
Does the door sound very loud when the dog goes in or out?When the wall dog door flap gets to its resting place there is a snapping sound when the magnets employ. This sound let's you know the door is doing its job sealing out the elements and keeping your heated or cooled air inside. |
I do not have to contend with wind or rain, if I buy the single flap version of the wall dog door is it possible to add the second flap in the future?It is possible, but it not simple and can be quite costly. A short explanation is that you will need to buy a new tunnel, outer frame with flap and installation kit. The only item you will keep with your single flap in the wall pet door unit is the interior frame with flap. |
What side does the locking cover slide in?Unlike other Endura Flap pet doors, the locking cover is front loading. It can be used on the inside or outside frame. |
Other brands of pet doors with plastic flaps always warp and thus let in air. How do these flaps hold up over time?The Endura Flap is made with a special polymer called Polyolefin. It remains safe, soft and flexible in temperatures as low as -40°F. It does not yellow nor harden in the sun. The patented magnetic design ensures the door door seals well for years. In fact, the pet door and flap are backed by a Lifetime warranty. |
Are there color options other than white?Yes, they are available in Tan and Bronze (Black). |
I have a dog that I want to let out, but I want to prevent our cats from using it. Can the door be weighted to keep them from using it?You can increase the magnetic strength of your Endura doggie door for walls by purchasing additional magnets from EnduraFlap.com. Some people have found success doing this and keeping their cats inside. |
What material is the tunnel made out of?The tunnel is made of wood. The wood is sealed with sealing tunnel tape and will keep the interior of your wall protected. |
Why is there a difference in flap size for the single versus the double flap models?Since each flap dual walled making them 7/8" thick as the pet pushes through the first flap will actually hit the second flap. This makes it so that there is a loss of about 1" of space a the top as they enter or exit. |
Is the patio pacific Endura Flap large wall mount - double flap large enough for a lab?In general we don't go by breed, however we have multiple dogs here that use that size door to get out to our yard. |
Is the Endura Door for Walls easy to install?Ease of installation is very subjective depending on skill set or access to certain tools that might be needed. The installation of a pet door say into a door is easier than installing it through a wall, however installing it into a door is more complicated than putting a pet door into a sliding door track, so it is also relative to what type of installation method. We recommend a contractor for installations going. |
Can I install this into my door?If you want to install an Endura Flap into a hinged door, then check out the Endura Flap Pet Door for Doors. |
Can this be installed into brick walls?Yes it can! You can find out how using this installing pet doors into brick walls guide. |
Warranty
Patio Pacific Inc Endura Flap Pet Door Lifetime Warranty
The Endura Flap lifetime warranty guarantees that any defective parts returned with proof of purchase will be replaced by the manufacturer for free. This excludes damage caused by accident, improper installation, overuse, or misuse—including damage by pets or glass breakage.