


Cat Mate 360 Microchip Cat Flap


- Secure and selective access: Cat Mate 360 Microchip Cat Flap ensures only your microchipped cats can enter your home
- Wide compatibility: Works with most common US microchips, including 15-digit ISO, AVIDXX, and AVID Encrypted
- Easy installation: Fits doors 1/8" to 3-3/8" thick, with a wall-mounted option available through an adapter kit
- Manual 4-way lock: Provides complete control over your cat's access, with locked, unlocked, in-only, and out-only settings
- Energy-efficient design: Features magnetic closure and fluffy weather stripping for insulation, and operates on 4 x AA batteries (not included)
 Product Details
Product Details
The Cat Mate 360 Microchip Cat Flap offers a cost-effective and practical solution for keeping strays out and providing your microchipped cats with controlled access to your home. With compatibility for most US microchips, you can ensure only your feline friends enter your home, while keeping unwanted visitors outside.
Installation is a breeze, as the Cat Mate 360 fits doors with thicknesses ranging from 1/8" to 3-3/8". If you prefer a wall-mounted option, an adapter kit can be purchased separately.
This cat flap is designed for households with multiple cats, as it allows you to program up to 30 microchips. For cats without microchips, the Cat Mate RFID Disk Collar Key can be used, which attaches to your cat's existing collar.
The manual 4-way rotary lock provides complete control over your cats' access, allowing you to choose between locked, unlocked, in-only, or out-only settings. The tinted, transparent Polypropylene flap ensures your cats can see through and feel comfortable using the door. The magnetic closure and fluffy weather stripping offer maximum insulation, keeping your home draft-free and cozy.
Powered by 4 x AA batteries (not included), the Cat Mate 360 Microchip Cat Flap lasts approximately 12 months before needing a battery replacement. This energy-efficient design makes it an ideal choice for conscientious pet parents.
The Cat Mate 360 Microchip Cat Flap gives you peace of mind knowing your home is safe from strays and your cats have controlled access to the outdoors. Invest in this innovative and secure solution to enhance your cats' freedom and your home's security.
Features:
- Programmable for up to 30 cats: Easily register your cats' microchips with the LED indicator for quick setup
- RFID Disk Collar Key option: For cats without microchips, use Cat Mate RFID Disk Collar Key that attaches to your cat's existing collar
- Tinted transparent flap: Cats can see through the Polypropylene flap for comfortable use
- Battery life: 4 x AA batteries last approximately 12 months before needing replacement
- Prevents strays from entering: Keep your home safe from unwanted feline visitors with selective entry technology
Size Chart
- Cat Mate 360 Microchip Cat Flap5 3/4"w x 6"h
Flap Dimensions:
5 3/4"w x 6"h
The entry way your dog goes through.Outside Frame Dimensions
7 3/4"w x 9 9/16"h
The outer edge of the pet door.


Rough Cut Out:
6 7/8"w x 7 3/4"h
The size of the hole needed to fit your pet door into your door.Flap Dimensions:
5 3/4"w x 6"h
The entry way your dog goes through.Outside Frame Dimensions
7 3/4"w x 9 9/16"h
The outer edge of the pet door.


Rough Cut Out:
6 7/8"w x 7 3/4"h
The size of the hole needed to fit your pet door into your door.Flap Dimensions:
5 3/4"w x 6"h
The entry way your dog goes through.Outside Frame Dimensions
7 3/4"w x 9 9/16"h
The outer edge of the pet door.


Rough Cut Out:
6 7/8"w x 7 3/4"h
The size of the hole needed to fit your pet door into your door.Flap Dimensions:
5 3/4"w x 6"h
The entry way your dog goes through.Outside Frame Dimensions
7 3/4"w x 9 9/16"h
The outer edge of the pet door.


Rough Cut Out:
6 7/8"w x 7 3/4"h
The size of the hole needed to fit your pet door into your door.| Flap Model | Flap Size | Flap Dimension | Rough Cut Out | Outside Frame | Recommended Pet Height |
|---|---|---|---|---|---|
| 360 Microchip Cat Flap | Cat Flap | 5 3/4” w x 6” h | 6 7/8” w x 7 3/4” h | 7 3/4” w x 9 9/16” h | 4" - 9" |
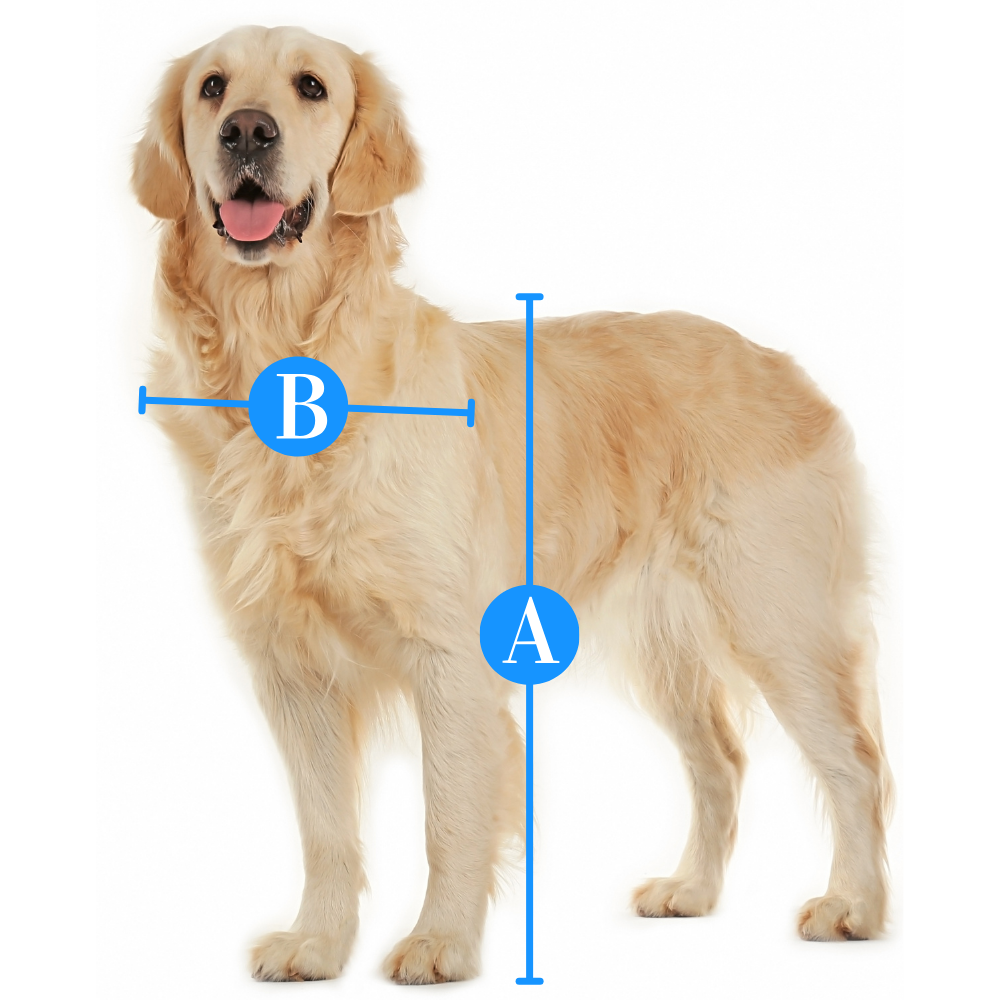
Not sure if this is the correct flap size? Here is a measurement guide to help you out.
Installation Instructions
Doors and Panels

 Difficulty
Moderate
Difficulty
Moderate
 Steps
03
Steps
03
 Time Required
1-2 hours
Time Required
1-2 hours
 Sections
01
Sections
01
 Flags
00
Flags
00
Parts
- Interior Frame
- Exterior Frame
- Screws
- Screw Covers
Tools
- Jigsaw
- Pencil
- Screwdriver
Read the following important notes prior to installing the pet door:
1. It is crucial that you program all of your pets to the door before installing the pet door or making a cut-out. Test to make sure that the chip triggers the door properly as the pet passes through the flap.
2. Do not cut into the tunnel on the flap frame. This will damage the sensor, causing the door to malfunction.
3. For any metal door you will need to re-tune the cat flap after installation.
Step 1 Wood/Plastic Doors and Panels Installation
- Make sure that the bottom of the template is about level with your pet’s stomach. You can place it lower if you would like. If you choose to place it lower, make sure that it is not too low that it compromises the structural soundness of the door/panel or forces your pet to stoop when in use.
- Use the exterior frame as the template for the cut-out. Place the frame on the panel and trace around the outside TUNNEL part of the frame.
- Check that the line for the rough cut is level before making the cut-out. It is very important to cut the hole even and level. If it is not cut correctly the flap will not open and close correctly after installation. The actual cut should be 1/16” of an inch OUTSIDE the line from the first step.
- To test that the door will swing properly, dry fit the frames in the cut-out.
Step 2 Thin Panels 1/8” to 1” Thick
- Mark the 4 screw holes using the OUTSIDE frame (the one without the flap) on the exterior side of the panel.
- Remove it and drill out holes ¼” in diameter. Check to make sure they are level.
- If your door or panel is less than ½”, you will need to trim down the liner on the OUTSIDE frame using a hacksaw or plastic cutting disk.
- Install the weather strip in the small channel on the back of the frame.
- Fix the exterior frame to the outside of the door and screw the interior frame on from the inside. Use the 1½” screws to attach them.
- Check that the door is working then install the screw covers.
Step 3 Doors or Panels 1” to 3-3/8” Thick
- Drill out the screw holes on the INTERIOR frame (this will be the frame with the flap). The holes should be 3/16” diameter, check to make sure they are level.
- Next, there is a small channel in the frame on the back where you need to install the weather seal strip.
- Using the ½” screws to attach the exterior frame to the outside of the door/panel.
- Now use the 7/8” screws to attach the inside frame to the interior of the door/panel.
- Check that the door is working, then tap in the screw covers.
FAQ
Does this door need my cat's microchip to work?The Cat Mate Microchip cat flap is made for cats who do not wear collars, but for cats who are not microchipped, there are Cat Mate i.d. discs available. Simply attach them to your cat's collar, and the locking system will be able to detect when your cat wants to use the dog door. |
Where does the LCD display show the exit lock status?This Pet Mate door uses a rotary lock to control its setting. If you want a cat door that uses an LCD display, check out the Cat Mate Elite Microchip cat flap. |
Does this door have timer control?Nope! If you want a door that does have a timer setting, check out the Sureflap DualScan cat door. |
Can I install this door into a wall? Into glass panels?Yes, but if your wall is more than 2" thick, you will need the Cat Mate Elite wall liner and tunnel extensions, which will create a water and draft-proof seal between your frame and the wall. Unfortunately, Cat Mate cat doors cannot be installed into glass doors or panels. The Sureflap Microchip cat flap can be installed into glass if you use their mounting adaptor. |
Warranty
Cat Mate/ Dog Mate/ Ani Mate 3 Year Limited Warranty
Guarantees your purchase for a period of three years from the date of original purchase against any defect arising due to faulty materials or manufacture. Accordingly, any defective item will be repaired free of charge or replaced at the manufacturer’s option provided that the defect has not been caused by neglect, misuse, or normal wear and tear and proof of purchase date is supplied. Your statutory rights are not affected.
Customer Reviews

Size Chart
- Cat Mate 360 Microchip Cat Flap5 3/4"w x 6"h
Flap Dimensions:
5 3/4"w x 6"h
The entry way your dog goes through.Outside Frame Dimensions
7 3/4"w x 9 9/16"h
The outer edge of the pet door. Rough Cut Out:
6 7/8"w x 7 3/4"h
The size of the hole needed to fit your pet door into your door.Flap Dimensions:
5 3/4"w x 6"h
The entry way your dog goes through.Outside Frame Dimensions
7 3/4"w x 9 9/16"h
The outer edge of the pet door. Rough Cut Out:
6 7/8"w x 7 3/4"h
The size of the hole needed to fit your pet door into your door.Flap Dimensions:
5 3/4"w x 6"h
The entry way your dog goes through.Outside Frame Dimensions
7 3/4"w x 9 9/16"h
The outer edge of the pet door. Rough Cut Out:
6 7/8"w x 7 3/4"h
The size of the hole needed to fit your pet door into your door.Flap Dimensions:
5 3/4"w x 6"h
The entry way your dog goes through.Outside Frame Dimensions
7 3/4"w x 9 9/16"h
The outer edge of the pet door. Rough Cut Out:
6 7/8"w x 7 3/4"h
The size of the hole needed to fit your pet door into your door.| Flap Model | Flap Size | Flap Dimension | Rough Cut Out | Outside Frame | Recommended Pet Height |
|---|---|---|---|---|---|
| 360 Microchip Cat Flap | Cat Flap | 5 3/4” w x 6” h | 6 7/8” w x 7 3/4” h | 7 3/4” w x 9 9/16” h | 4" - 9" |
Not sure if this is the correct flap size? Here is a measurement guide to help you out.
Doors and Panels
Difficulty
Moderate
Steps
03
Time Required
1-2 hours
Sections
01
Flags
00
Parts
- Interior Frame
- Exterior Frame
- Screws
- Screw Covers
Tools
- Jigsaw
- Pencil
- Screwdriver
Read the following important notes prior to installing the pet door:
1. It is crucial that you program all of your pets to the door before installing the pet door or making a cut-out. Test to make sure that the chip triggers the door properly as the pet passes through the flap.
2. Do not cut into the tunnel on the flap frame. This will damage the sensor, causing the door to malfunction.
3. For any metal door you will need to re-tune the cat flap after installation.
Step 1 Wood/Plastic Doors and Panels Installation
- Make sure that the bottom of the template is about level with your pet’s stomach. You can place it lower if you would like. If you choose to place it lower, make sure that it is not too low that it compromises the structural soundness of the door/panel or forces your pet to stoop when in use.
- Use the exterior frame as the template for the cut-out. Place the frame on the panel and trace around the outside TUNNEL part of the frame.
- Check that the line for the rough cut is level before making the cut-out. It is very important to cut the hole even and level. If it is not cut correctly the flap will not open and close correctly after installation. The actual cut should be 1/16” of an inch OUTSIDE the line from the first step.
- To test that the door will swing properly, dry fit the frames in the cut-out.
Step 2 Thin Panels 1/8” to 1” Thick
- Mark the 4 screw holes using the OUTSIDE frame (the one without the flap) on the exterior side of the panel.
- Remove it and drill out holes ¼” in diameter. Check to make sure they are level.
- If your door or panel is less than ½”, you will need to trim down the liner on the OUTSIDE frame using a hacksaw or plastic cutting disk.
- Install the weather strip in the small channel on the back of the frame.
- Fix the exterior frame to the outside of the door and screw the interior frame on from the inside. Use the 1½” screws to attach them.
- Check that the door is working then install the screw covers.
Step 3 Doors or Panels 1” to 3-3/8” Thick
- Drill out the screw holes on the INTERIOR frame (this will be the frame with the flap). The holes should be 3/16” diameter, check to make sure they are level.
- Next, there is a small channel in the frame on the back where you need to install the weather seal strip.
- Using the ½” screws to attach the exterior frame to the outside of the door/panel.
- Now use the 7/8” screws to attach the inside frame to the interior of the door/panel.
- Check that the door is working, then tap in the screw covers.
FAQ
Does this door need my cat's microchip to work?The Cat Mate Microchip cat flap is made for cats who do not wear collars, but for cats who are not microchipped, there are Cat Mate i.d. discs available. Simply attach them to your cat's collar, and the locking system will be able to detect when your cat wants to use the dog door. |
Where does the LCD display show the exit lock status?This Pet Mate door uses a rotary lock to control its setting. If you want a cat door that uses an LCD display, check out the Cat Mate Elite Microchip cat flap. |
Does this door have timer control?Nope! If you want a door that does have a timer setting, check out the Sureflap DualScan cat door. |
Can I install this door into a wall? Into glass panels?Yes, but if your wall is more than 2" thick, you will need the Cat Mate Elite wall liner and tunnel extensions, which will create a water and draft-proof seal between your frame and the wall. Unfortunately, Cat Mate cat doors cannot be installed into glass doors or panels. The Sureflap Microchip cat flap can be installed into glass if you use their mounting adaptor. |
Warranty
Cat Mate/ Dog Mate/ Ani Mate 3 Year Limited Warranty
Guarantees your purchase for a period of three years from the date of original purchase against any defect arising due to faulty materials or manufacture. Accordingly, any defective item will be repaired free of charge or replaced at the manufacturer’s option provided that the defect has not been caused by neglect, misuse, or normal wear and tear and proof of purchase date is supplied. Your statutory rights are not affected.