


Ideal Designer Series Ruff Weather Dog Door and Wall Mount Kit


- Highly Insulating Double-Flap Design: Ideal for walls in temperate, three-season climates with excellent sealing and wind resistance
- Four Sizes Available: Small, medium, extra-large, and super large options cater to pets of all sizes
- Telescoping Tunnel: Fits wall thicknesses of 4-3/4" - 5-1/4" or 6-3/4" - 7-1/4" for versatile installation
- Locking Cover: Enhances security and can be placed on either side of the frame for added peace of mind
- Easy Installation: Comes with template and wall hardware for effortless setup
 Product Details
Product Details
Enhance your pet's comfort and your home's energy efficiency with the Ideal Designer Series Ruff Weather Dog Door and Wall Mount Kit. Designed for walls in temperate, three-season climates, this highly insulating double-flap pet door offers excellent sealing and wind resistance, ensuring that heat stays out in summer and cold stays out in winter.
Available in small, medium, extra-large, and super large sizes, this dog door caters to pets of all sizes. The telescoping tunnel fits wall thicknesses of 4-3/4" - 5-1/4" or 6-3/4" - 7-1/4", providing versatile installation options. The durable 3" thick plastic frame is built to withstand rough climates and extended use, making it a reliable and long-lasting solution for your pet's needs.
Tinted vinyl flaps surrounded by brush weatherstripping not only provide optimal insulation, but also maintain their effectiveness even after years of use in harsh environments. The sliding locking cover, compatible with both interior and exterior frames, offers flexible security options and peace of mind.
Installation is made simple with the included template and wall hardware, allowing you to set up your pet door with ease.
Upgrade your pet's lifestyle and your home's energy efficiency with this top-of-the-line pet door solution today.
Features:
- Energy Efficiency: Tinted vinyl flaps surrounded by brush weatherstripping ensure optimal insulation
- Durable Construction: 3" thick plastic frame designed for extended use and rough climates
- Flexible Security: Sliding locking cover compatible with both interior and exterior frames
- Accommodates Various Pets: Variety of flap sizes designed for pets of all sizes
- Long-Lasting Performance: Maintains effectiveness even after years of use in harsh environments
Size Chart
- Small 5"w x 9"h
- Medium 7 1/4"w x 13"h
- Extra Large 9 3/4"w x 17"h
- Super Large 15"w x 23 1/2"h
Flap Dimensions:
5"w x 9"h
The entry way your dog goes through.Outside Frame Dimensions
9 1/16"w x 13 3/8"h
The outer edge of the pet door.


Rough Cut Out:
6 1/2"w x 11 1/4"h
The size of the hole needed to fit your pet door into your door.Flap Dimensions:
7 1/4"w x 13"h
The entry way your dog goes through.Outside Frame Dimensions
11 3/8"w x 17 1/2"h
The outer edge of the pet door. Rough Cut Out:
8 1/2"w x 15 1/4"h
The size of the hole needed to fit your pet door into your door.Flap Dimensions:
9 3/4"w x 17"h
The entry way your dog goes through.Outside Frame Dimensions
13 15/16"w x 21 5/8"h
The outer edge of the pet door.


Rough Cut Out:
11 1/4"w x 19 1/2"h
The size of the hole needed to fit your pet door into your door.Flap Dimensions:
15"w x 23 1/2"h
The entry way your dog goes through.Outside Frame Dimensions
19"w x 28 1/8"h
The outer edge of the pet door.


Rough Cut Out:
16 1/4"w x 26"h
The size of the hole needed to fit your pet door into your door.| Size | Flap Dimension | Rough Cut Out | Outside Frame Dimension | Recommended Pet Height |
|---|---|---|---|---|
| Small | 5" w x 9" h | 6 1⁄2" w x 11 1⁄4" h | 9 1⁄16" w x 13 3⁄8" h | 7" - 13" |
| Medium | 7 1⁄4" w x 13" h | 8 1⁄2" w x 15 1⁄4" h | 11 3⁄8" w x 17 1⁄2" h | 7" - 19" |
| Extra Large | 9 3⁄4" w x 17" h | 11 1⁄4" w x 19 1⁄2" h | 13 15⁄16" w x 21 5⁄8" h | 7" - 26" |
| Super Large | 15" w x 23 1⁄2" h | 16 1⁄4" w x 26" h | 19" w x 28 1⁄8" h | 7" - 36" |
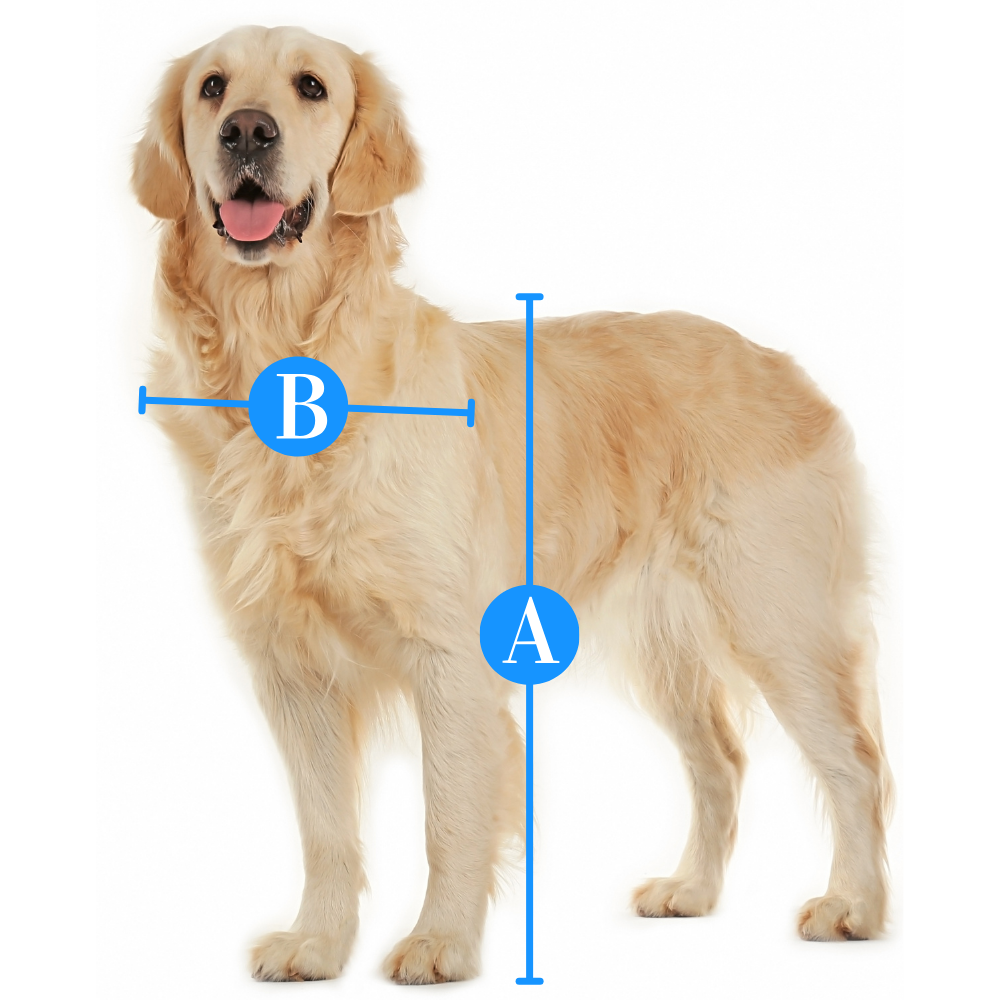
Do not know which flap size to get? Here is a measurement guide to help you out
Replacement Flaps at available at Ideal Ruff Weather and Protector Replacements.
Installation Instructions
See the "Videos" section below for parts 1-3 videos.
 Difficulty
Moderate
Difficulty
Moderate
 Steps
06
Steps
06
 Time Required
1 - 2 hours
Time Required
1 - 2 hours
 Sections
01
Sections
01
 Flags
01
Flags
01
Parts
- Installation Template
- Outer Frame
- Inner Frame
- 1/4" x 9-1/2" Screws
- 6 Wall Kit Panel Sections
- Locking Cover
Tools
- Tape Measure
- Level
- Pencil
- Hammer and Nails
- Electric Drill with ½" Regular Drill Bit
- 3/8" Drill Bits
- Saber Saw
- Electric Screwdriver with Phillips Bit
- Safety Goggles
- Vice Grips
- A Second Person
- Silicon Caulking (not supplied)
See the "Videos" section of this page for parts 1-3 of the installation guide video. Please read instructions & notes thoroughly before installation. Make sure to take extreme care when cutting / drilling through walls to avoid gas, electric, and plumbing lines. Use the template and instructions provided with the door to accurately cut the opening.
Step 1 Assemble the Wall Kit

- First, measure the thickness of the wall you will be cutting through. For walls measuring 6 ¾" to 7 ¼", use the wall kit as it is. For walls less than 6 ¾" please follow the proceeding steps.
- Put together the six panel sections of the the wall tunnel.
- Mark an “X” on all panel sections on the left side of the edge tabs.
- Snap off the “X” marked edge tabs using vice grips.
- Reassemble and test the newly sized tunnel kit for fit.
- If the tunnel still needs to be shorter, snap off the right side edge tabs using your vice grips.
Step 2 Complete Wall Kit Assembly

- Finish the final assembly of the kit by firmly pressing all six of the panel sections together.
Step 3 Cut the Screws

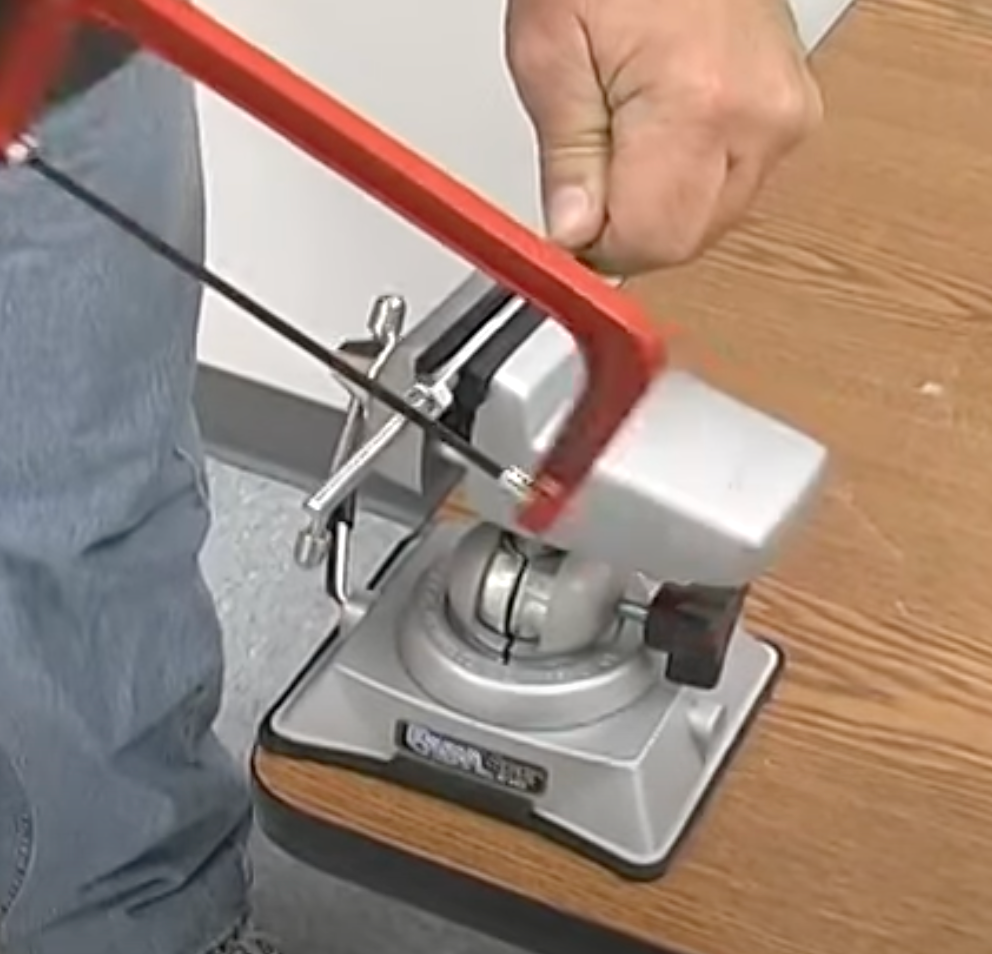
- The wall kit screws are 9 ½" long. Use the instructions below to determine custom lengths.
- To cut the screws, mark this length on the screws and thread a ¼" x 20 nut onto the screw past the mark.
- Now clamp the screw and cut with a hacksaw at the mark.
Step 4 Insert the Tunnel Kit and Frames

- Have a friend hold the outer frame of the door in place and insert the assembled wall kit into the opening from the inside.
- We recommend a wood support to be installed inside the wall, underneath the wall kit.
- Now place the inner frame of the door into the opening around the wall kit.
- Push the wall kit until it is touching the ribs on the inside frame. Caulk in place with silicone caulk.
Step 5 Tighten the Screws

- To complete the installation, insert the wall kit screws and tighten securely.
Step 6 Apply Caulking

- We recommend using silicone caulking for added insulation to fill any gaps where the wall kit joins the inside and the outside portions.
Videos
Installation Instructions: Part 1
Installation Instructions: Part 2
Installation Instructions: Part 3
FAQ
My Ruff Weather has a label of 10-1/2" x 17" on it. Which flap size should I order?You should order the XL Ruff Weather Replacement Flap (which is marked as 9-3/4" now, although the actual dimension of the flap did not change). |
Would small pets sharing with larger pets have an issue with the double flaps?No, the Ideal Ruff Weather Dog Door and Wall Mount Kit is easy for smaller pets to push open even with the double flaps since it only has magnets on the bottom. |
What is the tunnel made of?It is very durable plastic. However, we would recommend putting some framing in the cut out to support it on the bottom, especially in the extra-large and super large sizes. |
What is the flap made of?The flap is a clear flexible vinyl, 1/8" thick. |
How far does the frame stick out?The frame is pretty bulky, more than most doors, and it sticks out about 2 1/2" from the wall. |
Is this the same as the Ideal Ruff Weather Dog Door and Wall Kit Combination?They are exactly the same in size, but the flaps on the Designer are tinted and the frame is grey as opposed to the clear flaps and cream color frame on the old style. |
Is this easy to install?If you are very handy, it could be a good DIY solo pet door installation. Otherwise, we recommend hiring a licensed pro for all wall installations. |
What is the maximum wall thickness for the Ideal Pet Products Ruff Weather Pet Door with Telescoping Frame?The maximum wall thickness is 7 1/4". |
Warranty
Disclaimer:
The new and revised warranty that follows this disclaimer supersedes any and all previous warranties of whatever nature or description, whether express, implied or set by law. Any unexpired warranties shall now be governed by the terms of the new warranty for the duration of the existing warranty’s unexpired term.
One Year Warranty:
Ideal’s pet doors are very durable and with the proper care will provide many years of service for you and your pet. Thank you for selecting Ideal for your pet door. However, please be aware the pet doors are not waterproof against inclement weather or any excessive water exposure. The one year warranty set forth below applies to Ideal’s pet door(s).
This product has a One Year Warranty from the date of the purchase of the product to be free of manufacturer’s defects in workmanship and materials. This express One Year Warranty is limited only to the original purchaser of the product and is non-transferable. Satisfactory proof of purchase must be provided to the manufacturer for this one year warranty to apply. In that case, the manufacturer will replace at no charge to the purchaser the defective part(s). No refunds will be provided to the purchaser. No service contract is being provided under this One Year Warranty. Proof of purchase so that the One Year Warranty may be honored must be made to:
Ideal Pet Products, Inc.
24735 Avenue Rockefeller
Valencia, California, USA 91355
Attention: Warranty Department
(661) 294-2266 / 1-877-IDEALPET (433-2573)
Any and all implied warranties are expressly disclaimed and of no force or effect. These warranties include, but are not limited to, the implied warranties of merchantability, implied fitness for any intended purpose, and any warranties under the California Song-Beverly Consumer Act.
This One Year Warranty is void if the damage is due to improper installation, intentional misuse or abuse, repairs by anyone other than the manufacturer, the failure to follow manufacturer’s instructions, or if the product is being used for commercial purposes. Purchaser assumes all risks and liabilities for the misuse or abuse of the product, the commercial use of the product, or the failure to follow the manufacturer’s instructions.
This One Year Warranty only applies if the product is used for domesticated animals. The Manufacturer, Ideal, is not responsible and shall not have any liability for any damage to or defects caused by acts of God, criminal activity, dog abuse including, but not limited to chewing on the door, lightening, abuse, alteration, trespassing, children’s use of the product, unauthorized access, entry by non-domesticated or “stray” animals, or any other unintended use or misuse of the product.
The Manufacturer, Ideal, disclaims and excludes any liability for incidental, consequential, punitive, general, special, or other damages arising out of or connected with the purchase, use, or misuse of the product or concerning any warranty herein.
This One Year Warranty shall be governed by the laws of the State of California, USA. Venue shall be with the Los Angeles Superior Court, North Valley District.
Warning:
This product, or any of its accessories, parts, or attachments may not prevent adults, children, animals, insects, or objects from passing through or using the opening created by the product.
Ideal Pet Products will not be liable for any unintended or accidental usage, misuse, abuse, criminal conduct, water intrusion, acts of god, damages or injuries occurring or accruing from the use of this product except in strict accordance with Ideal's One Year Warranty accompanying the sale of this product to the original purchaser.
Customer Reviews

Size Chart
- Small 5"w x 9"h
- Medium 7 1/4"w x 13"h
- Extra Large 9 3/4"w x 17"h
- Super Large 15"w x 23 1/2"h
Flap Dimensions:
5"w x 9"h
The entry way your dog goes through.Outside Frame Dimensions
9 1/16"w x 13 3/8"h
The outer edge of the pet door. Rough Cut Out:
6 1/2"w x 11 1/4"h
The size of the hole needed to fit your pet door into your door.Flap Dimensions:
7 1/4"w x 13"h
The entry way your dog goes through.Outside Frame Dimensions
11 3/8"w x 17 1/2"h
The outer edge of the pet door. Rough Cut Out:
8 1/2"w x 15 1/4"h
The size of the hole needed to fit your pet door into your door.Flap Dimensions:
9 3/4"w x 17"h
The entry way your dog goes through.Outside Frame Dimensions
13 15/16"w x 21 5/8"h
The outer edge of the pet door. Rough Cut Out:
11 1/4"w x 19 1/2"h
The size of the hole needed to fit your pet door into your door.Flap Dimensions:
15"w x 23 1/2"h
The entry way your dog goes through.Outside Frame Dimensions
19"w x 28 1/8"h
The outer edge of the pet door. Rough Cut Out:
16 1/4"w x 26"h
The size of the hole needed to fit your pet door into your door.| Size | Flap Dimension | Rough Cut Out | Outside Frame Dimension | Recommended Pet Height |
|---|---|---|---|---|
| Small | 5" w x 9" h | 6 1⁄2" w x 11 1⁄4" h | 9 1⁄16" w x 13 3⁄8" h | 7" - 13" |
| Medium | 7 1⁄4" w x 13" h | 8 1⁄2" w x 15 1⁄4" h | 11 3⁄8" w x 17 1⁄2" h | 7" - 19" |
| Extra Large | 9 3⁄4" w x 17" h | 11 1⁄4" w x 19 1⁄2" h | 13 15⁄16" w x 21 5⁄8" h | 7" - 26" |
| Super Large | 15" w x 23 1⁄2" h | 16 1⁄4" w x 26" h | 19" w x 28 1⁄8" h | 7" - 36" |
Do not know which flap size to get? Here is a measurement guide to help you out
Replacement Flaps at available at Ideal Ruff Weather and Protector Replacements.
See the "Videos" section below for parts 1-3 videos.
Difficulty
Moderate
Steps
06
Time Required
1 - 2 hours
Sections
01
Flags
01
Parts
- Installation Template
- Outer Frame
- Inner Frame
- 1/4" x 9-1/2" Screws
- 6 Wall Kit Panel Sections
- Locking Cover
Tools
- Tape Measure
- Level
- Pencil
- Hammer and Nails
- Electric Drill with ½" Regular Drill Bit
- 3/8" Drill Bits
- Saber Saw
- Electric Screwdriver with Phillips Bit
- Safety Goggles
- Vice Grips
- A Second Person
- Silicon Caulking (not supplied)
See the "Videos" section of this page for parts 1-3 of the installation guide video. Please read instructions & notes thoroughly before installation. Make sure to take extreme care when cutting / drilling through walls to avoid gas, electric, and plumbing lines. Use the template and instructions provided with the door to accurately cut the opening.
Step 1 Assemble the Wall Kit
- First, measure the thickness of the wall you will be cutting through. For walls measuring 6 ¾" to 7 ¼", use the wall kit as it is. For walls less than 6 ¾" please follow the proceeding steps.
- Put together the six panel sections of the the wall tunnel.
- Mark an “X” on all panel sections on the left side of the edge tabs.
- Snap off the “X” marked edge tabs using vice grips.
- Reassemble and test the newly sized tunnel kit for fit.
- If the tunnel still needs to be shorter, snap off the right side edge tabs using your vice grips.
Step 2 Complete Wall Kit Assembly
- Finish the final assembly of the kit by firmly pressing all six of the panel sections together.
Step 3 Cut the Screws
- The wall kit screws are 9 ½" long. Use the instructions below to determine custom lengths.
- To cut the screws, mark this length on the screws and thread a ¼" x 20 nut onto the screw past the mark.
- Now clamp the screw and cut with a hacksaw at the mark.
Step 4 Insert the Tunnel Kit and Frames
- Have a friend hold the outer frame of the door in place and insert the assembled wall kit into the opening from the inside.
- We recommend a wood support to be installed inside the wall, underneath the wall kit.
- Now place the inner frame of the door into the opening around the wall kit.
- Push the wall kit until it is touching the ribs on the inside frame. Caulk in place with silicone caulk.
Step 5 Tighten the Screws
- To complete the installation, insert the wall kit screws and tighten securely.
Step 6 Apply Caulking
- We recommend using silicone caulking for added insulation to fill any gaps where the wall kit joins the inside and the outside portions.
Videos
Installation Instructions: Part 1
Installation Instructions: Part 2
Installation Instructions: Part 3
FAQ
My Ruff Weather has a label of 10-1/2" x 17" on it. Which flap size should I order?You should order the XL Ruff Weather Replacement Flap (which is marked as 9-3/4" now, although the actual dimension of the flap did not change). |
Would small pets sharing with larger pets have an issue with the double flaps?No, the Ideal Ruff Weather Dog Door and Wall Mount Kit is easy for smaller pets to push open even with the double flaps since it only has magnets on the bottom. |
What is the tunnel made of?It is very durable plastic. However, we would recommend putting some framing in the cut out to support it on the bottom, especially in the extra-large and super large sizes. |
What is the flap made of?The flap is a clear flexible vinyl, 1/8" thick. |
How far does the frame stick out?The frame is pretty bulky, more than most doors, and it sticks out about 2 1/2" from the wall. |
Is this the same as the Ideal Ruff Weather Dog Door and Wall Kit Combination?They are exactly the same in size, but the flaps on the Designer are tinted and the frame is grey as opposed to the clear flaps and cream color frame on the old style. |
Is this easy to install?If you are very handy, it could be a good DIY solo pet door installation. Otherwise, we recommend hiring a licensed pro for all wall installations. |
What is the maximum wall thickness for the Ideal Pet Products Ruff Weather Pet Door with Telescoping Frame?The maximum wall thickness is 7 1/4". |
Warranty
Disclaimer:
The new and revised warranty that follows this disclaimer supersedes any and all previous warranties of whatever nature or description, whether express, implied or set by law. Any unexpired warranties shall now be governed by the terms of the new warranty for the duration of the existing warranty’s unexpired term.
One Year Warranty:
Ideal’s pet doors are very durable and with the proper care will provide many years of service for you and your pet. Thank you for selecting Ideal for your pet door. However, please be aware the pet doors are not waterproof against inclement weather or any excessive water exposure. The one year warranty set forth below applies to Ideal’s pet door(s).
This product has a One Year Warranty from the date of the purchase of the product to be free of manufacturer’s defects in workmanship and materials. This express One Year Warranty is limited only to the original purchaser of the product and is non-transferable. Satisfactory proof of purchase must be provided to the manufacturer for this one year warranty to apply. In that case, the manufacturer will replace at no charge to the purchaser the defective part(s). No refunds will be provided to the purchaser. No service contract is being provided under this One Year Warranty. Proof of purchase so that the One Year Warranty may be honored must be made to:
Ideal Pet Products, Inc.
24735 Avenue Rockefeller
Valencia, California, USA 91355
Attention: Warranty Department
(661) 294-2266 / 1-877-IDEALPET (433-2573)
Any and all implied warranties are expressly disclaimed and of no force or effect. These warranties include, but are not limited to, the implied warranties of merchantability, implied fitness for any intended purpose, and any warranties under the California Song-Beverly Consumer Act.
This One Year Warranty is void if the damage is due to improper installation, intentional misuse or abuse, repairs by anyone other than the manufacturer, the failure to follow manufacturer’s instructions, or if the product is being used for commercial purposes. Purchaser assumes all risks and liabilities for the misuse or abuse of the product, the commercial use of the product, or the failure to follow the manufacturer’s instructions.
This One Year Warranty only applies if the product is used for domesticated animals. The Manufacturer, Ideal, is not responsible and shall not have any liability for any damage to or defects caused by acts of God, criminal activity, dog abuse including, but not limited to chewing on the door, lightening, abuse, alteration, trespassing, children’s use of the product, unauthorized access, entry by non-domesticated or “stray” animals, or any other unintended use or misuse of the product.
The Manufacturer, Ideal, disclaims and excludes any liability for incidental, consequential, punitive, general, special, or other damages arising out of or connected with the purchase, use, or misuse of the product or concerning any warranty herein.
This One Year Warranty shall be governed by the laws of the State of California, USA. Venue shall be with the Los Angeles Superior Court, North Valley District.
Warning:
This product, or any of its accessories, parts, or attachments may not prevent adults, children, animals, insects, or objects from passing through or using the opening created by the product.
Ideal Pet Products will not be liable for any unintended or accidental usage, misuse, abuse, criminal conduct, water intrusion, acts of god, damages or injuries occurring or accruing from the use of this product except in strict accordance with Ideal's One Year Warranty accompanying the sale of this product to the original purchaser.