


Liberty Pet Door For Doors


- Versatile design fits interior/exterior doors up to 1-3/4" thick
- Designed to seal in temperatures as low as 0°F and as high as 120°F
- Durable and stylish frame is available in white or black aluminum for enhanced home aesthetics.
- Flexible, clear vinyl flap is easy to use and is great for timid pets or sharing between dogs and cats
- Four sizes made for any dog and home, ensuring a perfect fit and seamless integration.
 Product Details
Product Details
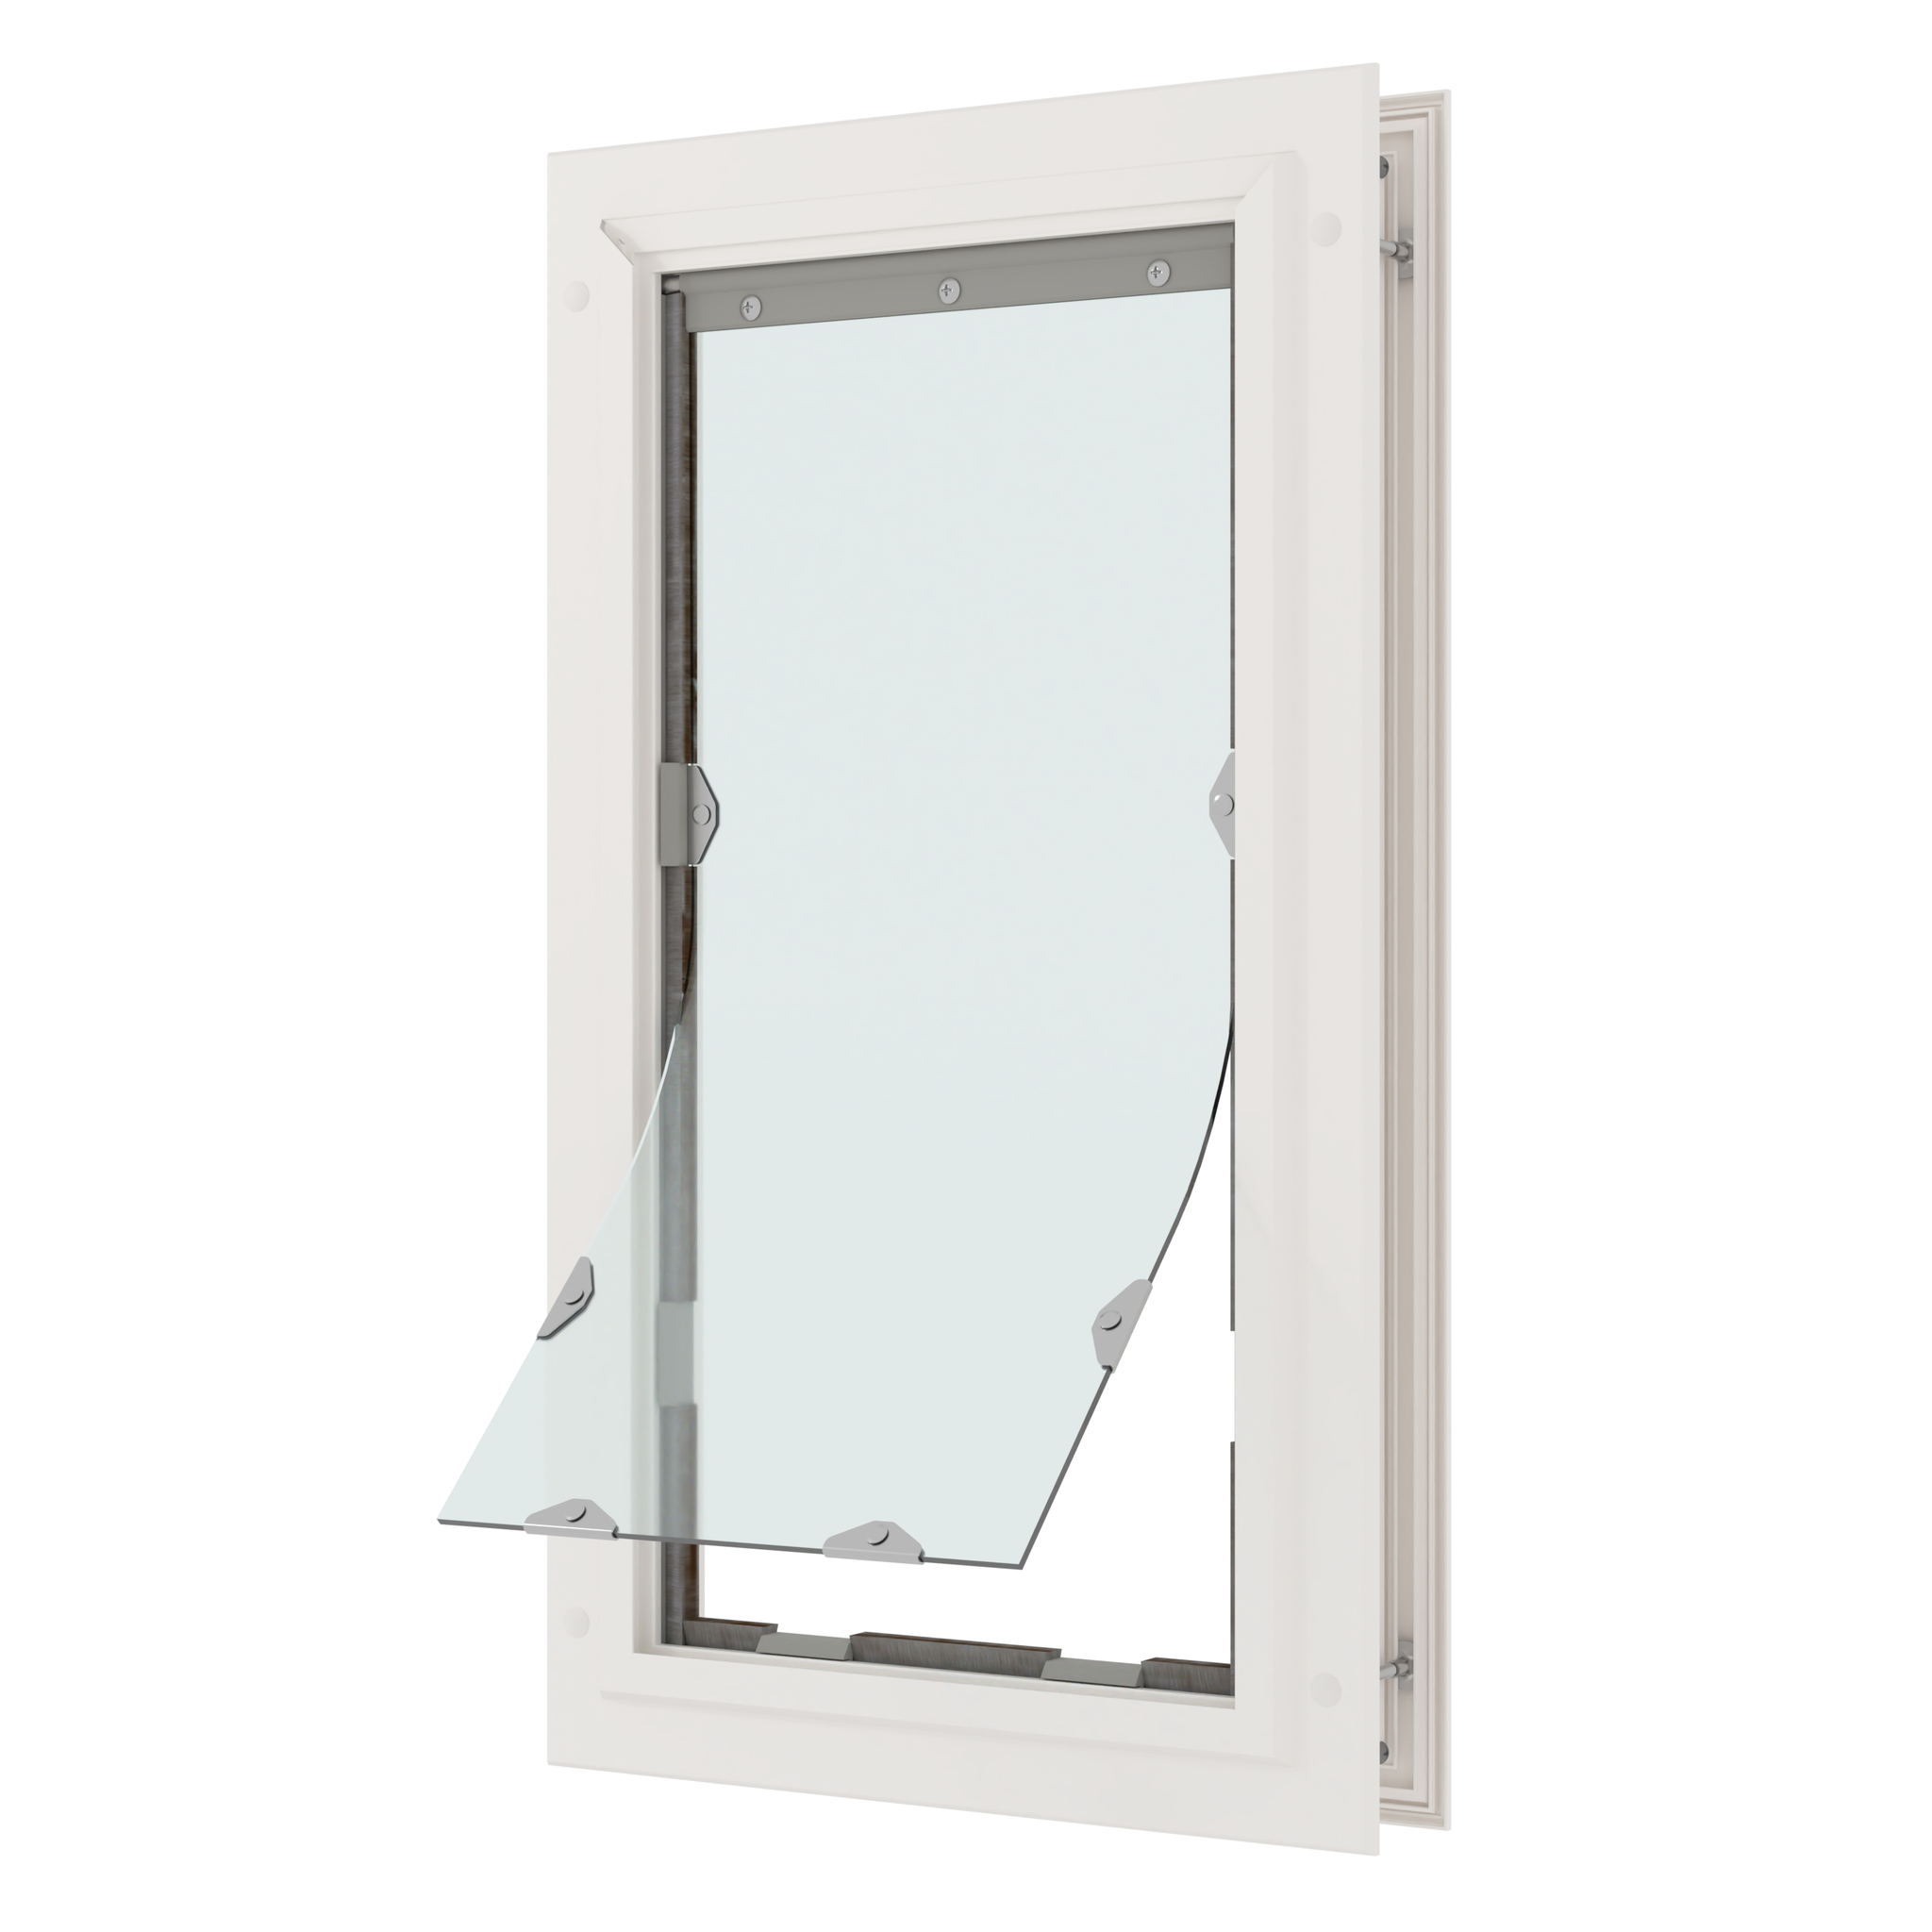
The Liberty Pet Door for Doors blends functionality and elegance. Designed to fit your home's aesthetic and your pet's needs, this pet door is a harmonious addition to any space. Whether you have a bustling household with pets of various sizes or a single furry friend, the Liberty Pet Door's four size options (small, medium, large, and extra large) ensures every pet can go outside comfortably.
The door's clear vinyl flap endures temperatures as low as 0°F while offering a clear view so that your pet can use their door with confidence. Its magnetic sealing keeps your home insulated and serene no matter the temperature outside. The magnets and weatherstripping are designed to allow the flap to shrink or expand in cold and heat while maintaining a weatherproof seal.
The Liberty Pet Door is designed for elegance. The aluminum frame, available in three classic colors, melds effortlessly with any home design. It's a stylish addition that complements your home decor. The flexible flap can also be easily cleaned with dish soap and water, which gives you time to enjoy moments with your pets and less on maintenance.
Security is also paramount, which is why every Liberty Pet Door comes with a sturdy locking cover to ensure peace of mind and keep your home secure.
Constructed in the USA, the Liberty Pet Door is built to last. Its heavy duty construction endures both the playful antics of your pets and the test of time.
The Liberty Pet Door for Doors is a lifestyle enhancement for you and your pets. Blending functionality, style, and durability, the Liberty Pet Door is the ideal choice for discerning pet owners who value quality and design.
Features:
- Size and Weather Protection Options: Choose from small to extra-large flap sizes, for varied pet needs.
- Durable and Easy to Install Design: the flap swings on a rod to ensure long-lasting use and is easy to replace when needed.
- Clear and Lightweight Flap: Easy for pets of all sizes to use, encouraging independence and ease of training.
- Maintenance-Friendly: The flap's material allows for effortless cleaning, perfect for active pets.
- American Craftsmanship: Proudly made in the USA, embodying quality and longevity in its build.
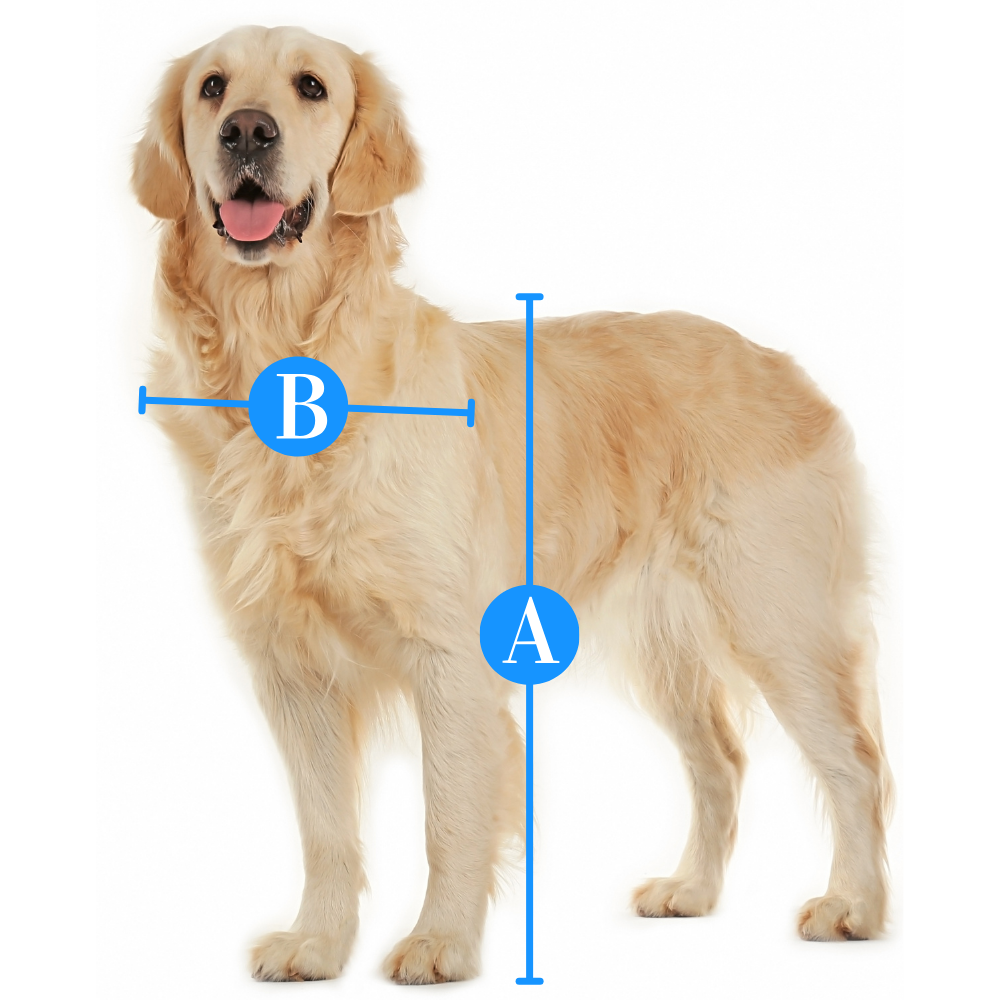
Size Chart
- Small 6" w x 12" h
- Medium 8" w x 16" h
- Large 10" w x 20" h
- Extra Large 12" w x 24" h
Flap Dimensions:
6" w x 12" h
The entry way your dog goes through.Outside Frame Dimensions
10 1/8" w x 16 3/4" h
The outer edge of the pet door.


Rough Cut Out:
9 -1 ⁄ 4" w x 15-1 ⁄ 8" h
The size of the hole needed to fit your pet door into your door.Flap Dimensions:
8" w x 16" h
The entry way your dog goes through.Outside Frame Dimensions
12 1/8" w x 20 13/16" h
The outer edge of the pet door.


Rough Cut Out:
11-5 ⁄ 16" w x 19-3 ⁄ 16" h
The size of the hole needed to fit your pet door into your door.Flap Dimensions:
10" w x 20" h
The entry way your dog goes through.Outside Frame Dimensions
14 3/16" w x 24 13/16"
The outer edge of the pet door.


Rough Cut Out:
13-3 ⁄ 8" w x 23-3 ⁄ 16" h
The size of the hole needed to fit your pet door into your door.Flap Dimensions:
12" w x 24" h
The entry way your dog goes through.Outside Frame Dimensions
16 1/4" w x 28 7/8" h
The outer edge of the pet door.


Rough Cut Out:
15-1 ⁄ 2" w x 27-3 ⁄ 16" h
The size of the hole needed to fit your pet door into your door.| Flap Size | Flap Dimension | Rough Cut Out | Outside Frame Dimension | Recommended Pet Height |
|---|---|---|---|---|
| Small | 6" w x 12" h | 9 -1 ⁄ 4" w x 15-1 ⁄ 8" h | 10 1/8" w x 16 3/4" h | 9" - 17" |
| Medium | 8" w x 16" h | 11-5 ⁄ 16" w x 19-3 ⁄ 16" h | 12 1/8" w x 20 13/16" h | 9" - 23" |
| Large | 10" w x 20" h | 13-3 ⁄ 8" w x 23-3 ⁄ 16" h | 14 3/16" w x 24 13/16" | 9" - 29" |
| Extra Large | 12" w x 24" h | 15-1 ⁄ 2" w x 27-3 ⁄ 16" h | 16 1/4" w x 28 7/8" h | 9" - 37" |
Installation Instructions
Single Flap Door Mount Instructions
 Difficulty
High
Difficulty
High
 Steps
14
Steps
14
 Time Required
2-3 hours
Time Required
2-3 hours
 Sections
06
Sections
06
 Flags
03
Flags
03
Parts
- 1 Installation Template
- Short Screws (2")
- Long Screws (2-1/4")
- 4 Screw Covers
- 1 Installation Magnet
- 1 Flap Frame
- 1 Trim Frame
- 1 Tube of Silicone
- 1 Locking Cover
Tools
- Pencil
- Drill with 3/8" (9,5 mm) drill bit
- Level
- Measuring Tape
- Jigsaw or Reciprocating Saw
Please read instructions & notes thoroughly before installation.
Single Flap Door Mount
Step 1 Prep Your Door

- If possible, remove the door from its hinges using a screwdriver and hammer to tap out the hinge pins. Lay the door flap for installation. Tape the provided template to the door. The top edge of the cut-out line should be at least 3” (7,6 cm) above the pet's shoulders.
Step 2 Drill the Holes

- Once you are certain the pet door will work with your door, make sure the template is level, and mark the outline with a pencil. Remove the template and drill holes through the corners just inside of the lines using a ⅜” (9,5 mm) drill bit.
Step 3 Saw An Opening

- Using a jigsaw, cut along the marked lines, making sure to cut straight.
Step 4 Check Weatherstripping

- Ensure the weatherstripping is firmly pressed in the groove on both frames. Weatherstripping indicated in red.
Step 5 Position the Frames

- Place the trim frame on the outside of the door and the flap frame on the inside.
Step 6 Position Screws


- Select appropriate screws and insert them into the pet door from the inside.
| Door Width | Screw Length |
|---|---|
| 1-⅜” (3.5 cm) | Short Screws (1-¾”) |
| 1-¾” (4.4 cm) | Long Screws (2-¼”) |
Step 7 Screw Door Into Place

- Once the pet door is leveled, tighten the screws so that the weatherstripping compresses.
Step 8 Attach Screw Covers

- Push the four screw covers in by hand to cover the screws.
- If you need help, you can use the wooden end of a hammer rubber, or other non-metal tool to tap in the hole plugs. You can also place a wood block on the hole plug and tap the block with a hammer.
Step 9 Seal With Silicone

- Apply silicone where the two frames meet. Also apply silicone where the outside frame meets the door.
PANELED DOORS
The best way to install the pet door is to have it straddle the recessed area of one of the panels. Have the pet door sit on the flat area in the middle, side, and below the recessed panel. The frame will cross the recessed area on the top, so you will be left with a gap. The easiest way to fill this gap is to get battens or shims from a local hardware store, and cut them to fit.
When that gap is mostly filled, caulk the remaining areas to seal the doggy door to the surface of the people door. If the space is very irregular you can also use a squishy foam weather stripping, which will compress down for a tight fit. When finished, use caulking to seal the door.
Warranty
Warranty Type: Limited.
Duration: 3 years
Coverage: Defects in materials and workmanship under standard regular use.
Exclusions:
Damage caused by misuse or not using the product as intended.
Improper installation.
Damage caused by chewing.
Customer Reviews
Size Chart
- Small 6" w x 12" h
- Medium 8" w x 16" h
- Large 10" w x 20" h
- Extra Large 12" w x 24" h
Flap Dimensions:
6" w x 12" h
The entry way your dog goes through.Outside Frame Dimensions
10 1/8" w x 16 3/4" h
The outer edge of the pet door. Rough Cut Out:
9 -1 ⁄ 4" w x 15-1 ⁄ 8" h
The size of the hole needed to fit your pet door into your door.Flap Dimensions:
8" w x 16" h
The entry way your dog goes through.Outside Frame Dimensions
12 1/8" w x 20 13/16" h
The outer edge of the pet door. Rough Cut Out:
11-5 ⁄ 16" w x 19-3 ⁄ 16" h
The size of the hole needed to fit your pet door into your door.Flap Dimensions:
10" w x 20" h
The entry way your dog goes through.Outside Frame Dimensions
14 3/16" w x 24 13/16"
The outer edge of the pet door. Rough Cut Out:
13-3 ⁄ 8" w x 23-3 ⁄ 16" h
The size of the hole needed to fit your pet door into your door.Flap Dimensions:
12" w x 24" h
The entry way your dog goes through.Outside Frame Dimensions
16 1/4" w x 28 7/8" h
The outer edge of the pet door. Rough Cut Out:
15-1 ⁄ 2" w x 27-3 ⁄ 16" h
The size of the hole needed to fit your pet door into your door.| Flap Size | Flap Dimension | Rough Cut Out | Outside Frame Dimension | Recommended Pet Height |
|---|---|---|---|---|
| Small | 6" w x 12" h | 9 -1 ⁄ 4" w x 15-1 ⁄ 8" h | 10 1/8" w x 16 3/4" h | 9" - 17" |
| Medium | 8" w x 16" h | 11-5 ⁄ 16" w x 19-3 ⁄ 16" h | 12 1/8" w x 20 13/16" h | 9" - 23" |
| Large | 10" w x 20" h | 13-3 ⁄ 8" w x 23-3 ⁄ 16" h | 14 3/16" w x 24 13/16" | 9" - 29" |
| Extra Large | 12" w x 24" h | 15-1 ⁄ 2" w x 27-3 ⁄ 16" h | 16 1/4" w x 28 7/8" h | 9" - 37" |
Single Flap Door Mount Instructions
Difficulty
High
Steps
14
Time Required
2-3 hours
Sections
06
Flags
03
Parts
- 1 Installation Template
- Short Screws (2")
- Long Screws (2-1/4")
- 4 Screw Covers
- 1 Installation Magnet
- 1 Flap Frame
- 1 Trim Frame
- 1 Tube of Silicone
- 1 Locking Cover
Tools
- Pencil
- Drill with 3/8" (9,5 mm) drill bit
- Level
- Measuring Tape
- Jigsaw or Reciprocating Saw
Please read instructions & notes thoroughly before installation.
Single Flap Door Mount
Step 1 Prep Your Door
- If possible, remove the door from its hinges using a screwdriver and hammer to tap out the hinge pins. Lay the door flap for installation. Tape the provided template to the door. The top edge of the cut-out line should be at least 3” (7,6 cm) above the pet's shoulders.
Step 2 Drill the Holes
- Once you are certain the pet door will work with your door, make sure the template is level, and mark the outline with a pencil. Remove the template and drill holes through the corners just inside of the lines using a ⅜” (9,5 mm) drill bit.
Step 3 Saw An Opening
- Using a jigsaw, cut along the marked lines, making sure to cut straight.
Step 4 Check Weatherstripping
- Ensure the weatherstripping is firmly pressed in the groove on both frames. Weatherstripping indicated in red.
Step 5 Position the Frames
- Place the trim frame on the outside of the door and the flap frame on the inside.
Step 6 Position Screws
- Select appropriate screws and insert them into the pet door from the inside.
| Door Width | Screw Length |
|---|---|
| 1-⅜” (3.5 cm) | Short Screws (1-¾”) |
| 1-¾” (4.4 cm) | Long Screws (2-¼”) |
Step 7 Screw Door Into Place
- Once the pet door is leveled, tighten the screws so that the weatherstripping compresses.
Step 8 Attach Screw Covers
- Push the four screw covers in by hand to cover the screws.
- If you need help, you can use the wooden end of a hammer rubber, or other non-metal tool to tap in the hole plugs. You can also place a wood block on the hole plug and tap the block with a hammer.
Step 9 Seal With Silicone
- Apply silicone where the two frames meet. Also apply silicone where the outside frame meets the door.
PANELED DOORS
The best way to install the pet door is to have it straddle the recessed area of one of the panels. Have the pet door sit on the flat area in the middle, side, and below the recessed panel. The frame will cross the recessed area on the top, so you will be left with a gap. The easiest way to fill this gap is to get battens or shims from a local hardware store, and cut them to fit.
When that gap is mostly filled, caulk the remaining areas to seal the doggy door to the surface of the people door. If the space is very irregular you can also use a squishy foam weather stripping, which will compress down for a tight fit. When finished, use caulking to seal the door.
Warranty
Warranty Type: Limited.
Duration: 3 years
Coverage: Defects in materials and workmanship under standard regular use.
Exclusions:
Damage caused by misuse or not using the product as intended.
Improper installation.
Damage caused by chewing.