


Gun Dog Pet Door Series for Doors & Kennels


- Versatile design options: Choose from heavy-duty spring hinges, quieter free-swinging doors, or guillotine openings to suit your pet's needs.
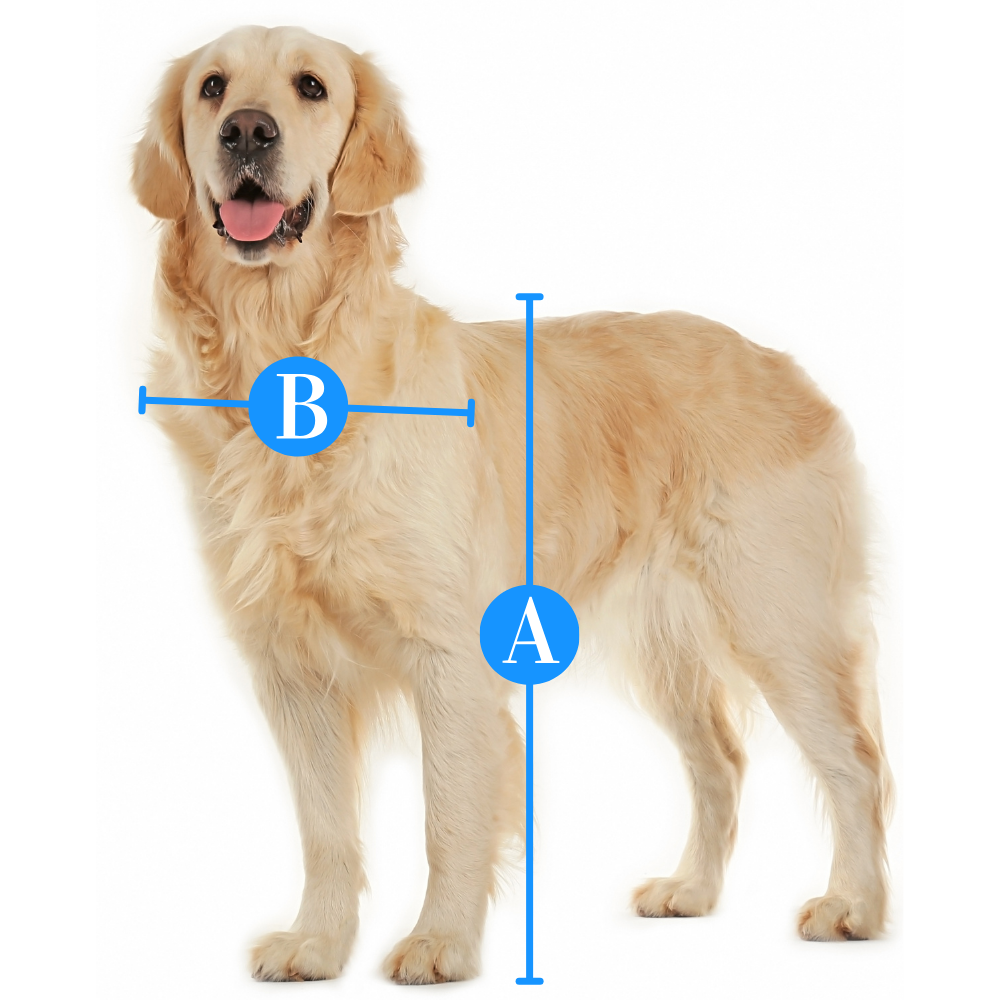
- All-size fit: Accommodates pets up to 200 pounds with medium to extra-large sizes, ensuring a secure fit for all breeds.
- Durable construction: Features aluminum frames and acrylic flaps, built to last in various climates from mild to extreme.
- Engineered for comfort: Offers high wind resistance and insulation, with a clear flap design for pet visibility and ease of use.
- Warranty assurance: Comes with a 5-year limited warranty for guillotine models and a limited lifetime warranty for other doors.
 Product Details
Product Details
The Gun Dog Pet Door Series redefines access solutions for pets, blending unparalleled versatility and durability. Designed and manufactured in the USA, this series caters to a broad spectrum of needs, from guillotine-style doors for kennels to robust options for large, active pets.
Heavy Duty Spring Hinges:
Crafted for durability and ease of use, the Heavy Duty Gun Dog Pet Door accommodates dogs weighing 20 to 120 pounds. It boasts a two-way design, featuring an aluminum frame and a chew-proof ¼” clear acrylic panel for enduring reliability.
The inclusion of heavy-duty spring hinges ensures the door is both secure against the weather and energy-efficient, standing up to harsh conditions. Its installation process is streamlined, requiring just two screws.
Free Swing Door:
The Free Swing Gun Dog Pet Door is tailored for dogs up to 120 lbs and is especially suited for those that are timid or suffer from arthritis. Its hinge-free, free-swinging flap design facilitates easy movement.
Constructed with a lightweight aluminum frame and a chew-proof ¼” polycarbonate panel, it combines durability with ease of use. The door features a weighted closure for self-shutting after use, designed for milder climates. Installation is simplified, needing only four screws.
Guillotine Door:
Optimized for colder climates or where additional clearance is needed above the door, the Guillotine Gun Dog Pet Door integrates a sturdy aluminum frame with a frosted 3/8" thick polypropylene panel for long-lasting performance.
This door variant is adaptable, fitting small (9.5" x 16"), medium/large (12.5" x 17.5"), and extra-large (16.5" x 27") openings, catering to various kennel sizes. Installation involves securing metal channels with 8 screws, allowing the guillotine panel to slide down and control access effectively. While not including a cable and pulley system, its design supports straightforward operation, ideal for facilities housing multiple dogs.
Features:
- Robust materials: Brushed aluminum frames paired with 1/4" thick chew-proof acrylic flaps ensure the door stands the test of time.
- Easy installation: Designed for a hassle-free setup in a range of materials, requiring minimal tools and effort.
- Climate resilient: Engineered to withstand severe weather conditions, providing a weather-tight, energy-efficient solution for your pet's access.
- Quiet operation: The free-swing door features a weighted closure for silent operation, enhancing the living environment for pets and their families.
- Compatibility and versatility: Suitable for integration with various kennel, door, and wall setups, enhancing the functionality of your space.
Size Chart
Gun Dog Pet Door with Heavy Duty Springs or Free Swing | |||||
|---|---|---|---|---|---|
| Flap Size | Type | Flap Dimension | Rough Cut Out | Overall Frame Dimension | Recommended Pet Height |
| Medium | Heavy Duty Spring Hinges | 10" x 14-1/4" | 9-1/2" x 14-1/2"" | 10-3/4" x 16-1/4" | 8" - 16" |
| Medium | Free Swing | 8 5/8" x 12 1/2" | 9 1/2" x 14 1/4" | 10 3/4" x 14 3/4" | 6" - 14" |
| Large | Heavy Duty Spring Hinges | 12-1/2" x 17-1/2" | 12 1/2" x 17 1/2" | 14" x 20" | 8" - 20" |
| Large | Free Swing | 11" x 14 1/2" | 12 1/2" x 17 1/2" | 14" x 18" | 6" - 18" |
| Extra Large | Heavy Duty Spring Hinges | 16-1/2" x 25-1/2" | 16-1/2” x 25-1/2” | 18" x 28"" | 8" - 27" |
| Extra Large | Free Swing | 15" x 23" | 16-1/2” x 25-1/2” | 18" x 26" | 6" - 25" |
Gun Dog Guillotine Dog Door | ||||
|---|---|---|---|---|
| Flap Size | Type | May Use With | Flap Dimension | Recommended Pet Height |
| Medium | Guillotine | Gun Dog House DoorEasy Door | 14" w x 20" h | 18" - 29" |
| Extra Large | Guillotine | Gun Dog Big DoorEasy Big Door | 18" w x 28" h | 18" - 42" |
Installation Instructions
Gun Dog Guillotine Pet Door

 Difficulty
Moderate
Difficulty
Moderate
 Steps
03
Steps
03
 Time Required
0.5-1 hours
Time Required
0.5-1 hours
 Sections
01
Sections
01
 Flags
00
Flags
00
Parts
- Gun Dog Guillotine-Style Door
Tools
- Rope or Wire
- Pulleys
- Handle
Additional guillotine door hardware will be needed (rope or wire, pulleys, handle), as they are NOT provided upon purchase. It can be purchased at your local hardware store.
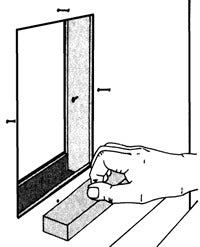
Step 1 Install Channels
- Place panel against wall as a template.
- Install each channel so the panel slides in its grooved track.
Step 2 Drill Holes
- Drill hole or install a eye hook in panel.
- Install two pulleys to ceiling and attach a cable/rope to the 3/8" polypropylene panel.
Step 3 Slide In Panel
- Slide polypropylene panel in channels as needed.
Gun Dog "Free Swing" Easy Dog Door Wall Installation
 Difficulty
Moderate
Steps
04
Time Required
1-2 hours
Sections
01
Flags
02
Difficulty
Moderate
Steps
04
Time Required
1-2 hours
Sections
01
Flags
02
Parts
- Gun Dog Pet Door
- Two 1-1/2" wood screws
Tools
- Tape measure
- Tools for cutting a hole in your wall
- Wall framing materials
- Felt or rubber weatherstripping
The Heavy Duty Dog Door ® and Big Dog Door™ are installed on the outside surface of a building, wall or door, etc.
Step 1 Measure Pet Height

- Measure the belly height of your pet from ground level to his underside to find the correct height of the door opening. The bottom edge is usually from 6" to 12".
- For the Heavy Duty Dog Door, cut the opening 12-1/2" wide x 17-1/2" high.
- For the Big Dog Door, cut the opening 16-1/2" wide x 25-1/2" high.
Step 2 Determine Framing Requirements

- If mounted on garage or house wall, frame the depth of the wall to form a tunnel through the wall. (Use 2" X 4" or 2" X 6" material).
- If needed, add a least a 1/2" x 1-1/2" flat outside mounting surfacing.
Step 3 Cut the Opening

- Cut opening, if needed add a 1-1/2" flat mounting surface.
- Place door over opening and use the enclosed two 1-1/2” wood screws to hold door to opening.
Step 4 Apply Weatherstripping

- Install 1/8" felt or rubber weather stripping on surface of building or door.
Gun Dog "Free Swing" Easy Dog Door for Doors Installation
Difficulty
Moderate
Steps
04
Time Required
1-2 hours
Sections
01
Flags
00
Parts
- Gun Dog Pet Door
- Two 1-1/2" wood screws
Tools
- Tape measure
- Pencil
- Drill
- Jigsaw
- Door framing materials
- Silicone caulking
The Heavy Duty Dog Door® and Big Dog Door™ are installed on the outside of a house door or a garage door.
Step 1 Measure Pet Height
- To find correct height of the hole for your dog, measure the belly height of your pet (average installation is 6"-12").
- Mark the height in pencil on one side of your door.
Step 2 Drill Holes

- The Heavy Duty Dog Door hole size is 12-1/2" x 17-1/2".
- For the Big Dog Door the hole size is 16-1/2" x 25-1/2".
- Drill a half inch hole into each corner. Then draw lines to connect the corners.
- Insert jigsaw into drill hole and follow drawn lines to cut out hole.
Step 3 Steel and raised Panel Doors

- If installing on a steel door, cut hole 3/4" larger, glue 3/8" pine, cedar, or plywood strips to inside of the opening.
- If installing on a raised panel door, cut hole in center of door 3/4", glue 3/8" pine, cedar, or plywood strips to inside of the opening to cover styrofoam and install trim to inside/outside of door surface.
Step 4 Hollow Core Doors
- If installing in a hollow core door, use four strips of wood the same width as the hollow between the panels in your door.
- Position the wood so that they are flush with the edges of the hole.
- Either glue, nail, or screw the strips. Frame the outside/inside hole with 2" x 1/4" lengths.
Step 5 Complete Installation

- Use silicone caulking around trim kit for added insulation.
- To quiet door closing, staple 5/8" of the window felt to the sides and the bottom of the pet door.
Gun Dog Heavy Duty Dog Door for Doors Installation
 Difficulty
Moderate
Steps
04
Time Required
1-2 hours
Sections
01
Flags
00
Difficulty
Moderate
Steps
04
Time Required
1-2 hours
Sections
01
Flags
00
Parts
- Gun Dog Pet Door
- Two 1-1/2" wood screws
Tools
- Tape measure
- Pencil
- Drill
- Jigsaw
- Door framing materials
- Silicone caulking
The Heavy Duty Dog Door® and Big Dog Door™ are installed on the outside of a house door or a garage door.
Step 1 Measure Pet Height
- To find correct height of the hole for your dog, measure the belly height of your pet (average installation is 6"-12").
- Mark the height in pencil on one side of your door.
Step 2 Drill Holes
- The Heavy Duty Dog Door hole size is 12-1/2" x 17-1/2".
- For the Big Dog Door the hole size is 16-1/2" x 25-1/2".
- Drill a half inch hole into each corner. Then draw lines to connect the corners.
- Insert jigsaw into drill hole and follow drawn lines to cut out hole.
Step 3 Steel and raised Panel Doors
- If installing on a steel door, cut hole 3/4" larger, glue 3/8" pine, cedar, or plywood strips to inside of the opening.
- If installing on a raised panel door, cut hole in center of door 3/4", glue 3/8" pine, cedar, or plywood strips to inside of the opening to cover styrofoam and install trim to inside/outside of door surface.
Step 4 Hollow Core Doors
- If installing in a hollow core door, use four strips of wood the same width as the hollow between the panels in your door.
- Position the wood so that they are flush with the edges of the hole.
- Either glue, nail, or screw the strips. Frame the outside/inside hole with 2" x 1/4" lengths.
Step 5 Complete Installation
- Use silicone caulking around trim kit for added insulation.
- To quiet door closing, staple 5/8" of the window felt to the sides and the bottom of the pet door.
FAQ
Do the Guillotine Dog Doors come with hardware for setting up a pulley system?You would have to purchase your own hardware if you wanted to link this up with a pulley system. The Gun Dog Guillotine Dog Door would also require drilling the holes in the solid panel. |
Do you know how to make a guillotine dog door pulley system?You would have to purchase the hardware locally, but the Gun Dog Guillotine Dog Door would require drilling a hole in the closing panel and attaching the cable. Then you would have to hang the pulley above the door and thread the cable through a hole in the fence run. This will allow you to open and close the run without going inside. We have some detailed photos on the installation instruction tab too. |
Can I use the Gun Dog Guillotine Dog Door with other doors?Yes, the Gun Dog Guillotine Dog Door can be used with really any door as long as the opening for the pet door is smaller than the flap dimension of the guillotine door. |
Is the Gun Dog Guillotine Dog Door the door durable?Very durable, which is why we recommend the Gun Dog Guillotine Dog Door for kennel use. |
Is the Gun Dog Guillotine Dog Door hard to install?Since the Gun Dog Guillotine Dog Door is only 4 parts that you screw into the door or wall, the Gun Dog Guillotine Dog Door is not particularly hard. However, you do need to make sure that you install them at the right width or else the cover won't fit properly. |
Is there a lock on the Gun Dog Guillotine Dog Door’s cover?No, but you can install your own. This can be done by drilling a hole through the cover and the channel and then using a metal pin lock that would go through both. |
Could I use this on a house or is the Gun Dog Guillotine Dog Door just for kennels?You could use this for a residential application as well. |
Can I paint the Gun Dog Guillotine Dog Door?You could paint the panel with the proper type of paint as it is just a polypropylene material. |
Can I just use the Gun Dog Guillotine Dog Door as a pet door?You could, but it just wouldn't provide any insulation value with open. |
Can I use the Gun Dog Heavy Duty Dog Door on a regular house installation?Since this is made for dog kennels, these doors can be loud when they close. We don't recommend them for residential use, but you can install them into a regular door if needed. |
Can I lock these doors?You can purchase a closing cover that fits over this door's heavy-duty spring hinges, but it does not come with one. |
Will it insulate well?Yup! This door is weatherproof and energy-efficient. |
Can I put this on a wall?Wall installation will work only if the wall is framed out properly. |
Are the heavy duty hinges?Because of the plastic and metal banging against each other, it is louder than most pet doors. Like electronic dog doors, timid dogs may have some difficulty using the door. |
Does this door swing both ways?Yes, the door will allow the pets in and out. |
Would I install this on the inside or outside?Normally you would want to install this metal dog door on the exterior. |
Can this be installed in a door?Yes, but if it is a hollow-core door, you will have to frame out the inside of the cutout. Be careful with measuring so that you get the correct frame size. |
Can this be installed into a sliding glass door?This is not the best dog door for sliding glass doors. For weatherproof alternatives, try Ideal Pet Products' Ruff Weather series, the double flap Endura Flap pet doors, and Petsafe dog supplies. |
Can this be used with multiple pets?Yes - as it is much easier to push open, it would be the one to use in a kennel with different size dogs. |
Can you lock the pet door?You can use this door along with the Gun Dog Closing covers. |
Is the dog gun dog door self framing?No, Gun Dog "Easy" Dog Door includes one frame with flap which allows it to be installed in virtually any application with proper framing |
Warranty
Gun Dog House Door® Co.
The Heavy Duty Dog Door®, Big Dog Door™, Easy Dog Door™ is covered by a limited lifetime warranty. We warrant this product to be free of defects in materials or workmanship for the life of your dog. Damage caused by accident, improper installation or abuse is specifically excluded from this warranty. Gun Dog House Door® Co. is not responsible for any incidental or consequential damage resulting from use of this product. Normal wear and tear excludes the hinges from warranty. Customers are responsible for all shipping costs.
Partial returns and/or damages will not receive full credit. Items damaged through USE or due to return shipping damage will receive partial or no credit. Should you decide that you wish to refuse receipt of an item when delivered by UPS, USPS, FedEx or common carrier and legitimately ordered the product, credit will be issued minus any shipping custom fees and charges.
Customer Reviews

Size Chart
Gun Dog Pet Door with Heavy Duty Springs or Free Swing | |||||
|---|---|---|---|---|---|
| Flap Size | Type | Flap Dimension | Rough Cut Out | Overall Frame Dimension | Recommended Pet Height |
| Medium | Heavy Duty Spring Hinges | 10" x 14-1/4" | 9-1/2" x 14-1/2"" | 10-3/4" x 16-1/4" | 8" - 16" |
| Medium | Free Swing | 8 5/8" x 12 1/2" | 9 1/2" x 14 1/4" | 10 3/4" x 14 3/4" | 6" - 14" |
| Large | Heavy Duty Spring Hinges | 12-1/2" x 17-1/2" | 12 1/2" x 17 1/2" | 14" x 20" | 8" - 20" |
| Large | Free Swing | 11" x 14 1/2" | 12 1/2" x 17 1/2" | 14" x 18" | 6" - 18" |
| Extra Large | Heavy Duty Spring Hinges | 16-1/2" x 25-1/2" | 16-1/2” x 25-1/2” | 18" x 28"" | 8" - 27" |
| Extra Large | Free Swing | 15" x 23" | 16-1/2” x 25-1/2” | 18" x 26" | 6" - 25" |
Gun Dog Guillotine Dog Door | ||||
|---|---|---|---|---|
| Flap Size | Type | May Use With | Flap Dimension | Recommended Pet Height |
| Medium | Guillotine | Gun Dog House DoorEasy Door | 14" w x 20" h | 18" - 29" |
| Extra Large | Guillotine | Gun Dog Big DoorEasy Big Door | 18" w x 28" h | 18" - 42" |
Gun Dog Guillotine Pet Door
Difficulty
Moderate
Steps
03
Time Required
0.5-1 hours
Sections
01
Flags
00
Parts
- Gun Dog Guillotine-Style Door
Tools
- Rope or Wire
- Pulleys
- Handle
Additional guillotine door hardware will be needed (rope or wire, pulleys, handle), as they are NOT provided upon purchase. It can be purchased at your local hardware store.
Step 1 Install Channels
- Place panel against wall as a template.
- Install each channel so the panel slides in its grooved track.
Step 2 Drill Holes
- Drill hole or install a eye hook in panel.
- Install two pulleys to ceiling and attach a cable/rope to the 3/8" polypropylene panel.
Step 3 Slide In Panel
- Slide polypropylene panel in channels as needed.
Gun Dog "Free Swing" Easy Dog Door Wall Installation
Difficulty
Moderate
Steps
04
Time Required
1-2 hours
Sections
01
Flags
02
Parts
- Gun Dog Pet Door
- Two 1-1/2" wood screws
Tools
- Tape measure
- Tools for cutting a hole in your wall
- Wall framing materials
- Felt or rubber weatherstripping
The Heavy Duty Dog Door ® and Big Dog Door™ are installed on the outside surface of a building, wall or door, etc.
Step 1 Measure Pet Height
- Measure the belly height of your pet from ground level to his underside to find the correct height of the door opening. The bottom edge is usually from 6" to 12".
- For the Heavy Duty Dog Door, cut the opening 12-1/2" wide x 17-1/2" high.
- For the Big Dog Door, cut the opening 16-1/2" wide x 25-1/2" high.
Step 2 Determine Framing Requirements
- If mounted on garage or house wall, frame the depth of the wall to form a tunnel through the wall. (Use 2" X 4" or 2" X 6" material).
- If needed, add a least a 1/2" x 1-1/2" flat outside mounting surfacing.
Step 3 Cut the Opening
- Cut opening, if needed add a 1-1/2" flat mounting surface.
- Place door over opening and use the enclosed two 1-1/2” wood screws to hold door to opening.
Step 4 Apply Weatherstripping
- Install 1/8" felt or rubber weather stripping on surface of building or door.
Gun Dog "Free Swing" Easy Dog Door for Doors Installation
Difficulty
Moderate
Steps
04
Time Required
1-2 hours
Sections
01
Flags
00
Parts
- Gun Dog Pet Door
- Two 1-1/2" wood screws
Tools
- Tape measure
- Pencil
- Drill
- Jigsaw
- Door framing materials
- Silicone caulking
The Heavy Duty Dog Door® and Big Dog Door™ are installed on the outside of a house door or a garage door.
Step 1 Measure Pet Height
- To find correct height of the hole for your dog, measure the belly height of your pet (average installation is 6"-12").
- Mark the height in pencil on one side of your door.
Step 2 Drill Holes
- The Heavy Duty Dog Door hole size is 12-1/2" x 17-1/2".
- For the Big Dog Door the hole size is 16-1/2" x 25-1/2".
- Drill a half inch hole into each corner. Then draw lines to connect the corners.
- Insert jigsaw into drill hole and follow drawn lines to cut out hole.
Step 3 Steel and raised Panel Doors
- If installing on a steel door, cut hole 3/4" larger, glue 3/8" pine, cedar, or plywood strips to inside of the opening.
- If installing on a raised panel door, cut hole in center of door 3/4", glue 3/8" pine, cedar, or plywood strips to inside of the opening to cover styrofoam and install trim to inside/outside of door surface.
Step 4 Hollow Core Doors
- If installing in a hollow core door, use four strips of wood the same width as the hollow between the panels in your door.
- Position the wood so that they are flush with the edges of the hole.
- Either glue, nail, or screw the strips. Frame the outside/inside hole with 2" x 1/4" lengths.
Step 5 Complete Installation
- Use silicone caulking around trim kit for added insulation.
- To quiet door closing, staple 5/8" of the window felt to the sides and the bottom of the pet door.
Gun Dog Heavy Duty Dog Door for Doors Installation
Difficulty
Moderate
Steps
04
Time Required
1-2 hours
Sections
01
Flags
00
Parts
- Gun Dog Pet Door
- Two 1-1/2" wood screws
Tools
- Tape measure
- Pencil
- Drill
- Jigsaw
- Door framing materials
- Silicone caulking
The Heavy Duty Dog Door® and Big Dog Door™ are installed on the outside of a house door or a garage door.
Step 1 Measure Pet Height
- To find correct height of the hole for your dog, measure the belly height of your pet (average installation is 6"-12").
- Mark the height in pencil on one side of your door.
Step 2 Drill Holes
- The Heavy Duty Dog Door hole size is 12-1/2" x 17-1/2".
- For the Big Dog Door the hole size is 16-1/2" x 25-1/2".
- Drill a half inch hole into each corner. Then draw lines to connect the corners.
- Insert jigsaw into drill hole and follow drawn lines to cut out hole.
Step 3 Steel and raised Panel Doors
- If installing on a steel door, cut hole 3/4" larger, glue 3/8" pine, cedar, or plywood strips to inside of the opening.
- If installing on a raised panel door, cut hole in center of door 3/4", glue 3/8" pine, cedar, or plywood strips to inside of the opening to cover styrofoam and install trim to inside/outside of door surface.
Step 4 Hollow Core Doors
- If installing in a hollow core door, use four strips of wood the same width as the hollow between the panels in your door.
- Position the wood so that they are flush with the edges of the hole.
- Either glue, nail, or screw the strips. Frame the outside/inside hole with 2" x 1/4" lengths.
Step 5 Complete Installation
- Use silicone caulking around trim kit for added insulation.
- To quiet door closing, staple 5/8" of the window felt to the sides and the bottom of the pet door.
FAQ
Do the Guillotine Dog Doors come with hardware for setting up a pulley system?You would have to purchase your own hardware if you wanted to link this up with a pulley system. The Gun Dog Guillotine Dog Door would also require drilling the holes in the solid panel. |
Do you know how to make a guillotine dog door pulley system?You would have to purchase the hardware locally, but the Gun Dog Guillotine Dog Door would require drilling a hole in the closing panel and attaching the cable. Then you would have to hang the pulley above the door and thread the cable through a hole in the fence run. This will allow you to open and close the run without going inside. We have some detailed photos on the installation instruction tab too. |
Can I use the Gun Dog Guillotine Dog Door with other doors?Yes, the Gun Dog Guillotine Dog Door can be used with really any door as long as the opening for the pet door is smaller than the flap dimension of the guillotine door. |
Is the Gun Dog Guillotine Dog Door the door durable?Very durable, which is why we recommend the Gun Dog Guillotine Dog Door for kennel use. |
Is the Gun Dog Guillotine Dog Door hard to install?Since the Gun Dog Guillotine Dog Door is only 4 parts that you screw into the door or wall, the Gun Dog Guillotine Dog Door is not particularly hard. However, you do need to make sure that you install them at the right width or else the cover won't fit properly. |
Is there a lock on the Gun Dog Guillotine Dog Door’s cover?No, but you can install your own. This can be done by drilling a hole through the cover and the channel and then using a metal pin lock that would go through both. |
Could I use this on a house or is the Gun Dog Guillotine Dog Door just for kennels?You could use this for a residential application as well. |
Can I paint the Gun Dog Guillotine Dog Door?You could paint the panel with the proper type of paint as it is just a polypropylene material. |
Can I just use the Gun Dog Guillotine Dog Door as a pet door?You could, but it just wouldn't provide any insulation value with open. |
Can I use the Gun Dog Heavy Duty Dog Door on a regular house installation?Since this is made for dog kennels, these doors can be loud when they close. We don't recommend them for residential use, but you can install them into a regular door if needed. |
Can I lock these doors?You can purchase a closing cover that fits over this door's heavy-duty spring hinges, but it does not come with one. |
Will it insulate well?Yup! This door is weatherproof and energy-efficient. |
Can I put this on a wall?Wall installation will work only if the wall is framed out properly. |
Are the heavy duty hinges?Because of the plastic and metal banging against each other, it is louder than most pet doors. Like electronic dog doors, timid dogs may have some difficulty using the door. |
Does this door swing both ways?Yes, the door will allow the pets in and out. |
Would I install this on the inside or outside?Normally you would want to install this metal dog door on the exterior. |
Can this be installed in a door?Yes, but if it is a hollow-core door, you will have to frame out the inside of the cutout. Be careful with measuring so that you get the correct frame size. |
Can this be installed into a sliding glass door?This is not the best dog door for sliding glass doors. For weatherproof alternatives, try Ideal Pet Products' Ruff Weather series, the double flap Endura Flap pet doors, and Petsafe dog supplies. |
Can this be used with multiple pets?Yes - as it is much easier to push open, it would be the one to use in a kennel with different size dogs. |
Can you lock the pet door?You can use this door along with the Gun Dog Closing covers. |
Is the dog gun dog door self framing?No, Gun Dog "Easy" Dog Door includes one frame with flap which allows it to be installed in virtually any application with proper framing |
Warranty
Gun Dog House Door® Co.
The Heavy Duty Dog Door®, Big Dog Door™, Easy Dog Door™ is covered by a limited lifetime warranty. We warrant this product to be free of defects in materials or workmanship for the life of your dog. Damage caused by accident, improper installation or abuse is specifically excluded from this warranty. Gun Dog House Door® Co. is not responsible for any incidental or consequential damage resulting from use of this product. Normal wear and tear excludes the hinges from warranty. Customers are responsible for all shipping costs.
Partial returns and/or damages will not receive full credit. Items damaged through USE or due to return shipping damage will receive partial or no credit. Should you decide that you wish to refuse receipt of an item when delivered by UPS, USPS, FedEx or common carrier and legitimately ordered the product, credit will be issued minus any shipping custom fees and charges.