Dragon Pet Door for Aluminum Sliders (One Piece)- Installation Instructions
Installation Instructions
Click to view the Two-Piece Sliding Glass Pet Door Panel Instructions.
 Difficulty
Easy
Difficulty
Easy
 Steps
06
Steps
06
 Time Required
0.5 hours
Time Required
0.5 hours
 Sections
02
Sections
02
 Flags
02
Flags
02
Parts
- Panel Pet Door
- Foam Weather Strip
- Center Post Weather Seal Draft Stopper
- Sliding Door C-Clamp Lock
- Screwdriver
Tools
- Flathead Screwdriver
Please read instructions & notes thoroughly before installation.
One-Piece Panel
Step 1 Adjust the Step Over (Optional)

- The top of the flap should be positioned to be at least 1” above the top of the pet’s shoulder.
- If the factory setting is not suitable, please adjust it before proceeding. If the current setting is suitable, proceed to the “Installation Instructions” section.
Step 2 Adjust the Screws

- Lay the entire panel on a flat surface.
- Using a #2 flat head screwdriver, remove the bottom side-screws and loosen the upper side-screws. Screws were tightly installed to hold the panel together during shipping; a power tool* is recommended.
Step 3 Adjust the Spacers

- Once the bottom screws have been removed and the upper side-screws loosened, the Pet Door Assembly and spacers can be removed by sliding the sections down and out of the panel.
Step 4 Replace the Spacers

- Replace the spacers and the Pet Door Assembly by sliding them back in a different order to achieve the desired height. You can move the spacer below and above the flap to raise or lower the flap height.
Step 5 Tighten the Screws
- When finished, replace the bottom side-screws and tighten the next upper-side screws.
Step 6 Unlock Spring Mechanism

- Loosen the height adjustment locks at the top of the pet panel with the screwdriver. This allows the spring mechanism to move freely up and down.
Step 7 Test Fit the Panel in Your Track

- To insert the panel into the top track, push up against the spring mechanism and swing the bottom of the panel up and over the threshold.
- Seat the panel on top of the small guide rail in the track.
Step 8 Apply the Weatherstripping

- Once you’re sure the panel fits, remove it from the frame and lay it on its side on the ground.
- Apply the foam weather-stripping by peeling back the paper and exposing the adhesive.
- Unroll it along the edge of the panel, pressing to ensure it adheres. Install on both sides, trim it fit with scissors.
Step 9 Install the Draft Stopper

- The center post weather seal strip (draft stopper) should be installed on the inside of the home.
- Trim with scissors as needed. Clean the edge of your patio door with rubbing alcohol before installing to assure a good seal.
- Repeat step two to install the panel in your track.
Dragon Locking Details
Since you cannot lock your sliding glass door to your panel pet door, we have provided you with an alternative locking method to secure your home.
Installing the Clamp Lock
- This clamp has a screw that tightens by hand to prevent the sliding door from moving beyond the clamp’s placement.
- For doors manufactured with the glass slider on the inside track, the lock can usually be installed on the door’s raised track.

Locking the Flap
- The Dragon Pet Door comes with a secure locking cover to block access to the flap when needed.
- The locking cover is a great perfect for keeping pets inside at night, or for blocking access to the flap when you're away.
Alternative Locking Method
- A great alternative to locking your sliding glass door is a Charley bar or dowel in the track.
- Both work off the same concept—they block the slider from opening. When engaged you cannot pull the sliding door away from the pet door panel.

FREQUENTLY ASKED QUESTIONS
What if my panel is slightly too tall?
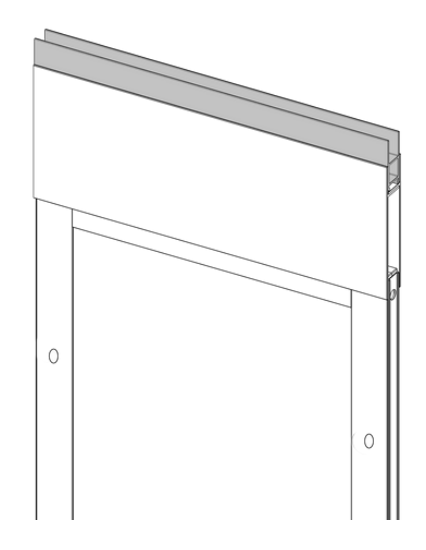
You can trim up to 3/4” off the spring- loaded adjustment piece at the top. This can be done by removing the adjustment pieces with a #2 Phillips head screwdriver and cutting down the flanges. Be careful not to cut too low or you will not be able to put the top back on.

The dark area marks where you can trim:

What if my panel is slightly too short?
We offer height extensions that will add 3/4” to the top of the panel that you slide into the channel at the top. These are made from the same aluminum as the panel so you can match the color.
You can also make your own extension out of nominal 1” wood (which is 3/4” thick), such as a 1x3, if you need more than 3/4" in height. Cut it to the same width as the panel and slide it into the channel at the top. Paint the wood to match your frame color. If the extension makes the panel feel unstable, you can secure it with screws.
What if the panel is wobbling slightly back and forth?
If your track is wider than 1” you can use small wooden shims or extra weather-stripping to fill in the gap inside the top and bottom tracks. By placing the material inside the tracks you won't be able to see it, but it will stabilize the panel.
- Choosing a selection results in a full page refresh.
- Press the space key then arrow keys to make a selection.