


Cat Mate Cat Door


- Simple cat door solution: Cat Mate 221, 234 and 235 Manual Cat Flaps provide a secure and convenient way for your cat to access different areas of your home or explore the outdoors
- Two & Four-Way Lock: Secure control of pet access with up to four locking modes: unlocked, locked, in-only, or out-only
- Flexible Installation: Suitable for materials 0"–2" thick, including doors, storm doors, and thin panels
- Energy Efficient: Brush strip surrounds the clear, rigid Polypropylene flap for weather resistance
- Easy Setup: Installation template and hardware included for a hassle-free experience
 Product Details
Product Details
Experience the perfect blend of functionality, durability, and convenience with the Cat Mate Cat Door, designed for your furry friend's unrestricted freedom. This versatile and efficient cat door accommodates large cats weighing over 20 pounds and small dogs up to 14" shoulder height, providing a generous 7" x 7" flap for easy passage.
The Cat Mate 221 and 235 features a four-way locking system, offering you ultimate control over your pet's access. Set the lock to unlocked, locked, in-only, or out-only as needed. The Cat Mate 234 features a two-way locking system, allowing you to manage your cat's movements by choosing between locked and unlocked settings.
The durable plastic frame is lined with brush weatherstripping for a weather-proof seal, while the clear, rigid Polypropylene flap withstands daily use.
Installation is a breeze, thanks to the included template and hardware. This cat door fits materials 0"–2" thick, making it ideal for storm doors, interior/exterior doors, and thin panels like plexiglass. Once installed, the magnetic closure ensures the flap remains in place, keeping out drafts and wind.
The large flap size accommodates even the "fluffiest" of kitties, making it a favorite among those with larger pets. The Cat Mate Cat Door is an excellent solution for pet parents seeking a high-quality and convenient pet door.
Please Note: The Cat Mate 221 "Large Cat Flap" and the Cat Mate 221 "Small Dog Door" are identical products except for the packaging (the part you throw away). Since the Cat version is available in brown and, currently, the Small Dog version is not, purchase the large cat version if you want a brown frame and have a small dog.
Features:
- Versatile Access Control: Manage your pet's comings and goings with the four-way locking system
- Weather-Proof Seal: Durable plastic frame and brush weatherstripping ensure a secure barrier against the elements
- Clear, Rigid Flap: Polypropylene flap is easy to clean and allows pets to see through for effortless navigation
- Magnetic Closure: Keeps the flap in place, preventing drafts and wind from entering your home
- Indoor and Outdoor Use: Ideal for controlling access to litter boxes, food, or outdoor spaces
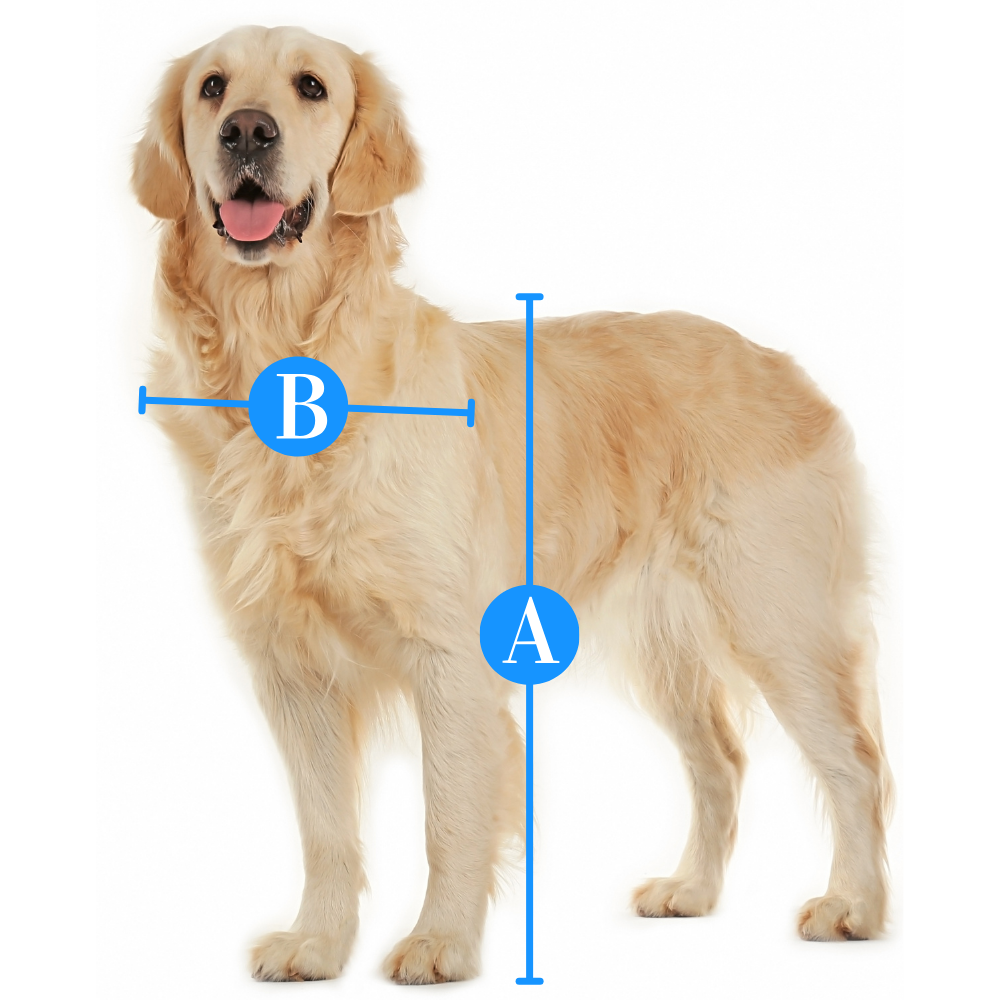
Size Chart
- Cat Mate 221 Large Cat Door7"w x 7 1/4"h
- Cat Mate 234 & 2355 3/4” w x 5 3/4"h
Flap Dimensions:
7"w x 7 1/4"h
The entry way your dog goes through.Outside Frame Dimensions
9 1/4"w x 10"h
The outer edge of the pet door.


Rough Cut Out:
8 5/8"w x 10"h
The size of the hole needed to fit your pet door into your door.Flap Dimensions:
5 3/4" x 5 3/4"h
The entry way your dog goes through.Outside Frame Dimensions
7 5/8"w x 7 7/8"h
The outer edge of the pet door. Rough Cut Out:
6 1/2"w x 6 7/8"h
The size of the hole needed to fit your pet door into your door.| Model | Flap Dimension | Rough Cut Out | Outside Frame Dimension | Recommended Pet Height |
|---|---|---|---|---|
| Cat Mate 221 | 7" w x 7 1/4" h | 8" w x 8 3/4" h | 9-1/4" w x 10" h | 5" - 10" |
| Cat Mate 234 | 5 3/4" w x 5 3/4" h | 6 1/2" w x 6 7/8" h | 7 5/8" w x 7 7/8" h | 4" - 9" |
| Cat Mate 235 | 5 3/4" w x 5 3/4" h | 6 1/2" w x 6 7/8" h | 7 5/8" w x 7 7/8" h | 4" - 9" |
Not sure if this is the correct flap size? Here is a measurement guide to help you out.
Installation Instructions
 Difficulty
Easy
Difficulty
Easy
 Steps
11
Steps
11
 Time Required
1-2 Hours
Time Required
1-2 Hours
 Sections
02
Sections
02
 Flags
02
Flags
02
Parts
- Cat Mate 221 Pet Door
- Installation Template
- Screws
Tools
- Electric Jigsaw
- Drill
Please read instructions & notes thoroughly before installation.
Step 1 Mark the Outline

- Place template in desired position on door and draw round it.
- We recommend the bottom of the hole is approximately level with your pet’s stomach.
Step 2 Make the Cutout

- Use an electric jig-saw to cut along inside of drawn line.
- Ensure frames are free-fitting in hole.
Step 3 Door Thickness

- Determine thickness of door panel (t).
Step 4 Adjust the Frame

- If necessary, cut interior frame (frame without swinging flap) to correct length with sharp knife.
Step 5: For door panels 0 - 7/8" thick Position the Frame


- Position interior frame on inside of door and mark four screw positions.
Step 6 Drill Holes


- Remove frame and drill screw clearance holes in panel to approximately 3/16 inch diameter.
Step 7 Select Screws


- Select appropriate screws.
Step 8 Position the Outside Frame

- Position exterior frame on outside of door. Screw interior frame to it by using appropriate screw for panel thickness (t) (see Fig. 8).
- Finally, fit screw caps.
Step 9: For door panels 7/8" or more thick Drill the Holes
- Drill out four screw holes in exterior frame to allow close clearance on screws.
- (Recommended drill 3/16 inch diameter).
Step 10 Attach Interior Frame

- Screw interior frame on inside of door, using short 1/2 inch screws.
Step 11 Attach Exterior Frame
- Screw exterior frame on outside of door using 3/4 inch screws. Finally, fit screw caps.
 Difficulty
Moderate
Steps
05
Time Required
1-2 hours
Sections
01
Flags
00
Difficulty
Moderate
Steps
05
Time Required
1-2 hours
Sections
01
Flags
00
Parts
- Cutout template
- Interior frame
- Exterior frame
- Screws and screw covers
Tools
- Jigsaw
- Measuring tape
- Drill
Step 1 Position the Template
- Position the template on the installation location and trace around it.
- Make sure that the bottom of the template is about level with your pet’s stomach. You can place it lower if you would like. If you choose to place it lower, make sure that it is not too low that it compromises the structural soundness of the door/panel or forces your pet to stoop when in use.
Step 2 Make the Rough Cutout
- Prior to cutting, make sure that the cut-out line is level. Using a jigsaw, cut along the inside of that line, and be very careful to cut that hole square to the door.
- The cut-out must be level and even for the pet door flap to swing freely and function correctly.
Step 3 Test Fit the Frames
- Dry fit the frame cut-out to make sure that the pet door is swinging properly. Then follow the recommended instructions for your door or material thickness.
Step 4 Determine Door Thickness
- Take a measuring tape and determine the thickness of your door/panel.
- If you are installing your 234/235 door into a thinner panel, less than 1-¼”, it may be necessary to trim the interior frame (the one that does NOT have the swinging flap). Make sure to keep hands away from the blade and use a piece of wood to support the inside of the frame.
Step 5 For Doors/Panels 0" – 7/8” Thick
- Put the INSIDE frame (one without the flap) on the inside of the door/panel and mark the screw spots with a pencil.
- Remove the frame and drill out the 4 holes to 3/16” in diameter.
- Choose the appropriate screws from the ones included in the instruction packet.
- Position the OUTSIDE frame (one with the flap) on the exterior and screw the inside frame to it, sandwiching it to the door/panel.
- Put on the screw covers.
Step 6 For Doors/Panels 7/8” – 2” Thick
- Put the OUTSIDE frame (one with the flap) on the exterior of the door/panel and mark the screw spots with a pencil and drill them out to 3/16” diameter.
- Screw the inside frame on interior of the door using ½” screws.
- Screw exterior frame on the outside of the door with the ¾” screws.
- Put on the screw covers.
- Enjoy your new Cat-Mate 234/235.
Videos
To Replace the Flap in a Catmate or Dogmate Pet Door
FAQ
Where can I find replacement flaps?Replacement Flaps for this Cat Flap may be found at Cat Mate 221 Large Cat Replacement Flap. |
Is the flap on the cat mate 221 large cat door clear?The flap is clear, but tinted darker. |
Can I use a different flap that is clear instead?Flaps usually are not interchangeable between models as they attach to the door differently, so the flap that comes with the door is the only option that is compatible for pet mate cat mate doors. |
Is the flap flexible?No, the flap is hard plastic. |
What is the thickness range for this door?This door fits materials 0-2" thick and is great for storm doors and interior/exterior doors. |
Can I install the 221 in a wall?It is possible to install the two halves on either side of your wall for an interior cat door, however there is no cat mate 221 wall liner, so you would need to find a diy way to build a tunnel and attach the frames, making sure to caulk the edges to prevent water leaking into the wall. The Cat Mate 234/235 is a similar smaller product that can be installed in walls. |
Are the magnets removable?No, they are not. If your cat is having issues pushing through, you can put some tape over the magnets on the frame to lessen the attraction. |
Can I install this in glass?Yes, thin panels and thinner material like plexiglass can accommodate this door. |
Can I lock this door at night?Yes, there is a built-in 4-way locking feature. |
What does a 4-way lock mean?That means there are 4 locking options: 1) unlocked 2) locked 3) locked going out only 4) locked coming in only |
What pet supplies hardware comes with this door?Short and long screws, and screw hole covers. |
Is the cat mate large cat door good for interior installation?It can be used on interior or exterior doors. |
Is the cat mate large cat flap door the same as the chubby kat door?It is not the same, they are just both for larger pets. |
Is this considered a good big cat door?Yes this is a very good, best seller, economical choice if you need a cat flap with a little extra room. |
Where can I find a Dog Mate large dog door?The Dog Mate 215 and 216 are larger pet doors in stock that are available in two sizes. The flap size for the 215 is 8 3/4" w x 10 1/4" h and the 216 is 11 3/4" w x 14 1/8" h. |
Does the manufacturer make a dog mate large dog door?They do, those would be the Dog Mate 215 and 216 dog doors. |
I bought a Model # 221WD in the past. Is this the same pet door?Yes it is. It is the Small Dog Door with a flap size of 7"w x 7"h. |
Warranty
Cat Mate/ Dog Mate/ Ani Mate 3 Year Limited Warranty
Guarantees your purchase for a period of three years from the date of original purchase against any defect arising due to faulty materials or manufacture. Accordingly, any defective item will be repaired free of charge or replaced at the manufacturer’s option provided that the defect has not been caused by neglect, misuse, or normal wear and tear and proof of purchase date is supplied. Your statutory rights are not affected.
Customer Reviews

Size Chart
- Cat Mate 221 Large Cat Door7"w x 7 1/4"h
- Cat Mate 234 & 2355 3/4” w x 5 3/4"h
Flap Dimensions:
7"w x 7 1/4"h
The entry way your dog goes through.Outside Frame Dimensions
9 1/4"w x 10"h
The outer edge of the pet door. Rough Cut Out:
8 5/8"w x 10"h
The size of the hole needed to fit your pet door into your door.Flap Dimensions:
5 3/4" x 5 3/4"h
The entry way your dog goes through.Outside Frame Dimensions
7 5/8"w x 7 7/8"h
The outer edge of the pet door. Rough Cut Out:
6 1/2"w x 6 7/8"h
The size of the hole needed to fit your pet door into your door.| Model | Flap Dimension | Rough Cut Out | Outside Frame Dimension | Recommended Pet Height |
|---|---|---|---|---|
| Cat Mate 221 | 7" w x 7 1/4" h | 8" w x 8 3/4" h | 9-1/4" w x 10" h | 5" - 10" |
| Cat Mate 234 | 5 3/4" w x 5 3/4" h | 6 1/2" w x 6 7/8" h | 7 5/8" w x 7 7/8" h | 4" - 9" |
| Cat Mate 235 | 5 3/4" w x 5 3/4" h | 6 1/2" w x 6 7/8" h | 7 5/8" w x 7 7/8" h | 4" - 9" |
Not sure if this is the correct flap size? Here is a measurement guide to help you out.
Difficulty
Easy
Steps
11
Time Required
1-2 Hours
Sections
02
Flags
02
Parts
- Cat Mate 221 Pet Door
- Installation Template
- Screws
Tools
- Electric Jigsaw
- Drill
Please read instructions & notes thoroughly before installation.
Step 1 Mark the Outline
- Place template in desired position on door and draw round it.
- We recommend the bottom of the hole is approximately level with your pet’s stomach.
Step 2 Make the Cutout
- Use an electric jig-saw to cut along inside of drawn line.
- Ensure frames are free-fitting in hole.
Step 3 Door Thickness
- Determine thickness of door panel (t).
Step 4 Adjust the Frame
- If necessary, cut interior frame (frame without swinging flap) to correct length with sharp knife.
Step 5: For door panels 0 - 7/8" thick Position the Frame
- Position interior frame on inside of door and mark four screw positions.
Step 6 Drill Holes
- Remove frame and drill screw clearance holes in panel to approximately 3/16 inch diameter.
Step 7 Select Screws
- Select appropriate screws.
Step 8 Position the Outside Frame
- Position exterior frame on outside of door. Screw interior frame to it by using appropriate screw for panel thickness (t) (see Fig. 8).
- Finally, fit screw caps.
Step 9: For door panels 7/8" or more thick Drill the Holes
- Drill out four screw holes in exterior frame to allow close clearance on screws.
- (Recommended drill 3/16 inch diameter).
Step 10 Attach Interior Frame
- Screw interior frame on inside of door, using short 1/2 inch screws.
Step 11 Attach Exterior Frame
- Screw exterior frame on outside of door using 3/4 inch screws. Finally, fit screw caps.
Difficulty
Moderate
Steps
05
Time Required
1-2 hours
Sections
01
Flags
00
Parts
- Cutout template
- Interior frame
- Exterior frame
- Screws and screw covers
Tools
- Jigsaw
- Measuring tape
- Drill
Step 1 Position the Template
- Position the template on the installation location and trace around it.
- Make sure that the bottom of the template is about level with your pet’s stomach. You can place it lower if you would like. If you choose to place it lower, make sure that it is not too low that it compromises the structural soundness of the door/panel or forces your pet to stoop when in use.
Step 2 Make the Rough Cutout
- Prior to cutting, make sure that the cut-out line is level. Using a jigsaw, cut along the inside of that line, and be very careful to cut that hole square to the door.
- The cut-out must be level and even for the pet door flap to swing freely and function correctly.
Step 3 Test Fit the Frames
- Dry fit the frame cut-out to make sure that the pet door is swinging properly. Then follow the recommended instructions for your door or material thickness.
Step 4 Determine Door Thickness
- Take a measuring tape and determine the thickness of your door/panel.
- If you are installing your 234/235 door into a thinner panel, less than 1-¼”, it may be necessary to trim the interior frame (the one that does NOT have the swinging flap). Make sure to keep hands away from the blade and use a piece of wood to support the inside of the frame.
Step 5 For Doors/Panels 0" – 7/8” Thick
- Put the INSIDE frame (one without the flap) on the inside of the door/panel and mark the screw spots with a pencil.
- Remove the frame and drill out the 4 holes to 3/16” in diameter.
- Choose the appropriate screws from the ones included in the instruction packet.
- Position the OUTSIDE frame (one with the flap) on the exterior and screw the inside frame to it, sandwiching it to the door/panel.
- Put on the screw covers.
Step 6 For Doors/Panels 7/8” – 2” Thick
- Put the OUTSIDE frame (one with the flap) on the exterior of the door/panel and mark the screw spots with a pencil and drill them out to 3/16” diameter.
- Screw the inside frame on interior of the door using ½” screws.
- Screw exterior frame on the outside of the door with the ¾” screws.
- Put on the screw covers.
- Enjoy your new Cat-Mate 234/235.
Videos
To Replace the Flap in a Catmate or Dogmate Pet Door
FAQ
Where can I find replacement flaps?Replacement Flaps for this Cat Flap may be found at Cat Mate 221 Large Cat Replacement Flap. |
Is the flap on the cat mate 221 large cat door clear?The flap is clear, but tinted darker. |
Can I use a different flap that is clear instead?Flaps usually are not interchangeable between models as they attach to the door differently, so the flap that comes with the door is the only option that is compatible for pet mate cat mate doors. |
Is the flap flexible?No, the flap is hard plastic. |
What is the thickness range for this door?This door fits materials 0-2" thick and is great for storm doors and interior/exterior doors. |
Can I install the 221 in a wall?It is possible to install the two halves on either side of your wall for an interior cat door, however there is no cat mate 221 wall liner, so you would need to find a diy way to build a tunnel and attach the frames, making sure to caulk the edges to prevent water leaking into the wall. The Cat Mate 234/235 is a similar smaller product that can be installed in walls. |
Are the magnets removable?No, they are not. If your cat is having issues pushing through, you can put some tape over the magnets on the frame to lessen the attraction. |
Can I install this in glass?Yes, thin panels and thinner material like plexiglass can accommodate this door. |
Can I lock this door at night?Yes, there is a built-in 4-way locking feature. |
What does a 4-way lock mean?That means there are 4 locking options: 1) unlocked 2) locked 3) locked going out only 4) locked coming in only |
What pet supplies hardware comes with this door?Short and long screws, and screw hole covers. |
Is the cat mate large cat door good for interior installation?It can be used on interior or exterior doors. |
Is the cat mate large cat flap door the same as the chubby kat door?It is not the same, they are just both for larger pets. |
Is this considered a good big cat door?Yes this is a very good, best seller, economical choice if you need a cat flap with a little extra room. |
Where can I find a Dog Mate large dog door?The Dog Mate 215 and 216 are larger pet doors in stock that are available in two sizes. The flap size for the 215 is 8 3/4" w x 10 1/4" h and the 216 is 11 3/4" w x 14 1/8" h. |
Does the manufacturer make a dog mate large dog door?They do, those would be the Dog Mate 215 and 216 dog doors. |
I bought a Model # 221WD in the past. Is this the same pet door?Yes it is. It is the Small Dog Door with a flap size of 7"w x 7"h. |
Warranty
Cat Mate/ Dog Mate/ Ani Mate 3 Year Limited Warranty
Guarantees your purchase for a period of three years from the date of original purchase against any defect arising due to faulty materials or manufacture. Accordingly, any defective item will be repaired free of charge or replaced at the manufacturer’s option provided that the defect has not been caused by neglect, misuse, or normal wear and tear and proof of purchase date is supplied. Your statutory rights are not affected.